Maintenance Clutch Bleed Procedure
 11-17-2013, 01:41 PM
#1
MFz Regular

Thread Starter

Join Date: Oct 2013
Location: North Stonington, Connecticut
Posts: 107
ClutchBleeding Procedure:
This was writtenfor an MSM, but is very similar for any NA/NB car.
This task isrelatively simple, but does require removing the front right (passenger) sidetire / wheel. As is usual, this workinvolves lifting a machine you wouldn’t want to fall on you, working withchemicals (brake fluid), tools with sharp edges (wrenches), and a variety ofother hazards. Use your head. I will take no responsibility if you injureyourself or damage your car.
Tools:
A �” drive torquewrench (capable of at least 100 ft lbs) with an appropriate socket for thewheel’s lug nuts 21 mm if stock, aftermarket wheels may vary. (Mine are 19mm –aftermarket wheels). A short extensionwill make your life easier.
An 8 mm box endwrench: An open end wrench can be used,but the box end makes life easier.
A flashlight: A drop light or a headlamp can also be used.
A can of brakefluid: Small cans are preferred, sinceopened cans shouldn’t be kept for long term storage. Check the “Wet Boiling Point Temperature” forthe brake fluid. Higher temperatures arebetter. ATE Super Blue Racing and ATETYP 200 are the preferred brands for track duty, but for street use otherbrands may be easier to obtain. Don’topen the shiny aluminum seal inside the can until you are ready to use thefluid.
Several feet of�” I.D. flexible clear plastic tubing.
A small jar (withlid) to catch excess brake fluid: preferably disposable
Several small clothhand towels your wife won’t miss.
Paper towels. It is critical that no brand other than“Bounty” be used.
Latex gloves: Theseare my preference…lately “mechanics gloves” have become popular, but I havebetter “feel” with the thinner gloves.
HandCleaner: Fast Orange with Pumice – available at Autozone,and probably other fine automotive establishments. Other brands will likely do just as well, butthis works well for me.
Antiseizecompound: Several brands should beavailable at your FLAPS. Only a smallamount will be needed for the wheel lugs.
A turkey basteror similar rubber bulb “medicine dropper” gadget you can use to suck up brakefluid. I wouldn’t recommend putting itback in the kitchen drawer when you’ve finished!
Optional: a Mityvac hand operated vacuum pump(approximately $ 25 from most FLAPS).
Flyin Miata (FM)Jack Adapter Pad: 2 are nice.

Where we’ll be working:
Clutch MasterCylinder:
It’s located onthe drivers side near the cowl wall (which separates the windshield washerlinkage from the engine compartment) in the corner of the engine compartment.
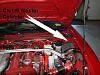
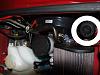
There are twoblack plastic “jar cover” lids located there. The larger is for the brake master cylinder, the smaller is the coverfor the clutch master cylinder. Photo 2above shows the lid location.
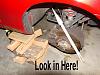
Clutch Slave Cylinder:
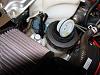
It’s located inthe passenger side front wheel well, near the side of the engine. To see it (and to work on it) you’ll need toremove the wheel / tire assembly.
The rubber bootseal protects the piston connecting rod from dirt. If the cylinder is leaking, fluid willcollect inside this boot. If fluid leaksout from the boot when the right hand end is gently lifted out of its groove,you will likely need to repair / replace the slave cylinder. That is not covered by this FAQ.
Procedure:
Raising the Car:
First: Clean the engine / wheel well area with ahose and simple green or similar. Thisisn’t really necessary, but it will make your life much easier.
Second: You’ll need to get the car into the airsomewhat. A lift is ideal, jackstandsare quite workable. Ramps don’t work,since you need to remove the front passenger side wheel. Also, you don’t want the car five feetup. It’s necessary to be able to reachthe master cylinder while you’re working.
Put the car inreverse, engine off and parking brake on.
Chock the rearwheels. I use two pieces (one for eachwheel) of split firewood. You can alsouse store bought parts or other items that will keep the wheels from sliding.
Install latexgloves on your hands.
Assuming you’reusing jackstands….loosen the front passenger side wheel lug nuts slightly,while the tire still has weight on it. Turn the lug nuts counterclockwise. Then jack the front of the car up, placingthe jack under the front metal crossmember shown circled in Figure 1 below. Thanks to FM for Figure 1.

A wood pad will help distribute the load. Once you begin jacking do NOT get under thecar. If it slips off the jack, well youget the idea! To ease the jacking, Idrive the car onto ramps, and then jack it higher to clear my jackstands. Should you be as lazy as I am, remove theramps to provide working room in the wheel well once the car is safelysupported on jackstands.
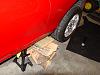
When the car ishigh enough, place the jackstands under the car’s side rails. I use small towels to pad the jackstands. The location of the jackstands is marked witharrows in Figure 1 Also, the FM JackAdapter Pad is very useful. Be sure the jackstands are in the properlocation to avoid damaging the car. Slowly lower the car onto the jackstands. If you’re truly paranoid (like me) place somecribbing (I use firewood) under the car to catch it if the jackstandsdematerialize.
FM Jack AdapterPad
Once you have thecar supported to your satisfaction, it should be safe to get inside the wheelwell to work on the clutch slave cylinder.
Preparation:
Open thehood. Wrap one of the hand towels aroundthe clutch master cylinder to catch any spills. This should be below the lid.
Place severallayers of paper towels in the cowl area to provide a place to set the clutchmaster cylinder lid and the strainer you’ll find inside. Those aren’t shown in the above photo. No, there’s no need to remove the cover andstrainer yet.
Spills:
Should you spillbrake fluid onto a painted surface, wipe it off immediately. Brake fluid dissolves paint!! You may wish to rinse the area of a spillwith water also.
Remember….youaren’t paying yourself an hourly wage; take the time to do the job right.
More Preparation:
Clean theexterior of the clutch master cylinder lid to prevent any dirt from fallinginto the plastic reservoir. Also cleanthe exterior of the plastic reservoir.
Remove the clutchmaster cylinder lid, by turning it counter clockwise. It should come off easily. Clean the inside of the lid, and set itaside. Since water has bad effects onthe hydraulic system we are working on, use dry paper towels to clean theseparts. Do not use water. Once cleaned, I set the lid in the cowlopening, near the windshield operating mechanism.
Carefully removeand clean the plastic strainer which is under the lid. Again, no water, and set it aside. Photo 7 below shows the lid on the brakemaster cylinder lid.
This was writtenfor an MSM, but is very similar for any NA/NB car.
This task isrelatively simple, but does require removing the front right (passenger) sidetire / wheel. As is usual, this workinvolves lifting a machine you wouldn’t want to fall on you, working withchemicals (brake fluid), tools with sharp edges (wrenches), and a variety ofother hazards. Use your head. I will take no responsibility if you injureyourself or damage your car.
Tools:
A �” drive torquewrench (capable of at least 100 ft lbs) with an appropriate socket for thewheel’s lug nuts 21 mm if stock, aftermarket wheels may vary. (Mine are 19mm –aftermarket wheels). A short extensionwill make your life easier.
An 8 mm box endwrench: An open end wrench can be used,but the box end makes life easier.
A flashlight: A drop light or a headlamp can also be used.
A can of brakefluid: Small cans are preferred, sinceopened cans shouldn’t be kept for long term storage. Check the “Wet Boiling Point Temperature” forthe brake fluid. Higher temperatures arebetter. ATE Super Blue Racing and ATETYP 200 are the preferred brands for track duty, but for street use otherbrands may be easier to obtain. Don’topen the shiny aluminum seal inside the can until you are ready to use thefluid.
Several feet of�” I.D. flexible clear plastic tubing.
A small jar (withlid) to catch excess brake fluid: preferably disposable
Several small clothhand towels your wife won’t miss.
Paper towels. It is critical that no brand other than“Bounty” be used.
Latex gloves: Theseare my preference…lately “mechanics gloves” have become popular, but I havebetter “feel” with the thinner gloves.
HandCleaner: Fast Orange with Pumice – available at Autozone,and probably other fine automotive establishments. Other brands will likely do just as well, butthis works well for me.
Antiseizecompound: Several brands should beavailable at your FLAPS. Only a smallamount will be needed for the wheel lugs.
A turkey basteror similar rubber bulb “medicine dropper” gadget you can use to suck up brakefluid. I wouldn’t recommend putting itback in the kitchen drawer when you’ve finished!
Optional: a Mityvac hand operated vacuum pump(approximately $ 25 from most FLAPS).
Flyin Miata (FM)Jack Adapter Pad: 2 are nice.

Photo: 1 Mityvac set up for Bleeding Operation
Where we’ll be working:
Clutch MasterCylinder:
It’s located onthe drivers side near the cowl wall (which separates the windshield washerlinkage from the engine compartment) in the corner of the engine compartment.
Photo: 2 Clutch Master Cylinder Location
There are twoblack plastic “jar cover” lids located there. The larger is for the brake master cylinder, the smaller is the coverfor the clutch master cylinder. Photo 2above shows the lid location.
Clutch Slave Cylinder:
It’s located inthe passenger side front wheel well, near the side of the engine. To see it (and to work on it) you’ll need toremove the wheel / tire assembly.
Photo: 3 Wheel Well Exterior
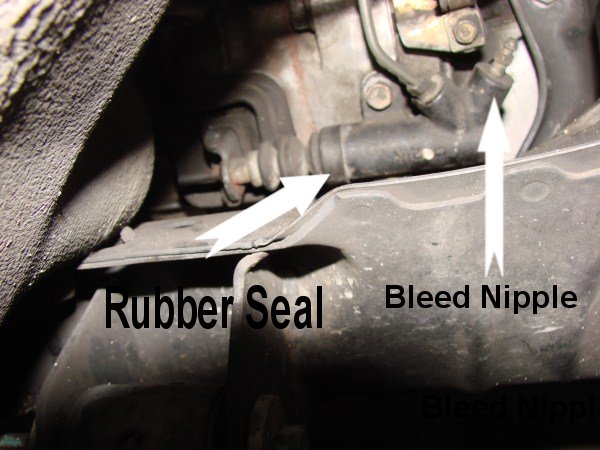
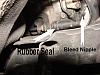
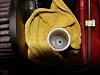
Photo: 4 Clutch Slave Cylinder Location
The rubber bootseal protects the piston connecting rod from dirt. If the cylinder is leaking, fluid willcollect inside this boot. If fluid leaksout from the boot when the right hand end is gently lifted out of its groove,you will likely need to repair / replace the slave cylinder. That is not covered by this FAQ.
Procedure:
Raising the Car:
First: Clean the engine / wheel well area with ahose and simple green or similar. Thisisn’t really necessary, but it will make your life much easier.
Second: You’ll need to get the car into the airsomewhat. A lift is ideal, jackstandsare quite workable. Ramps don’t work,since you need to remove the front passenger side wheel. Also, you don’t want the car five feetup. It’s necessary to be able to reachthe master cylinder while you’re working.
Put the car inreverse, engine off and parking brake on.
Chock the rearwheels. I use two pieces (one for eachwheel) of split firewood. You can alsouse store bought parts or other items that will keep the wheels from sliding.
Install latexgloves on your hands.
Assuming you’reusing jackstands….loosen the front passenger side wheel lug nuts slightly,while the tire still has weight on it. Turn the lug nuts counterclockwise. Then jack the front of the car up, placingthe jack under the front metal crossmember shown circled in Figure 1 below. Thanks to FM for Figure 1.
Figure 1 MSM Undercarriage
A wood pad will help distribute the load. Once you begin jacking do NOT get under thecar. If it slips off the jack, well youget the idea! To ease the jacking, Idrive the car onto ramps, and then jack it higher to clear my jackstands. Should you be as lazy as I am, remove theramps to provide working room in the wheel well once the car is safelysupported on jackstands.
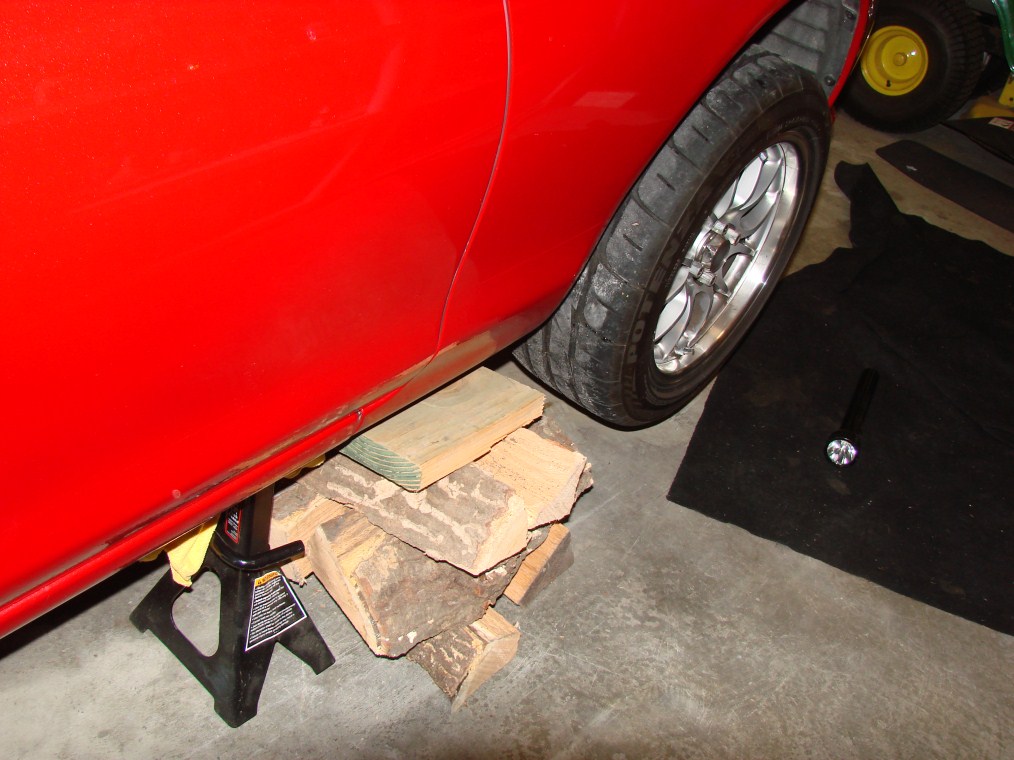
Photo: 5 Jackstand and Cribbing
When the car ishigh enough, place the jackstands under the car’s side rails. I use small towels to pad the jackstands. The location of the jackstands is marked witharrows in Figure 1 Also, the FM JackAdapter Pad is very useful. Be sure the jackstands are in the properlocation to avoid damaging the car. Slowly lower the car onto the jackstands. If you’re truly paranoid (like me) place somecribbing (I use firewood) under the car to catch it if the jackstandsdematerialize.
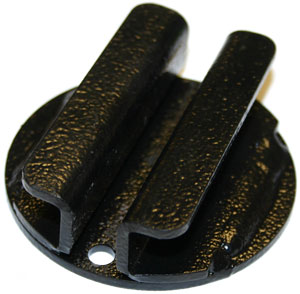
FM Jack AdapterPad
Once you have thecar supported to your satisfaction, it should be safe to get inside the wheelwell to work on the clutch slave cylinder.
Preparation:
Open thehood. Wrap one of the hand towels aroundthe clutch master cylinder to catch any spills. This should be below the lid.

Photo: 6 Clutch Master Cylinder & Cowl Area
Place severallayers of paper towels in the cowl area to provide a place to set the clutchmaster cylinder lid and the strainer you’ll find inside. Those aren’t shown in the above photo. No, there’s no need to remove the cover andstrainer yet.
Spills:
Should you spillbrake fluid onto a painted surface, wipe it off immediately. Brake fluid dissolves paint!! You may wish to rinse the area of a spillwith water also.
Remember….youaren’t paying yourself an hourly wage; take the time to do the job right.
More Preparation:
Clean theexterior of the clutch master cylinder lid to prevent any dirt from fallinginto the plastic reservoir. Also cleanthe exterior of the plastic reservoir.
Remove the clutchmaster cylinder lid, by turning it counter clockwise. It should come off easily. Clean the inside of the lid, and set itaside. Since water has bad effects onthe hydraulic system we are working on, use dry paper towels to clean theseparts. Do not use water. Once cleaned, I set the lid in the cowlopening, near the windshield operating mechanism.
Carefully removeand clean the plastic strainer which is under the lid. Again, no water, and set it aside. Photo 7 below shows the lid on the brakemaster cylinder lid.

Photo: 7 Reservoir Strainer and Lid

Photo: 8 Interior of Cleaned Reservoir
Last edited by CharlesE; 11-17-2013 at 01:43 PM. Reason: No Changes
 11-17-2013, 01:42 PM
#2
MFz Regular
Thread Starter
Join Date: Oct 2013
Location: North Stonington, Connecticut
Posts: 107
Drain the clutchmaster cylinder, by using the turkey baster. The old fluid will likely be very dark / black in color. That is normal for clutch fluid. Squirt the used fluid into the disposableplastic jar. Clean the plastic reservoirusing the paper towels.
Bleeding the Clutch:
This can be doneseveral ways, using one, two or three people! Using more people requires less equipment expense.
The three people version requires one person to work the bleed nipple on the slavecylinder, one to watch the fluid level in the master cylinder reservoir, andone to work the clutch pedal.
The clutch slave cylinderhas a bleed nipple with an 8 mm hex on it that allows fluid (pressure) to bereleased from the clutch hydraulic system. This nipple is used to bleed air outof the system, and to flush old, contaminated fluid out of the system.
Place somenewspaper on the garage floor under the slave cylinder to absorb any spillage.
Clean theexterior of the slave cylinder, particularly the nipple, using papertowels. Cleanliness is next to godliness(unless you�re Stephen Hawking).
Set the box end8mm wrench over the nipple�s hex. Placea length of the plastic tubing on the end of the slave cylinder nipple. Do not cover the hex with the tubing. Place the loose end of the plastic tubinginto a jar with enough brake fluid to cover the end of the tubing.
Fill the mastercylinder with new fluid. Yep break openthe aluminum seal, and pour away. Makesure none of the seal enters the reservoir. Replace the lid and hand tighten it. The strainer doesn�t need to be installed at this time.
Have your partnersit in the car and push the clutch pedal all the way down. Loosen the bleederscrew with the 8 mm wrench. A bunch ofair will probably come out first, mixed with a tiny bit of dark fluid. Make sure the master cylinder has fluid init at all times--if air enters the lines, you will have to bleed the system again.
Re-tighten thebleeder screw, then tell your partner to slowly let up on the clutch pedaluntil it is free-standing. Check themaster cylinder for fluid level.
Have your partnerpush the clutch to the floor. Loosen the bleeder screw. Repeat these stepsuntil only clean (amber colored in my case) fluid--not air--comes out of theslave cylinder bleeder valve.
Tighten thebleeder screw (nipple) a final time and refill the master cylinder withhydraulic fluid. Remove the plastictubing and the 8 mm wrench. The workshopmanual calls for 53 to 78 inch-pounds of torque (4 � to 6 � ft-lbs). That�s not much torque. I suggest you measure it or be verygentle. Stripping the nipple thread willlikely mean replacing the slave cylinder ($ 50 minimum for the part).
The two person version is similar but requires more running around for the participants.
The one person version requires use of the Mityvac or a similar vacuum pump.
Set up theMityvac as shown in Photo1. This setupbasically uses a catch can to trap the old fluid. Verify that the master cylinder is filled withfresh brake fluid. Install the 8 mmwrench over the slave cylinder nipple hex. Place the rubber fitting shown on the left of Photo 1 over the slavecylinder nipple end. Ensure the mastercylinder lid is off or loose on the master cylinder. Loosen the nipple a quarter turn or so. Squeeze the large �trigger� on the Mityvacseveral times to develop a vacuum. Darkfluid should enter the plastic tubing and the catch can. If not loosen the nipple slightly more. Once the fluid flow stops, refill the mastercylinder reservoir with fresh fluid and repeat. Do this until new fluid enters the catch can.
Refill the mastercylinder, replace and tighten the lid. Loosen the slave cylinder nipple and squeeze the trigger again. Once air stops coming out of the slavecylinder close the nipple, tighten it down, and remove the tubing and 8 mmwrench. The workshop manual calls for 53to 78 inch-pounds of torque (4 � to 6 �ft-lbs). That�s not much torque. I suggest you measure it or be verygentle. Stripping the nipple thread willlikely mean replacing the slave cylinder ($ 50 minimum for the part).
Open the mastercylinder lid and refill the cylinder. Replace the strainer, and tighten the lid.
Push down on theclutch pedal; ensure that the clutch feels �right�. Push down several times, then inspect underthe car for fluid puddles.
Cleanup:
Remove the papertowels from the cowl area, remove the cloth towel from around the mastercylinder. Verify that there are no tools,small animals, etc. under the car.
Place the wheelon the wheel lugs. Lightly coat thewheel lugs with antiseize compound, particularly if you live in an area whereroad salt is used (winter conditions).
Carefully lowerthe car until the front wheel touches the floor. Torque the wheel, using thetorque wrench to 66 � 86 ft-lbs. Continue lowering the car until it rests on the ground. Pick up any loose tools from the area aroundthe car and under the hood. Close thehood. Take the car out for a testdrive. On returning, shine a lightthrough the reservoir to verify that it is still full.
11-19-2013, 07:00 AM
#3
Moderator

Join Date: Jul 2011
Location: Tampa, FL; Lake Jackson (Atlanta), GA
Posts: 1,902
I'm getting ready to change my clutch master and slave on the track car when I put the engine back in. I highly recommend eliminating the curly metal line if you ever have the slave off or are changing the clutch. There are some really nice steel braided lines available to replace the curly line that are far easier to work with.


Thread
Thread Starter
Forum
Replies
Last Post