Maintenance How-To: Check Valve Clearance/Re-shimming NB head
 09-13-2011, 09:15 PM
#1
BAMFr

Thread Starter

Join Date: Jul 2011
Location: NC
Posts: 1,787
Alrighty guys, this won't really apply to half of you, but for the NB guys, this should be helpful and good for about .167 hp somewhere.
NOTE: I will start off with the valve cover removed, that should be easy enough and is covered in many other locations!
NOTE 2: I am not responsible for any damage to your car. Do this at your own RISK!
To start off, Here are the tools you will need for
Tools
-Torque Wrench (115-125 in-lb is the only torque measurement on this how-to)
-3/8" socket wrench
-3" extension
-10mm socket
-21mm shorty socket
-tweezers/needle nose pliers
-computer FLATHEAD screwdriver (small flathead in otherwords)
-Pen
-Paper
-Feeler gauges (preferably in mm if you can find that)
-Paper/shop towels
-magnetic base dial indicator (A micrometer is preferred over the dial indicator, but I did mine with a dial indicator which I already had from checking my thrust bearing)
-Quart of your oil
-New Shims*
*You will have to order new shims after the take down. You have two options, leave the car in pieces till they come in, or put it back, then take it apart again. I do the former, but in this re-shim I am lucky and did not require ordering new shims.
So, if i haven't chased you away yet, AND you have an NB HEAD (in 98% of cases, this only applies to you if you have a 99 miata or newer, this cannot be done on HLA'd cars), and you have collected parts, then its time to begin!
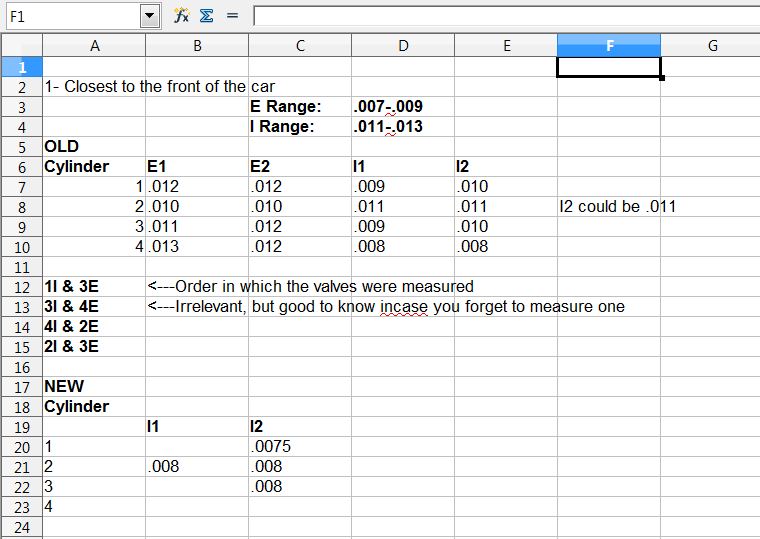
First thing we need to do is check the clearance on all the valves, and write this down in excel or on one of the sheets of paper you have in hand. I will include an S.S. of my excel sheet as an example.
After removing the VC, put some paper towels over your timing belt if you are not changing it as part of this maintenance. You don't want to get oil on the timing belt and there is a good chance you could during this how-to.
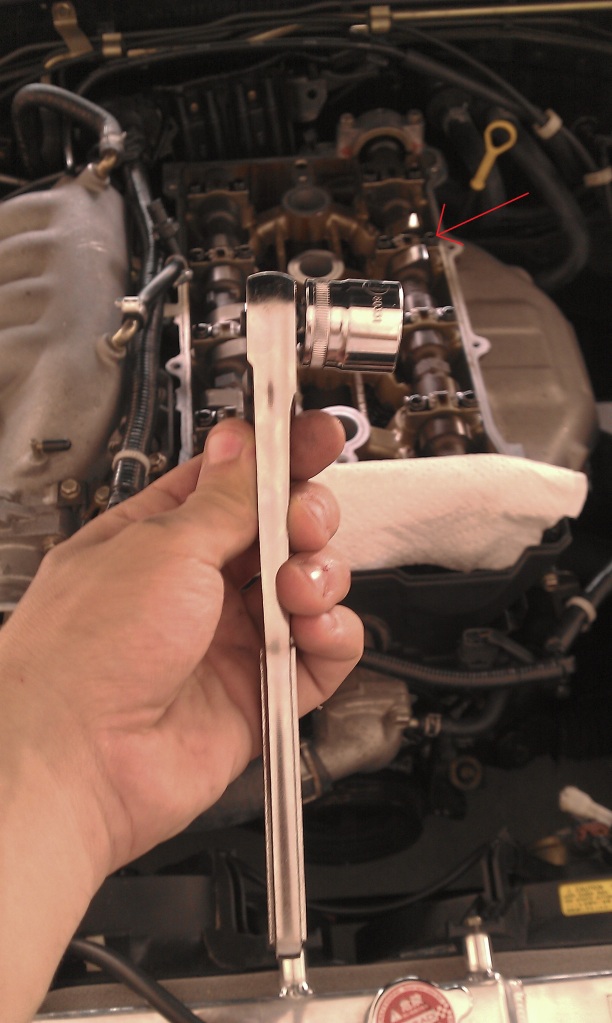
Next thing first, we use the socket wrench to line up the cams by turning the crank. this can be a bit difficult as you compress the air and all that. but you get the idea.
Line up the cam lobes so it makes a 180* angle with the shim and bucket combo. See picture
After that, you take the feeler gauge and stick it between the cam lobe and the shim. You don't have to put all your strength on this, its pretty simple really. with two fingers, push with light/moderate strength here. if its not going in easy, then it doesn't fit.
Clearance for the valves according to MAZDA:
Intake: .008-.009
Exhaust: .011-.012
WHAT I USE (Use at your discretion!, mine are different because mazda rounds down on all conversions, even if its just a hair off):
intake: .007-.009
Exhaust: .011-.013
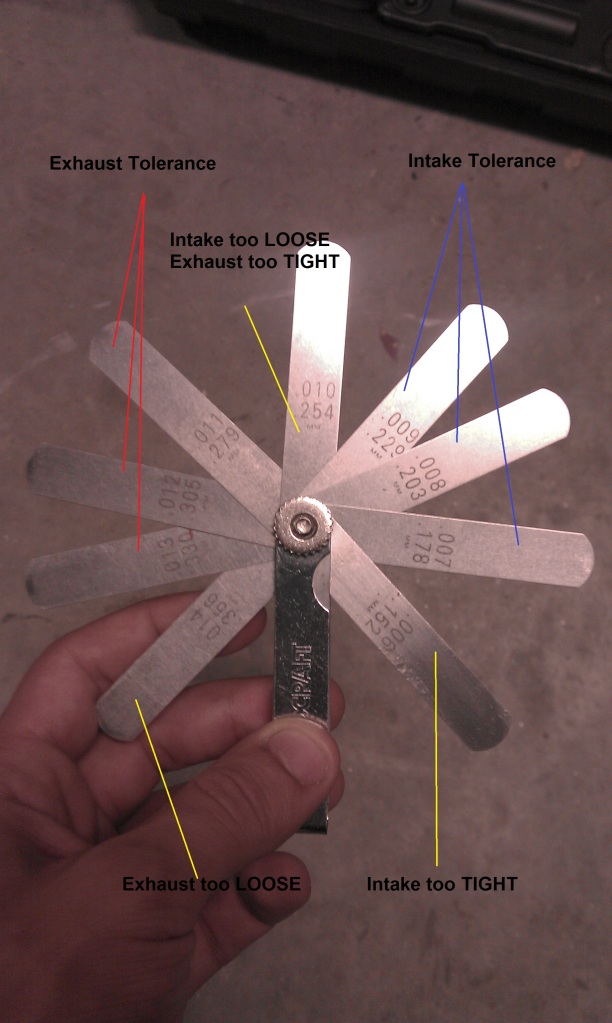
Here are all the feeler gauges you will probably need:
Here is my excel sheet once I was done with measurements:
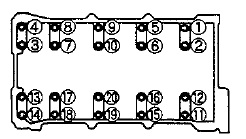
Once measurements are done, you have a few options. You can loosen the cam caps and pop the shims out of place, Here is the order for loosening the cam cap bolts (according to the 1999 Workshop Manual):
I apologize for my shitty picture here, I did not realize that it would come out so vague and nasty...Anyways
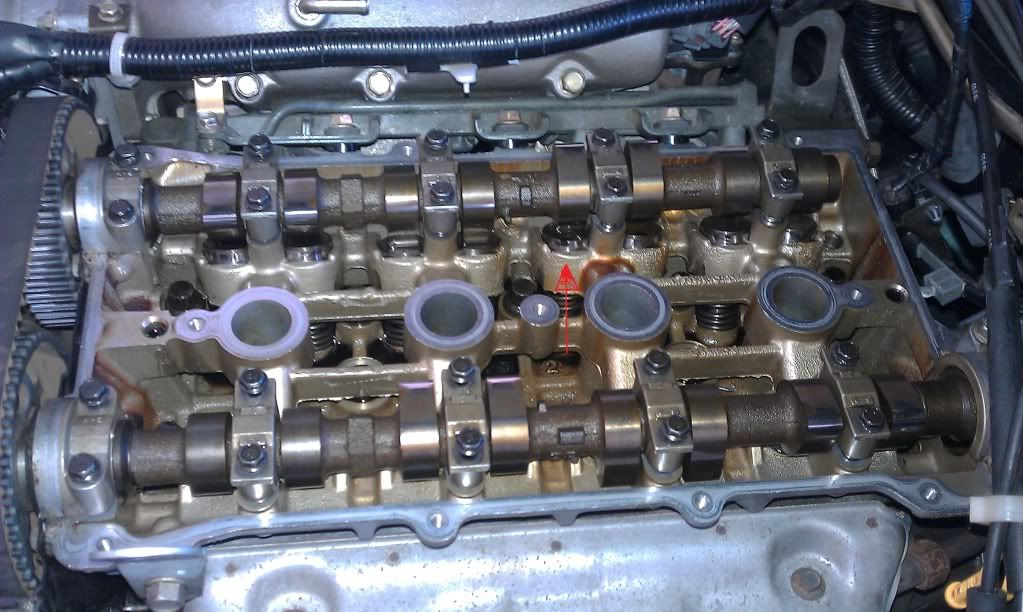
Once the cam caps are loose, you need to use needle nose pliers, tweezers, and/or a small flat-head screwdriver to remove the shims. There is a notch in the bucket, which you can find by spinning it around.
(Updated Pic)here is one of my shims removed, note the cam caps are loosened and on cylinder three one shim is out the other is in. Also note the cam lobe position is ideal for shim removal:
Then on a sheet of paper, you should identify the shim and the location it came out of it:

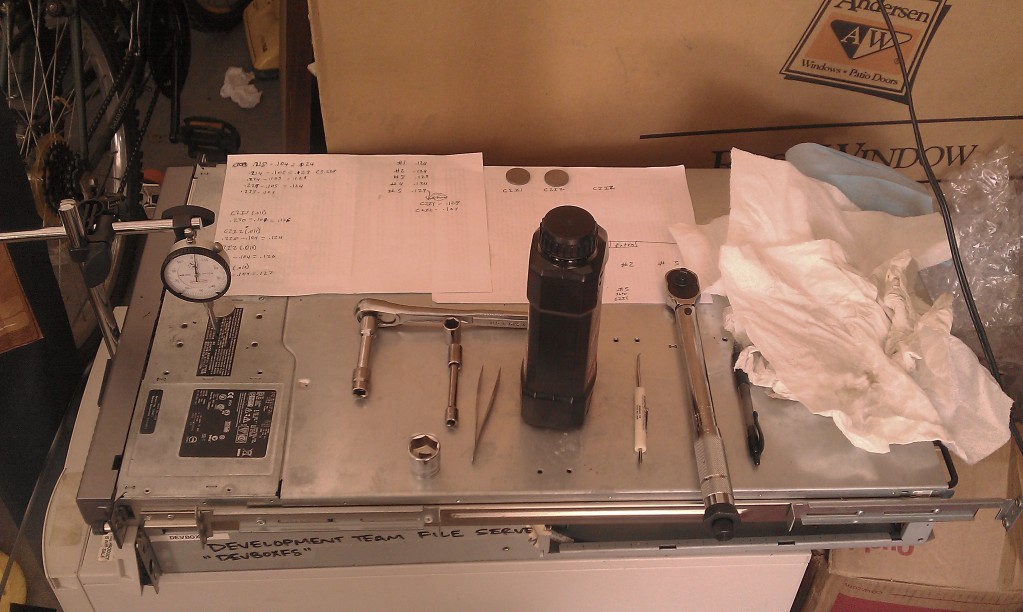
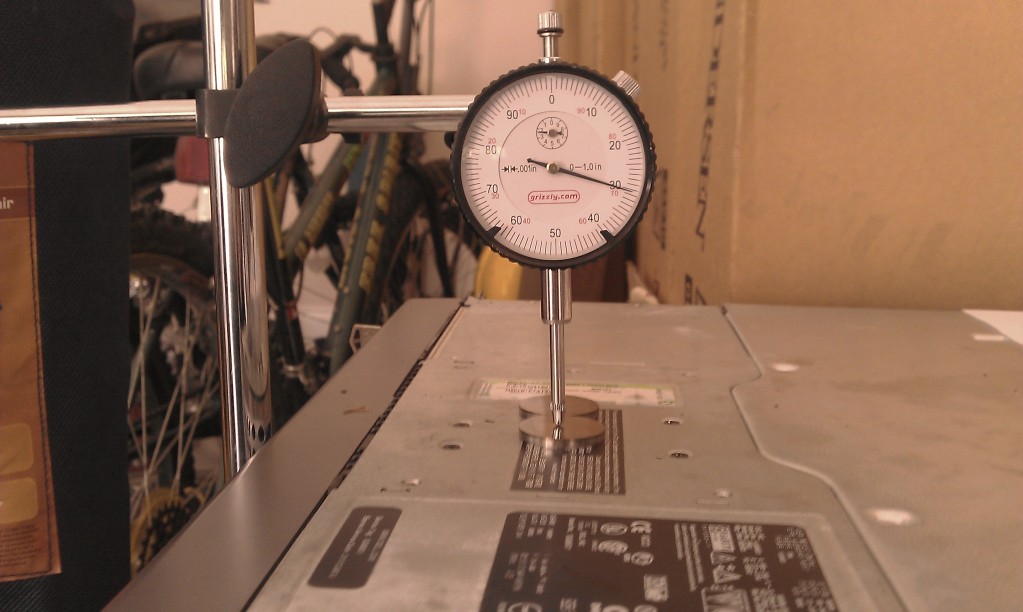
At this point you need to have setup your dial indicator to measure the shim. You can see my setup in the first picture. but to add to it...
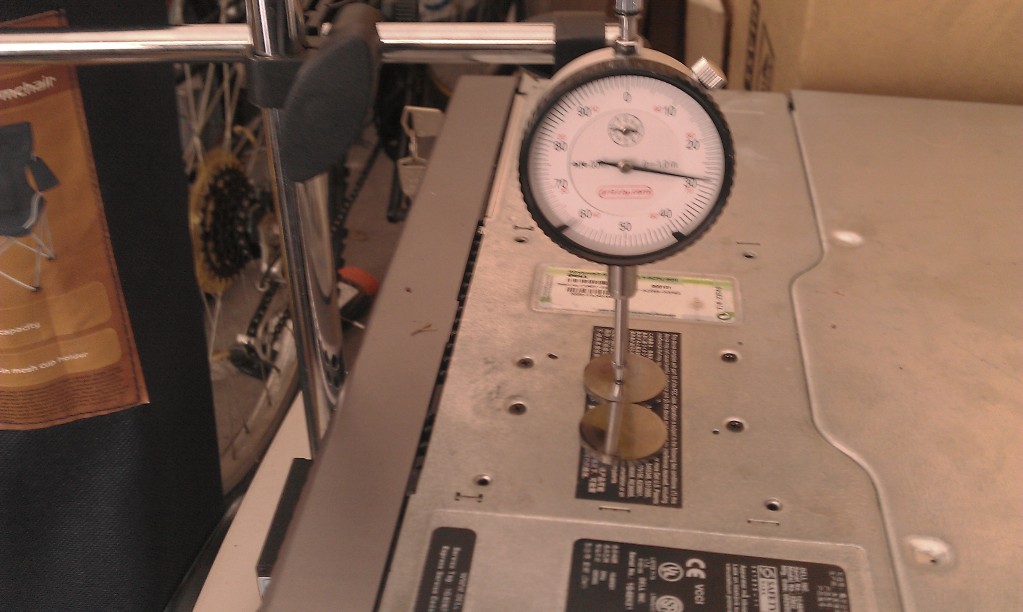
To accurately measure the size of the shim, you need to write down the base value on the dial indicator (Let me know if you need help reading one, but my pictures should be enough to get you started), then subract that from the value read with the shim under it. For example:
with NO shim, my dial indicator read .104 inches (its NOT a good idea to have this at zero...hard to explain but you don't know if your indicator is in mid-air or just a hair from touching the flat plane under it).
with a shim, my dial indicator read .230 inches.
.230-.104= .126 inches = 3.002 mm (you can find shims at your dealership or finishlineperformance/rosenthal mazda).
Got it? Cool, here is my sheet (yours will differ obviously)
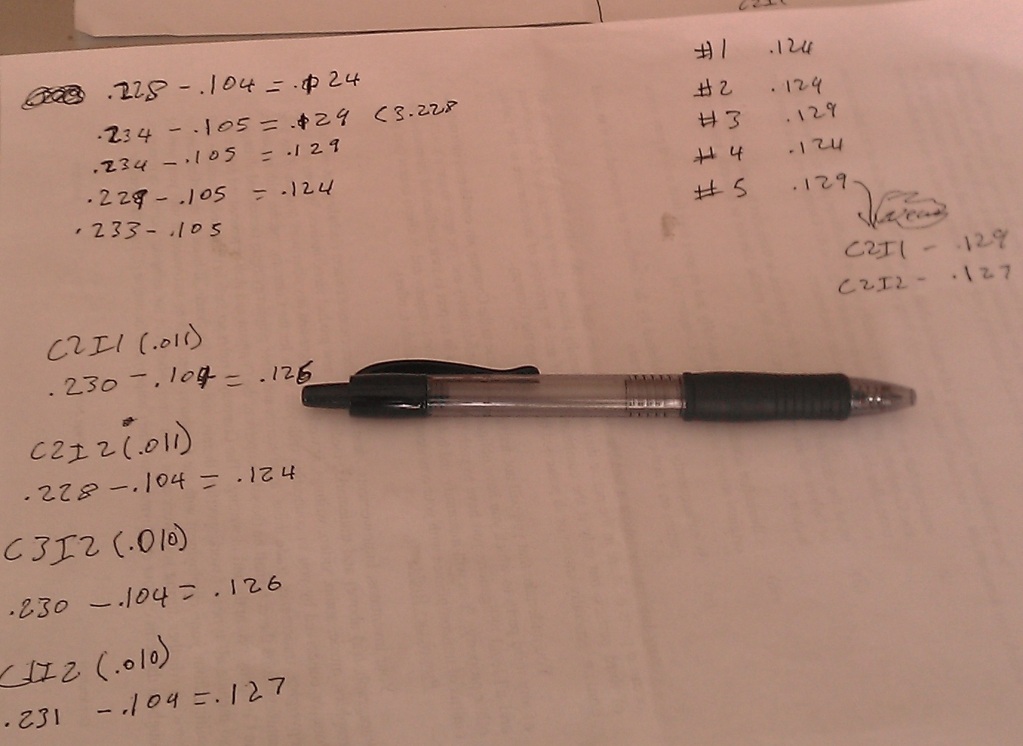
So once you have all your shim sizes written down, you will need to figure out how much of a change you need to make. Lets follow this example all the way through:
An intake valve clearance reads .011 (.003 too loose from the middle value of .008).
We take the shim out and find it to be .124.
We need to increase the shim size by .002-.004 to stay within tolerance size.
INCREASE in shim size = DECREASE in valve clearance (and vice versa)
Lets pick .003 so we can land in the middle.
.124+.003=.127=3.2258mm
We take this number and go to our list of shims and the closest we find is 3.252mm. Take that value and convert it back to inches:
3.252mm=.128in, which is larger than our .127, but it fits in our range of .002-.004.
Great, add to cart. next shim, etc.
Some BIG HINTS:
-Take all the shims that need removing out, then try to move them around to fill in as many out-of-spec valves as possible before buying new shims.
-As an example, during this reshim, I did not have to buy any new shims as I had 5 extra laying around and was able to reuse 2 of the ones I pulled out.
-ALWAYS convert your shim value from mm to inch (if you are using inches for your measurements), or you will ---- it up. 3.252 may sound close to 3.225 but its a .001 increase and you don't want to go down too far either. Mazda's shims move up in relatively large increments.
- Don't get fancy and take the cam caps apart in random order. You could bur your head or the caps. Its a steel cam in an aluminum head, its scary enough already.
-Be VERY gentle with the tweezers/screwdriver/needlenose, you don't want to scratch the shim incase you need to reuse it and you really DON'T WANT TO SCRATCH THE BUCKET!
-Take good notes, and recheck your recheck. I wrote many numbers in the wrong columns initially and if you don't write the right ones down, you are screwed from the start.
-turn the CRANKSHAFT the right way, I don't think you will break anything, but do it just to be safe.
-Use a good pen, and make your clarifications VERY CLEAR. You could be waiting for days on the shims, and its unlikely you will remember everything 3 days later.
-MAKE SURE YOUR DIAL INDICATOR IS STABLE. everyone of my readings was at .104 base, and occassionally at .105. you should not be getting base changes larger than .002 or your base is off badly.
This is probably the best hint of them all if you understand whats going on...Don't hesitate to measure two shims against each other for the BEST accuracy in size difference. Let me demonstrate (watch the dial indicator and the two shims being measured):
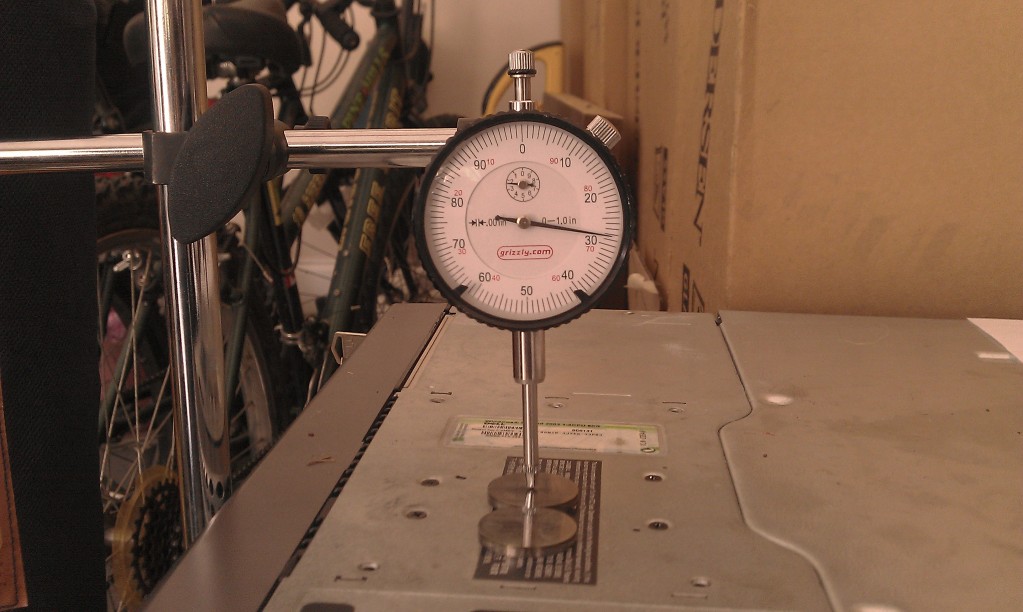
As you can see, the difference from one to the other is .003. No matter the shim size here, you know one is .003 larger, so you can use that one to make go from .011 to .008. (as shims wear down, they change in size I guess).
At this point, you will add in your new shims and need to start tightening the cam caps back on. Here is the order for tightening them. IT IS different from loosening them (opposite direction):
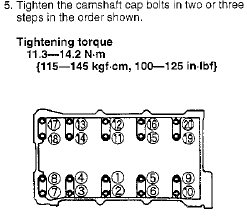
Just incase you can't see the picture, here is order (each number corresponds to the bolt and its location):
17-13-12-16-20
18-14-11-15-19
8-4-1-5-9
7-3-2-6-10
torque spec is 100-125 INCH-lbs. and Mazda suggests tightening them in about 2-3 steps.
Note: Once you have torqued the cam back down. I spin the crank 2-3 cycles (1-1.5 turns of the cams) and recheck my clearance again. This is a good idea and should be done everytime valve clearance is changed. This will allow you to check over your work, incase you wrote the clearance value in the wrong column, or replacement shim was not the proper size, or whatever else. Just check over your work to make sure!
Update: I have gotten a BETTER picture of the cam caps loose and a shim removed for visual aid. It is replacing the 6th picture down and I marked it with an "Updated Pic" tag. Also take note of the cam lobe position, thats the position you want it to be in when measuring the clearance (but obviously you need the cam caps torqued down).
NOTE: I will start off with the valve cover removed, that should be easy enough and is covered in many other locations!
NOTE 2: I am not responsible for any damage to your car. Do this at your own RISK!
To start off, Here are the tools you will need for
Tools
-Torque Wrench (115-125 in-lb is the only torque measurement on this how-to)
-3/8" socket wrench
-3" extension
-10mm socket
-21mm shorty socket
-tweezers/needle nose pliers
-computer FLATHEAD screwdriver (small flathead in otherwords)
-Pen
-Paper
-Feeler gauges (preferably in mm if you can find that)
-Paper/shop towels
-magnetic base dial indicator (A micrometer is preferred over the dial indicator, but I did mine with a dial indicator which I already had from checking my thrust bearing)
-Quart of your oil
-New Shims*
*You will have to order new shims after the take down. You have two options, leave the car in pieces till they come in, or put it back, then take it apart again. I do the former, but in this re-shim I am lucky and did not require ordering new shims.
So, if i haven't chased you away yet, AND you have an NB HEAD (in 98% of cases, this only applies to you if you have a 99 miata or newer, this cannot be done on HLA'd cars), and you have collected parts, then its time to begin!
First thing we need to do is check the clearance on all the valves, and write this down in excel or on one of the sheets of paper you have in hand. I will include an S.S. of my excel sheet as an example.
After removing the VC, put some paper towels over your timing belt if you are not changing it as part of this maintenance. You don't want to get oil on the timing belt and there is a good chance you could during this how-to.
Next thing first, we use the socket wrench to line up the cams by turning the crank. this can be a bit difficult as you compress the air and all that. but you get the idea.
Line up the cam lobes so it makes a 180* angle with the shim and bucket combo. See picture
After that, you take the feeler gauge and stick it between the cam lobe and the shim. You don't have to put all your strength on this, its pretty simple really. with two fingers, push with light/moderate strength here. if its not going in easy, then it doesn't fit.
Clearance for the valves according to MAZDA:
Intake: .008-.009
Exhaust: .011-.012
WHAT I USE (Use at your discretion!, mine are different because mazda rounds down on all conversions, even if its just a hair off):
intake: .007-.009
Exhaust: .011-.013
Here are all the feeler gauges you will probably need:
Here is my excel sheet once I was done with measurements:
Once measurements are done, you have a few options. You can loosen the cam caps and pop the shims out of place, Here is the order for loosening the cam cap bolts (according to the 1999 Workshop Manual):
I apologize for my shitty picture here, I did not realize that it would come out so vague and nasty...Anyways
Once the cam caps are loose, you need to use needle nose pliers, tweezers, and/or a small flat-head screwdriver to remove the shims. There is a notch in the bucket, which you can find by spinning it around.
(Updated Pic)here is one of my shims removed, note the cam caps are loosened and on cylinder three one shim is out the other is in. Also note the cam lobe position is ideal for shim removal:
Then on a sheet of paper, you should identify the shim and the location it came out of it:
At this point you need to have setup your dial indicator to measure the shim. You can see my setup in the first picture. but to add to it...
To accurately measure the size of the shim, you need to write down the base value on the dial indicator (Let me know if you need help reading one, but my pictures should be enough to get you started), then subract that from the value read with the shim under it. For example:
with NO shim, my dial indicator read .104 inches (its NOT a good idea to have this at zero...hard to explain but you don't know if your indicator is in mid-air or just a hair from touching the flat plane under it).
with a shim, my dial indicator read .230 inches.
.230-.104= .126 inches = 3.002 mm (you can find shims at your dealership or finishlineperformance/rosenthal mazda).
Got it? Cool, here is my sheet (yours will differ obviously)
So once you have all your shim sizes written down, you will need to figure out how much of a change you need to make. Lets follow this example all the way through:
An intake valve clearance reads .011 (.003 too loose from the middle value of .008).
We take the shim out and find it to be .124.
We need to increase the shim size by .002-.004 to stay within tolerance size.
INCREASE in shim size = DECREASE in valve clearance (and vice versa)
Lets pick .003 so we can land in the middle.
.124+.003=.127=3.2258mm
We take this number and go to our list of shims and the closest we find is 3.252mm. Take that value and convert it back to inches:
3.252mm=.128in, which is larger than our .127, but it fits in our range of .002-.004.
Great, add to cart. next shim, etc.
Some BIG HINTS:
-Take all the shims that need removing out, then try to move them around to fill in as many out-of-spec valves as possible before buying new shims.
-As an example, during this reshim, I did not have to buy any new shims as I had 5 extra laying around and was able to reuse 2 of the ones I pulled out.
-ALWAYS convert your shim value from mm to inch (if you are using inches for your measurements), or you will ---- it up. 3.252 may sound close to 3.225 but its a .001 increase and you don't want to go down too far either. Mazda's shims move up in relatively large increments.
- Don't get fancy and take the cam caps apart in random order. You could bur your head or the caps. Its a steel cam in an aluminum head, its scary enough already.
-Be VERY gentle with the tweezers/screwdriver/needlenose, you don't want to scratch the shim incase you need to reuse it and you really DON'T WANT TO SCRATCH THE BUCKET!
-Take good notes, and recheck your recheck. I wrote many numbers in the wrong columns initially and if you don't write the right ones down, you are screwed from the start.
-turn the CRANKSHAFT the right way, I don't think you will break anything, but do it just to be safe.
-Use a good pen, and make your clarifications VERY CLEAR. You could be waiting for days on the shims, and its unlikely you will remember everything 3 days later.
-MAKE SURE YOUR DIAL INDICATOR IS STABLE. everyone of my readings was at .104 base, and occassionally at .105. you should not be getting base changes larger than .002 or your base is off badly.
This is probably the best hint of them all if you understand whats going on...Don't hesitate to measure two shims against each other for the BEST accuracy in size difference. Let me demonstrate (watch the dial indicator and the two shims being measured):
As you can see, the difference from one to the other is .003. No matter the shim size here, you know one is .003 larger, so you can use that one to make go from .011 to .008. (as shims wear down, they change in size I guess).
At this point, you will add in your new shims and need to start tightening the cam caps back on. Here is the order for tightening them. IT IS different from loosening them (opposite direction):
Just incase you can't see the picture, here is order (each number corresponds to the bolt and its location):
17-13-12-16-20
18-14-11-15-19
8-4-1-5-9
7-3-2-6-10
torque spec is 100-125 INCH-lbs. and Mazda suggests tightening them in about 2-3 steps.
Note: Once you have torqued the cam back down. I spin the crank 2-3 cycles (1-1.5 turns of the cams) and recheck my clearance again. This is a good idea and should be done everytime valve clearance is changed. This will allow you to check over your work, incase you wrote the clearance value in the wrong column, or replacement shim was not the proper size, or whatever else. Just check over your work to make sure!
Update: I have gotten a BETTER picture of the cam caps loose and a shim removed for visual aid. It is replacing the 6th picture down and I marked it with an "Updated Pic" tag. Also take note of the cam lobe position, thats the position you want it to be in when measuring the clearance (but obviously you need the cam caps torqued down).
Last edited by Track; 09-18-2011 at 12:50 PM.

 09-13-2011, 10:13 PM
#4
MFz Regular

Join Date: Aug 2011
Location: Plant City Florida
Posts: 66
+1 on the micrometer, and you do not need the high dollar one shown either.
Very nicely written.
I have a nice little cheap trick when you have to service the cylinder head.
Get a plastic ice tray, they usually have 16 cubes. Cut a notch in one end of the tray to notate the front of the motor. Put lifters and or shims in the proper cube that would match up to the location on the motor.
Yes, it is an old trick, but it works quite nicely.
09-15-2011, 05:18 PM
#5
BAMFr
Thread Starter
Join Date: Jul 2011
Location: NC
Posts: 1,787
+1 on the micrometer, and you do not need the high dollar one shown either.
Very nicely written.
I have a nice little cheap trick when you have to service the cylinder head.
Get a plastic ice tray, they usually have 16 cubes. Cut a notch in one end of the tray to notate the front of the motor. Put lifters and or shims in the proper cube that would match up to the location on the motor.
Yes, it is an old trick, but it works quite nicely.
Very nicely written.
I have a nice little cheap trick when you have to service the cylinder head.
Get a plastic ice tray, they usually have 16 cubes. Cut a notch in one end of the tray to notate the front of the motor. Put lifters and or shims in the proper cube that would match up to the location on the motor.
Yes, it is an old trick, but it works quite nicely.
As you can see, my way isn't exactly the easiest, but it was the cheapest for my application.
 05-16-2013, 03:36 PM
#9
MFz Lurker

Join Date: Aug 2011
Location: Fort Myers, FL
Posts: 9
Figured I'd share my findings to help others...
List of Mazda Part Numbers and thicknesses so you can order from a dealer. They're ~$9 a piece from Rosenthal.
Reposted from: http://fixjunk.com/solomiata/FE3N/Mi...Thickness.html
List of compatible Nissan Shims that can be purchased from Cylinder Head Supply I bought quite a few shims from them and have been very happy with the sevice and quality/accuracy of the shims. Prices are $13.75 for 4, so they come out considerably cheaper than OEM.
Reposted from: Valve Shims Hard to Find? - MX-5 Miata Forum
List of Mazda Part Numbers and thicknesses so you can order from a dealer. They're ~$9 a piece from Rosenthal.
Reposted from: http://fixjunk.com/solomiata/FE3N/Mi...Thickness.html
mm Mazda Part #
2.750 Z5Y1-12-541
2.800 Z5Y2-12-541
2.850 Z5Y3-12-541
2.900 Z5Y4-12-541
2.950 Z5Y5-12-541
3.000 Z5Y6-12-541
3.028 Z502-12-542
3.050 FP07-12-564
3.052 Z502-12-545
3.076 Z502-12-548
3.092
3.100 FP07-12-566
3.100 Z502-12-552
3.116 Z502-12-554
3.148 Z502-12-558
3.150
3.156 Z502-12-559
3.164 Z502-12-561
3.172 Z502-12-562
3.175 FP07-12-569
3.180 Z502-12-563
3.188 Z502-12-564
3.196 Z502-12-565
3.202 ?
3.204 Z502-12-566
3.210 Z502-12-567
3.212 ?
3.220 Z502-12-568
3.228
3.236 Z502-12-571
3.244 ?
3.252 Z502-12-573
3.260 Z502-12-574
3.268 Z502-12-575
3.284 Z502-12-577
3.292 Z502-12-578
3.300 Z502-12-579
3.316 Z502-12-582
3.324 Z502-12-583
3.348 Z502-12-586
3.350 FP07-12-577
3.372
3.396 Z502-12-593
3.400 FP07-12-579
3.450 KJ01-12-595
3.500 KJ01-12-597
3.550 KJ01-12-599
3.600 Z5Y1-12-599
3.650 Z5Y2-12-599
3.700 Z5Y3-12-599
3.750 Z5Y4-12-599
Reposted from: Valve Shims Hard to Find? - MX-5 Miata Forum
Shim Sizes 2.75mm--3.00mm Co-Exist on Mazda and Nissan List
Size ----Nissan Part
2.00mm - NISK2-00---------------0.07874�
2.05mm - NISK2-05---------------0.08070�
2.10mm - NISK2-10---------------0.08267�
2.15mm - NISK2-15---------------0.08464�
2.20mm - NISK2-20---------------0.08661�
2.25mm - NISK2-25---------------0.08858�
2.30mm - NISK2-30---------------0.09055�
2.35mm - NISK2-35---------------0.09251�
2.40mm - NISK2-40---------------0.09448�
2.45mm - NISK2-45---------------0.09645�
2.50mm - NISK2-50---------------0.09842�
2.55mm - NISK2-55---------------0.10039�
2.60mm - NISK2-60---------------0.10433�
2.65mm - NISK2-65---------------0.10826�
2.70mm - NISK2-70---------------0.10629�
2.75mm - NISK2-75---------------0.10826�
2.80mm - NISK2-80--------------0.11023�
2.85mm - NISK2-85--------------0.11220�
2.90mm - NISK2-90--------------0.11417�
2.95mm - NISK2-95--------------0.11614�
3.00mm � NISK3-00 -------------0.11811�

Thread
Thread Starter
Forum
Replies
Last Post