
Maintenance How-To: Everything Intake manifold


Thread Starter
BAMFr

Joined: Jul 2011
Posts: 1,787
From: NC
I did this while reshimming the valves and changing out the VC gasket. I did a complete intake manifold cleaning and replaced my intake manifold gaskets in the process.
So, I wrote up a DIY for it. This, in conjunction with the detailed m.net write up for the upper intake manifold, should just about complete any maintence you would need to do on that side of the engine.
*** DISCLAIMER: This is for an NB Miata, but it may work for your NA.*******
Car specific parts:
ICV if you are replacing it
Throttle Body Gasket
Idle Control Valve Gasket
Plenum Gasket
Intake Manifold Gasket
Throttle Body/Idle Control Valve (ICV)
DISCLAIMER: Be careful what you use to clean your throttle body and the ICV. Some people will tell you to only use TB cleaner, or you will ---- it up. Seafoam is a great cleaner and I PERSONALLY don't think it will hurt anything, but I am not an expert on this stuff. I am just crazy and have a wrench.
Tools:
Torque Wrench (18ft-lbs)
12mm socket
phillips screw driver (thicker tip)
Throttle Body Gasket
Idle Control Valve Gasket
****I am starting after the cross-over tube has been removed. Its easy, if you can't figure it out then please stop here****
This is pretty simple really, Take out 2 nuts & 2 bolts, disconnect the throttle cable from the throttle body, disconnect the 2 coolant lines, disconnect the TPS & ICV connectors.
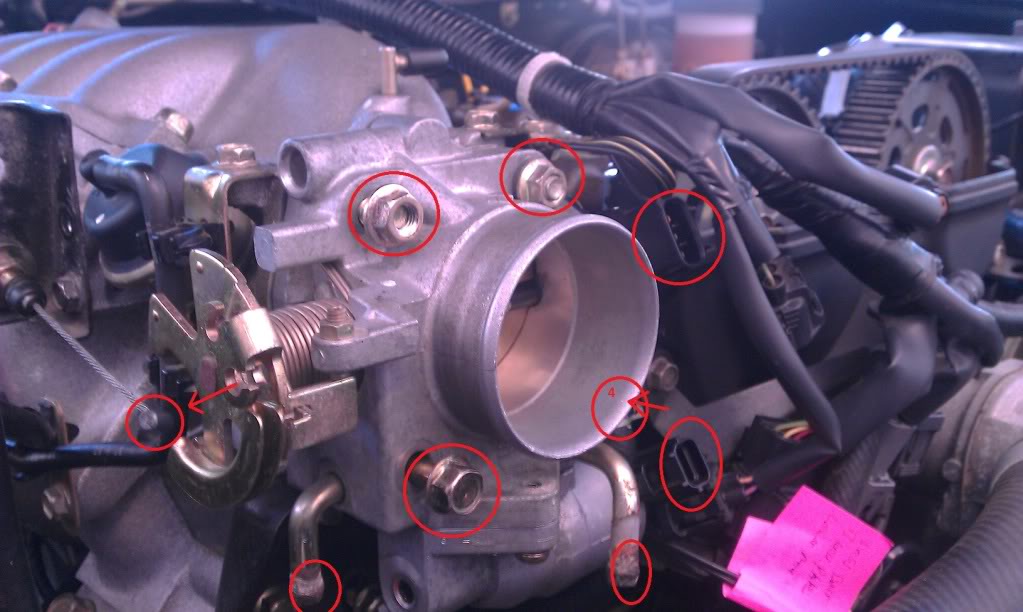
Easy! You got that done, you have pretty much got the biggest culprit for Idle Dip... AND half the gaskets!
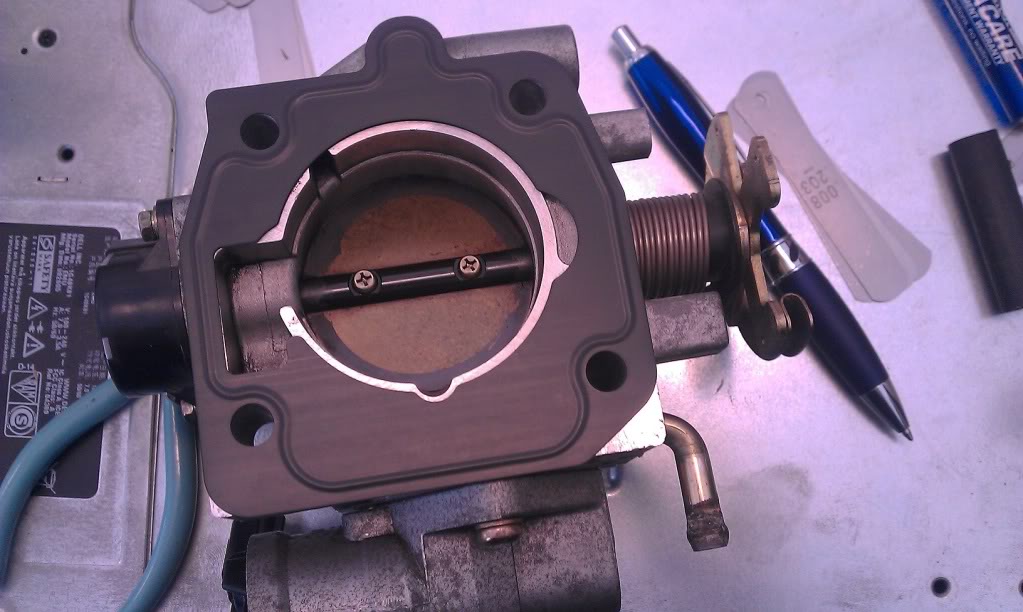
Now, Throttle body gasket orientation (this is the back of the throttle body obviously). Just make sure you clean off both the TB surface and the Intake Manifold surface where the gasket goes, so you can get a nice even surface for the gasket. More importantly, note the chunk on the bottom of the throttle body attached by screws? That is your ICV. Unscrew the two screws and you you will have that troublesome sucker in your hands. CAREFUL: the screws strip REALLY easy!
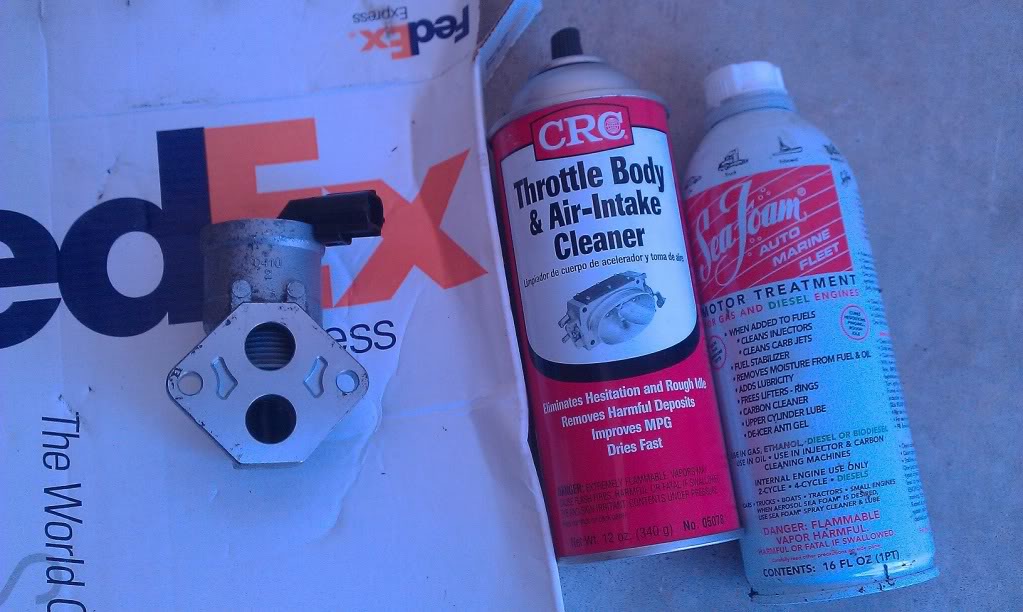
Here is the ICV, and my choice of cleaners. Pick one or pick both. I pour some seafoam into it (both holes) and let sit for about 30s or a minute. Dump it out, flush out with TB cleaner and let it dry.
Put it back together now. Torque specs for the bolts/nuts on the throttle body is 15-18 ft-lbs. I did mine to 17, just cause thats as high as my IN-lb torque wrench will go.
If you are suffering from idle dip, Here is the rest of the instructions: short TEN and GND on the diagnostics port in the Engine bay (while the car is warmed up and idling), then MANUALLY adjust the Idle.
NB/NA DIAGNOSTIC:
So, I wrote up a DIY for it. This, in conjunction with the detailed m.net write up for the upper intake manifold, should just about complete any maintence you would need to do on that side of the engine.
*** DISCLAIMER: This is for an NB Miata, but it may work for your NA.*******
Car specific parts:
ICV if you are replacing it
Throttle Body Gasket
Idle Control Valve Gasket
Plenum Gasket
Intake Manifold Gasket
Throttle Body/Idle Control Valve (ICV)
DISCLAIMER: Be careful what you use to clean your throttle body and the ICV. Some people will tell you to only use TB cleaner, or you will ---- it up. Seafoam is a great cleaner and I PERSONALLY don't think it will hurt anything, but I am not an expert on this stuff. I am just crazy and have a wrench.
Tools:
Torque Wrench (18ft-lbs)
12mm socket
phillips screw driver (thicker tip)
Throttle Body Gasket
Idle Control Valve Gasket
****I am starting after the cross-over tube has been removed. Its easy, if you can't figure it out then please stop here****
This is pretty simple really, Take out 2 nuts & 2 bolts, disconnect the throttle cable from the throttle body, disconnect the 2 coolant lines, disconnect the TPS & ICV connectors.
Easy! You got that done, you have pretty much got the biggest culprit for Idle Dip... AND half the gaskets!
Now, Throttle body gasket orientation (this is the back of the throttle body obviously). Just make sure you clean off both the TB surface and the Intake Manifold surface where the gasket goes, so you can get a nice even surface for the gasket. More importantly, note the chunk on the bottom of the throttle body attached by screws? That is your ICV. Unscrew the two screws and you you will have that troublesome sucker in your hands. CAREFUL: the screws strip REALLY easy!
Here is the ICV, and my choice of cleaners. Pick one or pick both. I pour some seafoam into it (both holes) and let sit for about 30s or a minute. Dump it out, flush out with TB cleaner and let it dry.
Put it back together now. Torque specs for the bolts/nuts on the throttle body is 15-18 ft-lbs. I did mine to 17, just cause thats as high as my IN-lb torque wrench will go.
If you are suffering from idle dip, Here is the rest of the instructions: short TEN and GND on the diagnostics port in the Engine bay (while the car is warmed up and idling), then MANUALLY adjust the Idle.
NB/NA DIAGNOSTIC:
Last edited by Track; Sep 16, 2011 at 08:09 AM.
Thread Starter
BAMFr
Joined: Jul 2011
Posts: 1,787
From: NC
Upper Intake Manifold removal and cleaning
Self explanatory, follow the instruction at M.net.
http://www.miata.net/garage/manifold/index.html
I am not going to re-do this, but what I will do is provide some close-up pictures of where all the tubes and hoses go. This is in-case you get lost or did not label yours.
No need for labels here, most are self-explanatory. The second circle from the right is a little tricky and can be hard to see. the two small circles connect from the upper to the lower manifolds.
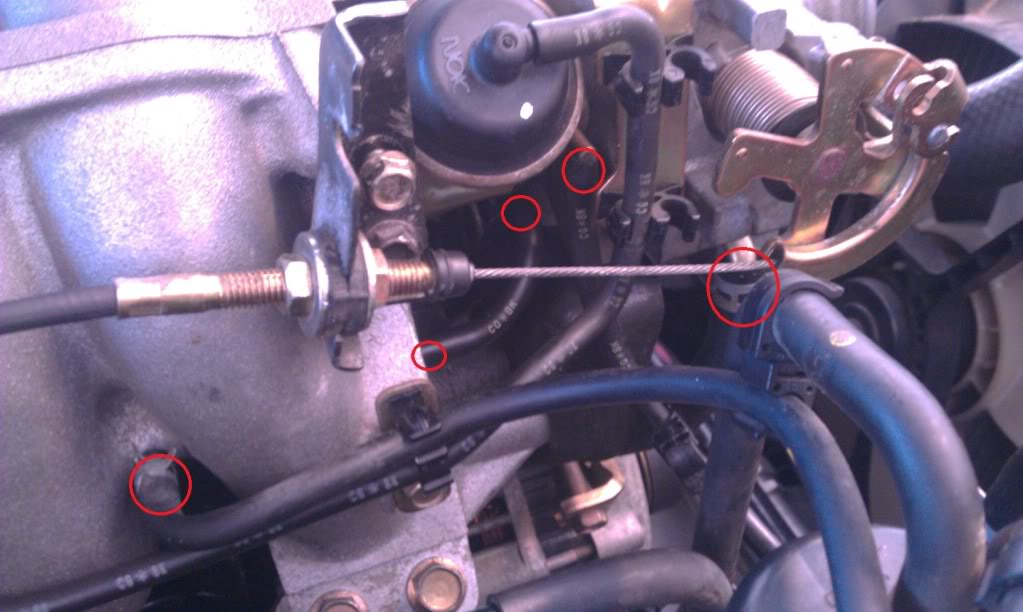
The number 3 hose is the PCV valve and goes to the valve cover.

Self explanatory, follow the instruction at M.net.
http://www.miata.net/garage/manifold/index.html
I am not going to re-do this, but what I will do is provide some close-up pictures of where all the tubes and hoses go. This is in-case you get lost or did not label yours.
No need for labels here, most are self-explanatory. The second circle from the right is a little tricky and can be hard to see. the two small circles connect from the upper to the lower manifolds.
The number 3 hose is the PCV valve and goes to the valve cover.
Thread Starter
BAMFr
Joined: Jul 2011
Posts: 1,787
From: NC
Ok, so you got the two easier section done so far. If you are here, then you are either really ---- about cleaning your manifold and want it done right, you are removing it to put a new one in, have an intake manifold leak, or you are VERY lost or possibly bored.
Lower Intake Manifold removal
Required Tools:
Torque Wrench (15-18 ftlbs for 12mm nuts on the manifold, and 25-38 ft-lbs for the two support bracket ones, 10mm nuts don't have a torque rating)
10mm, 12mm, 14mm sockets (for the support bracket)
Random Extensions for the sockets (I got away with a deep socket 12mm and 2 3" extensions)
Helpful Tools:
Wobble extensions
****This is written in a TEXT FIRST, PICTURE SECOND format (unless I have stated otherwise)****
So this won't be so much a walk-through of what to do. The manifold requires some finagling, thin/small hands, and thick skin. With that said, I DID NOT COVER EVERYTHING TO REMOVE IT IN PICTURES! So please don't ask "why won't it come off?!?#@?." If you read the next paragraph, you will be told everything needed to remove it:
There is a total of 9 nuts (12mm) holding the manifold onto the intake ports, 2 bolts (14mm) holding it to the Intake Manifold Support (its right beside the Alternator), 2 nuts (10mm) holding the EGR to the lower manifold, assortment of connectors (including a ground) and hoses, the EGR valve is connected to the rear, and last but most painful is two brackets on the UNDERSIDE of it (both held on with 10mm bolts). Quick listing:
Hardware:
9 12mm nuts
2 14mm bolts
2 10mm nuts
2 10mm bolts
3 (?) electrical connectors
2-3 vacuum hoses (its possible you already disconnected one with the upper manifold)
Now, Onto the nitty gritty hard stuff:
I would start by getting the bottom studs off first. They may seem very difficult (and some of them are), but I hope to make it easier by cutting down on your time spent experimenting with ways of reaching them.
Things to note before we get on:
-the corner nuts are pretty easy to get, so I am not giving instructions on those.
-the bottom nuts are hard to see, but YOU CAN get them out without lifting the car. If you are struggling, then I suggest you jack the passenger side up, take the wheel off and get a flash light.
This is a preliminary step, you have to remove the ground wire from the TB bracket (once thats done, you are on the way to the PAIN!):
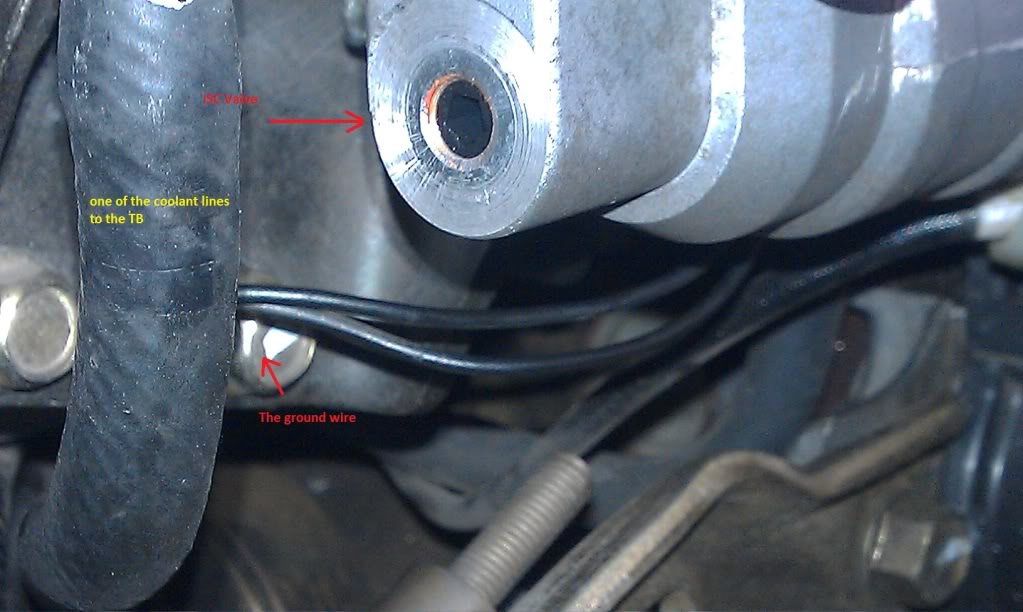
-I start off with the closest of the annoying brackets that are holding up wiring harnesses. it will require a 3" extension and a 10mm socket. Just feel around down there under the cylinder 2 runner and you will get a finger on it, slip the socket down and get it off. Once thats is done, you have a clear path to all the bottom studs.

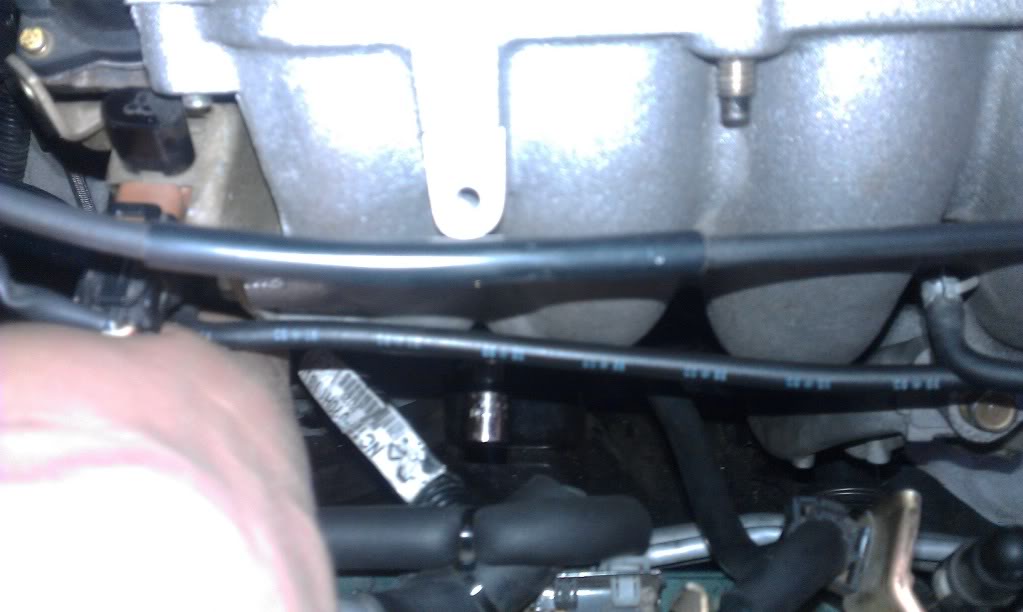
-THERE IS another 10mm bracket, might as well get it out of the way now! Its easy to get as nothing is in the way and its RIGHT BESIDE the 3rd Nut from the back of the engine. I used 2 3" extensions and a 10mm deep socket. To help you visualize this:

-(this applies to the picture above) This is the brackets placed back on there to help you understand location. I HIGHLY suggestion you leave the back one on before you put the manifold back in the car. Just make sure you use one hand to move the wires and hoses out of its way, so you don't cut, pull or nick any wiring/hoses. The front bracket is easy to get back on with the manifold in the car.
-BOTTOM NUTS:I used 2 3" extensions and a 12mm deep socket on a 3/8" rachet. (Basic stuff really, no wobbles or pivots) for the two middle ones on the bottom side. the trick is to stick your hand down there as if you are getting the oil filter, and use a finger to follow the runner around (otherwise you will reach too low) and find the nut, and then slip the socket down and attach the ratchet at the end. Here is an example on the 2nd nut from the rear of the engine:
-(this applies to the picture above) Be careful on 2nd nut from the rear of the engine, its hard to get the socket flush with the nut, so it can be easy to strip (Use a wobble if you are worried). I suggest you "feel" it with your finger to make sure its on there snug and then twist away, just don't haphazardly twist, once its loose you can remove it the rest of the way without the socket! The 3rd nut from the rear is pretty easy once the front bracket is out of the way.
-TOP NUTS: Easy to get out, tricky to get back in! Once again I used 2 3" extensions and a deep socket on the middle 3 nuts. You have to slip the socket into the space between the runners, then attach the ratchet. pretty easy... With that said, MOST of these suggestions are on the Re-Installation of the top nuts.
-(this applies to the picture above) 2nd nut from the back of the engine. Self-explanatory.
-(Installation) Slip the socket between the runners first and then feed the nut onto the socket.

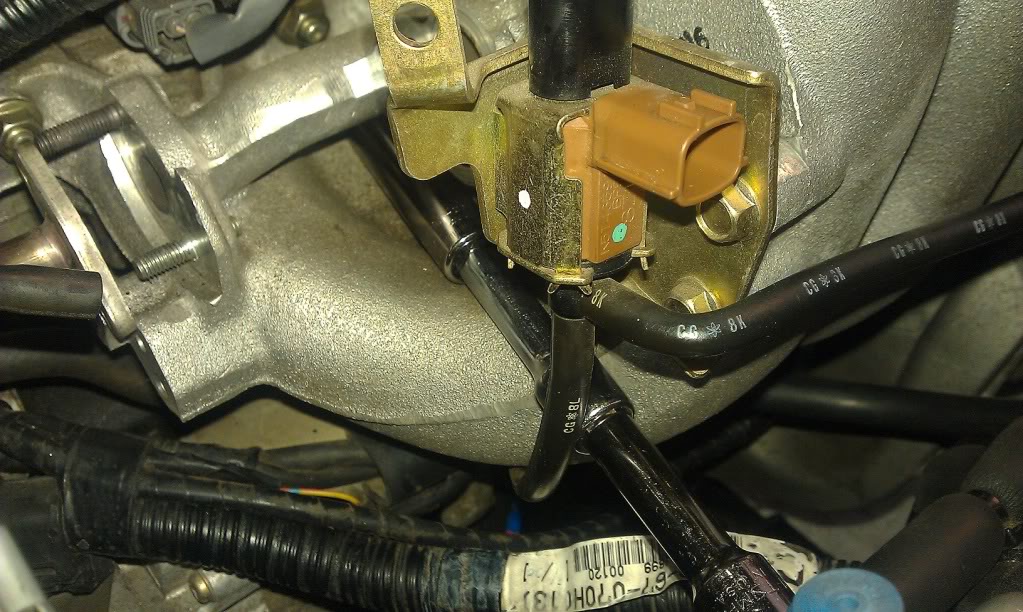
-You can't do that on the 3rd nut from the rear of the engine, you will just have to manage to get it in without cheating. Its easier if you bring it up at a right angle, so if you hit anything it won't knock the nut out, then once you are in the home stretch, angle it as needed to get at the stud. YOU CAN see where the socket is if you look from the right and down some:
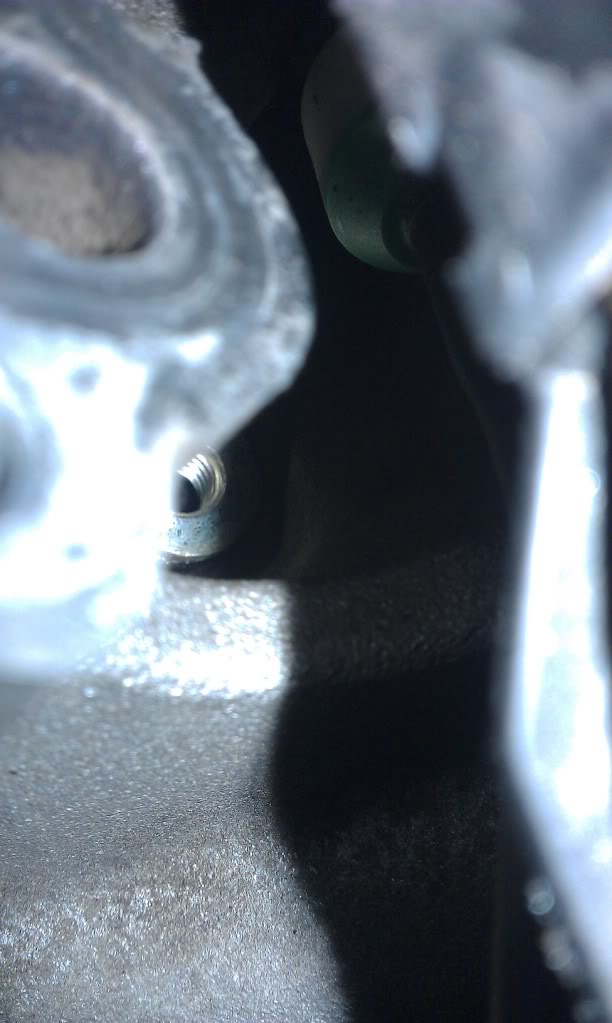
-(This applies to the picture above)Note the green & white piece which comes from some kind of valve (possibly for EGR valve cleaning without removal). Also note to the left the threads for one of the top manifold bolts. This all the way to the right of the lower manifold. The picture doesn't show it well, but you can see pretty far in there and it should make it easier to guide the socket+nut through the obstacle course. You can also see the green/white thing on the picture below.
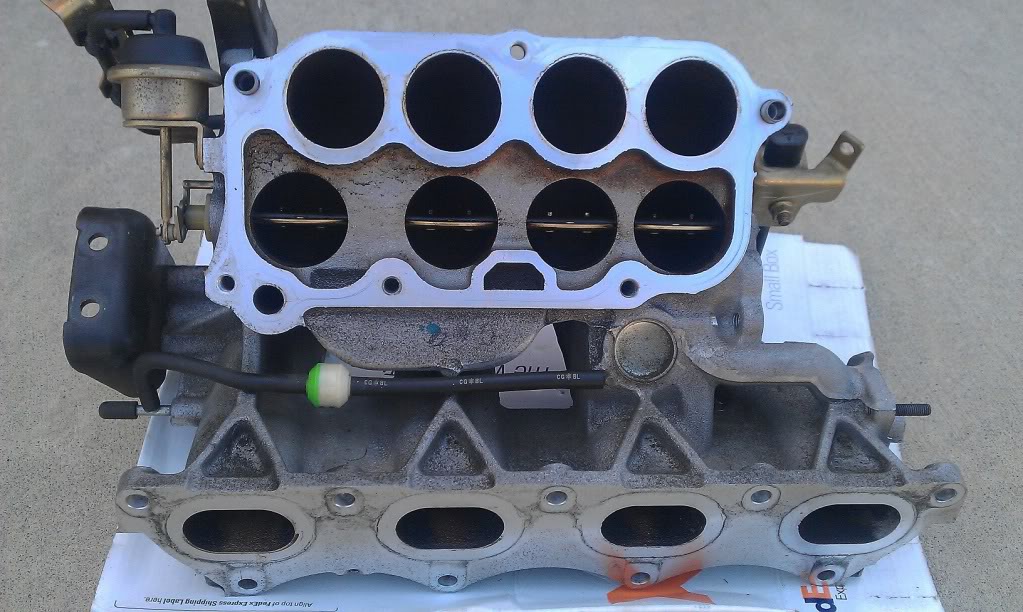
Here is a picture of the manifold out (you can use it to find nut positions:
Lower Intake Manifold removal
Required Tools:
Torque Wrench (15-18 ftlbs for 12mm nuts on the manifold, and 25-38 ft-lbs for the two support bracket ones, 10mm nuts don't have a torque rating)
10mm, 12mm, 14mm sockets (for the support bracket)
Random Extensions for the sockets (I got away with a deep socket 12mm and 2 3" extensions)
Helpful Tools:
Wobble extensions
****This is written in a TEXT FIRST, PICTURE SECOND format (unless I have stated otherwise)****
So this won't be so much a walk-through of what to do. The manifold requires some finagling, thin/small hands, and thick skin. With that said, I DID NOT COVER EVERYTHING TO REMOVE IT IN PICTURES! So please don't ask "why won't it come off?!?#@?." If you read the next paragraph, you will be told everything needed to remove it:
There is a total of 9 nuts (12mm) holding the manifold onto the intake ports, 2 bolts (14mm) holding it to the Intake Manifold Support (its right beside the Alternator), 2 nuts (10mm) holding the EGR to the lower manifold, assortment of connectors (including a ground) and hoses, the EGR valve is connected to the rear, and last but most painful is two brackets on the UNDERSIDE of it (both held on with 10mm bolts). Quick listing:
Hardware:
9 12mm nuts
2 14mm bolts
2 10mm nuts
2 10mm bolts
3 (?) electrical connectors
2-3 vacuum hoses (its possible you already disconnected one with the upper manifold)
Now, Onto the nitty gritty hard stuff:
I would start by getting the bottom studs off first. They may seem very difficult (and some of them are), but I hope to make it easier by cutting down on your time spent experimenting with ways of reaching them.
Things to note before we get on:
-the corner nuts are pretty easy to get, so I am not giving instructions on those.
-the bottom nuts are hard to see, but YOU CAN get them out without lifting the car. If you are struggling, then I suggest you jack the passenger side up, take the wheel off and get a flash light.
This is a preliminary step, you have to remove the ground wire from the TB bracket (once thats done, you are on the way to the PAIN!):
-I start off with the closest of the annoying brackets that are holding up wiring harnesses. it will require a 3" extension and a 10mm socket. Just feel around down there under the cylinder 2 runner and you will get a finger on it, slip the socket down and get it off. Once thats is done, you have a clear path to all the bottom studs.
-THERE IS another 10mm bracket, might as well get it out of the way now! Its easy to get as nothing is in the way and its RIGHT BESIDE the 3rd Nut from the back of the engine. I used 2 3" extensions and a 10mm deep socket. To help you visualize this:
-(this applies to the picture above) This is the brackets placed back on there to help you understand location. I HIGHLY suggestion you leave the back one on before you put the manifold back in the car. Just make sure you use one hand to move the wires and hoses out of its way, so you don't cut, pull or nick any wiring/hoses. The front bracket is easy to get back on with the manifold in the car.
-BOTTOM NUTS:I used 2 3" extensions and a 12mm deep socket on a 3/8" rachet. (Basic stuff really, no wobbles or pivots) for the two middle ones on the bottom side. the trick is to stick your hand down there as if you are getting the oil filter, and use a finger to follow the runner around (otherwise you will reach too low) and find the nut, and then slip the socket down and attach the ratchet at the end. Here is an example on the 2nd nut from the rear of the engine:
-(this applies to the picture above) Be careful on 2nd nut from the rear of the engine, its hard to get the socket flush with the nut, so it can be easy to strip (Use a wobble if you are worried). I suggest you "feel" it with your finger to make sure its on there snug and then twist away, just don't haphazardly twist, once its loose you can remove it the rest of the way without the socket! The 3rd nut from the rear is pretty easy once the front bracket is out of the way.
-TOP NUTS: Easy to get out, tricky to get back in! Once again I used 2 3" extensions and a deep socket on the middle 3 nuts. You have to slip the socket into the space between the runners, then attach the ratchet. pretty easy...
With that said, MOST of these suggestions are on the Re-Installation of the top nuts.-(this applies to the picture above) 2nd nut from the back of the engine. Self-explanatory.
-(Installation) Slip the socket between the runners first and then feed the nut onto the socket.
-You can't do that on the 3rd nut from the rear of the engine, you will just have to manage to get it in without cheating. Its easier if you bring it up at a right angle, so if you hit anything it won't knock the nut out, then once you are in the home stretch, angle it as needed to get at the stud. YOU CAN see where the socket is if you look from the right and down some:
-(This applies to the picture above)Note the green & white piece which comes from some kind of valve (possibly for EGR valve cleaning without removal). Also note to the left the threads for one of the top manifold bolts. This all the way to the right of the lower manifold. The picture doesn't show it well, but you can see pretty far in there and it should make it easier to guide the socket+nut through the obstacle course. You can also see the green/white thing on the picture below.
Here is a picture of the manifold out (you can use it to find nut positions:

MFz Regular
Joined: Sep 2011
Posts: 190
From: Mt.Peak, Texas
Track ,my understanding is there is a small teflon rim or wall inside the throttle body that the throttle plate touches. This is to prevent air from coming around the throttle plate at idle. Using the wrong product will eat this teflon away . This is waht causes uneven idle
Thread Starter
BAMFr
Joined: Jul 2011
Posts: 1,787
From: NC
Track ,my understanding is there is a small teflon rim or wall inside the throttle body that the throttle plate touches. This is to prevent air from coming around the throttle plate at idle. Using the wrong product will eat this teflon away . This is waht causes uneven idle
MFz Regular
Joined: Sep 2011
Posts: 190
From: Mt.Peak, Texas
If you close the throttle plate all the way you should not be able to see any daylight at all through it not even a glimmer. If you do then the coating is gone.
Now how much this does or doesn't hurt anything I am not sure . I thinkl it could cause problems when going for an inspection from the O2 sensor trying to compensate for the air seeping in at idle
I will say this is on 96 models and before not sure about after the 96.
If you do have any idle issues this may be a place to start looking


!!!! I NEED TO POST !!!!
Joined: Aug 2015
Posts: 1
Does anyone know what the part number or size of the bolt/screw that attaches the vacuum hose bracket to the top of the throttle body?
My 99 Miata is missing this and I'm having trouble locating the exact part.
My 99 Miata is missing this and I'm having trouble locating the exact part.

Thread
Thread Starter
Forum
Replies
Last Post
For Sale New 1.6L DCOE Manifold with linkage
Kyo
Miata Parts for Sale & Wanted
1
Nov 6, 2014 06:26 PM
julekpl
NA (1989-1997)
1
Mar 27, 2013 09:29 PM
atlnb
Miata Parts for Sale & Wanted
1
Dec 21, 2011 10:01 PM
shuiend
Miata Parts for Sale & Wanted
2
Aug 8, 2011 09:30 PM