Interior How-To: Linear Water Temp Gauge
 11-01-2011, 09:13 PM
#21
BAMFr

Thread Starter

Join Date: Jul 2011
Location: NC
Posts: 1,787
perhaps its my directions that are confusing?
You need a Zequivalent of 137-139. So you can do
A) Series: 100+37=137, 100+39=139, 80+59=139, etc, etc.
B) Parallel: (280*280)/(280+280)= 140, (560*184)/(560+184)=139, (1000*159)/(1000+159)=137, etc. etc.
Best to stick with series anyways, you can probably pick two easy resistors from radio shack and be done with it.
 11-02-2011, 07:18 AM
#22
MFz Regular

Join Date: Sep 2011
Location: Mt.Peak, Texas
Posts: 190
Yes I did read it and said "you did good," so don't get tacky about it,it was not meant to ruffle your feathers or to discredit you I had no idea you were experinced in the field ,I just did not know it would do the same thing.
I have read so many things that are not true or that is wrong I just ask for clarification
Did you know that you can take the six volt DC cell battery and rip it apart and use the AA batteries in it instead of buying a bunch of batteries and a lot cheaper. That statement is as false as it comes but a ton of people have fell for it. So had no idea if what you said was correct or you left something out.
I have made some small circuits and have burned some up .Really thought it was from the way the resistors were hooked up. Using LED'S they looked brighter hooked one way or the other and burn up or not burn at all
11-02-2011, 07:58 AM
#23
BAMFr
Thread Starter
Join Date: Jul 2011
Location: NC
Posts: 1,787
^lol, well I can't really tell you why your LED looked brighter without looking at the circuit you setup. but if you did series resistors then used the same two resistors to make a parallel circuit, then of course the LED will look brighter. two series resistors add together, while two parallel resistors will divide. note in all the parallel examples, I used two higher resistors to get a lower equivalent resistance!
Anyways, let me know if you need help with your circuit beyond this. I shall go hibernating again.
Anyways, let me know if you need help with your circuit beyond this. I shall go hibernating again.
11-02-2011, 08:50 AM
#24
MFz Regular
Join Date: Sep 2011
Location: Mt.Peak, Texas
Posts: 190
Thanks Track for the offer.That was just something I played around with a while back.
I made a small box with the idea of installing an led arrow design to put on a something. I get it to work after some hits and misses but was a fun learning experience
If I do decide to tackle another project I will give you a yell
I made a small box with the idea of installing an led arrow design to put on a something. I get it to work after some hits and misses but was a fun learning experience
If I do decide to tackle another project I will give you a yell


 05-07-2012, 12:28 PM
#28
MFz Lurker

Join Date: Mar 2012
Location: Cicero, NY
Posts: 14
This might simplify things for anyone who's hesitant to pull their NB gauge hood. I sorted it out on a fluke when pulling mine the first time, and it made the second time around a snap!
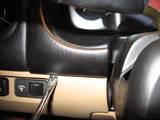
After removing the panel between the pedals and the steering column cover (2 screws) and then the steering column cover (three screws, then the cover splits top and bottom with a little tug), you can reach a finger behind where the hood meets the dash next to the column. There is a tab on each side that pokes into the dash from the hood, pointing toward the front of the car. If you curl your finger in there and lift that tab just a bit (not too far - it'll bend!) and grab a tool to pry the other side (see below - click for bigger), you can pop off the lower clip on each side, making the rest of the hood a lot easier! Use a proper tool to pry; the one I used was handy for its hook shape and wide surface at the end. The tan part is rather strong, but don't test it, OK? The second pic below should give you a better idea of what you're up against - the tabs you'll push up to pop each bottom side can be seen along the flat, toward the center, and the metal tabs toward the outside will come right out. That leaves the three around the top. Fingers under the hood, pull straight back. Simple!

If anyone needs a good reason to do this mod, here's one: After the mod, from a cold start I found the temp gauge slowly walking a ways past center and then suddenly dropping back to vertical. OBD-II verified this to be correct - it went to ~217 and then sank quickly to ~190. With the stock gauge setup, this would have been invisible. This is a cooling system problem, more than likely involving the hose that drops from the thermostat housing to the water pump inlet.
Thanks for the writeup!
After removing the panel between the pedals and the steering column cover (2 screws) and then the steering column cover (three screws, then the cover splits top and bottom with a little tug), you can reach a finger behind where the hood meets the dash next to the column. There is a tab on each side that pokes into the dash from the hood, pointing toward the front of the car. If you curl your finger in there and lift that tab just a bit (not too far - it'll bend!) and grab a tool to pry the other side (see below - click for bigger), you can pop off the lower clip on each side, making the rest of the hood a lot easier! Use a proper tool to pry; the one I used was handy for its hook shape and wide surface at the end. The tan part is rather strong, but don't test it, OK? The second pic below should give you a better idea of what you're up against - the tabs you'll push up to pop each bottom side can be seen along the flat, toward the center, and the metal tabs toward the outside will come right out. That leaves the three around the top. Fingers under the hood, pull straight back. Simple!


If anyone needs a good reason to do this mod, here's one: After the mod, from a cold start I found the temp gauge slowly walking a ways past center and then suddenly dropping back to vertical. OBD-II verified this to be correct - it went to ~217 and then sank quickly to ~190. With the stock gauge setup, this would have been invisible. This is a cooling system problem, more than likely involving the hose that drops from the thermostat housing to the water pump inlet.
Thanks for the writeup!
Last edited by LetItSnow; 05-07-2012 at 12:30 PM.

Thread
Thread Starter
Forum
Replies
Last Post
Redcap
Engine Upgrades
3
03-14-2012 08:47 AM