Maintenance Oil Change Procedure
 11-09-2013, 12:18 PM
#1
MFz Regular

Thread Starter

Join Date: Oct 2013
Location: North Stonington, Connecticut
Posts: 107
Oil Change Procedure
Yes, this is elementary.
Supplies:
1 long sleeved shirt or sweat shirt you don’t mind gettingoil / grime covered
1 roll of paper towels
1 sheet of newspaper
2 rubber gloves
4 quarts of the oil of your choice
1 oil filter
1 replacement oil drain plug washer
You can Google for many intense discussions of brands, oilweights, synthetic vs dino, change intervals, etc. Those are your decision, not mine! Should you wish to discuss that in detail,there is a perpetual discussion of these topics on - Bob is the Oil Guy.
Tools:
Drain plug socket 14mm typically
6” extension
Socket wrench
Waste oil drain pan – at least 6 quart size, and low enough to slide under the car
Carpet or pad to lay on while working (a large sheet of cardboard is good too)
flashlight or drop light
Empty plastic screw top jars (from orange juice or similar) to store the used fluid in
A towel / cotton or paper to place under the filter before it’s removed. NEVER tell your S. O.where the towel went.
Optional: a 0 – 50ft-lbf reading torque wrench
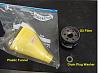
Optional: a plastic funnel that will go into the valve cover opening beneath the valve cover cap(shiny “Mazdaspeed” screw on cover - on my car)
Procedure:
It’s not a bad idea to do this after a car / undercarriagewash. It also aids the oil to drain outcompletely if the engine is slightly warm.
The car is too low for me to work on the underside, so thefirst step is to raise at least the front of the car.
Using the jack to support the car is a major leagueNO-NO. Using any jack or hydraulicallysupported device to support the car while you work under it is a major leagueNO-NO. You want a mechanical supportthat is stable and can be visually verified to be safe while you’re under it.
At a minimum, ramps can be used. You can make ramps from 2 x 12 lumber, borrowfrom a friend, or use store bought ramps. Other devices such as lifts or jack stands, which raise the entire carare easier to work under, again provided there is a mechanical stop to keep thecar from coming down on top of you. Note that jack stands have a relativelynarrow base. It is not difficult to pusha car sideways off jack stands.
As you’ve likely noted, I tend to be very cautious about this. A secondary stop will make you feel much safer. I use stacked firewood. You can also use 6x6 timbers, or almostanything that is strong, economical and will not crack under a sudden impact.Do not use cinder or concrete blocks. They will crack if the car falls on them.
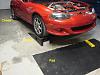
I use ramps, since they’re inexpensive, and easy touse. Simply place the ramps in front ofthe front tires, on the garage / driveway surface, ensure that they’re in linewith the both the front and back wheels, and that the front wheels arestraight. If you have a helper, havethem watch for problems when you drive onto the ramps.
As you climb the ramp, the car will go up rather slowly andthen quickly accelerate on the flat portion of the ramp. Typically, that flat portion is little longerthan the tires contact patch, so it is best to stop the car quickly once you’reon the flat surface. Repairing the car once you drive past the end of the ramp is outside the scope of this procedure. Sorry.
Once your front wheels are on the ramps, put the car inreverse, set the parking brake, and chock the rear wheels. I use split pieces of firewood, manufactured chocks will also work. Again, you want to ensure the car doesn’t come down on top of you.
Now, pull the inside latch, and raise the hood, setting theend of the hood support rod (located just in front of the radiator) in the slotnear the right (as you look at the car) front of the hood.
By the way, while you’re doing this, it’s a good idea tolook for leaks, stains, dirt accumulations, or anything that appearsunusual. If you see something odd,consider discussing it with a mechanic.
Put on the rubber gloves.
Slide the oil drain pan under the front of the car, andplace the carpet / pad as close to the front wheels as you can. Place yourflashlight, socket wrench assembly, and a roll of paper towels on thecarpet. Then lie down on the carpet, onyour back, and slide under the car until you see the stuff in photo 2 aboveyou.
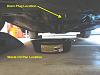
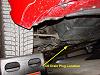
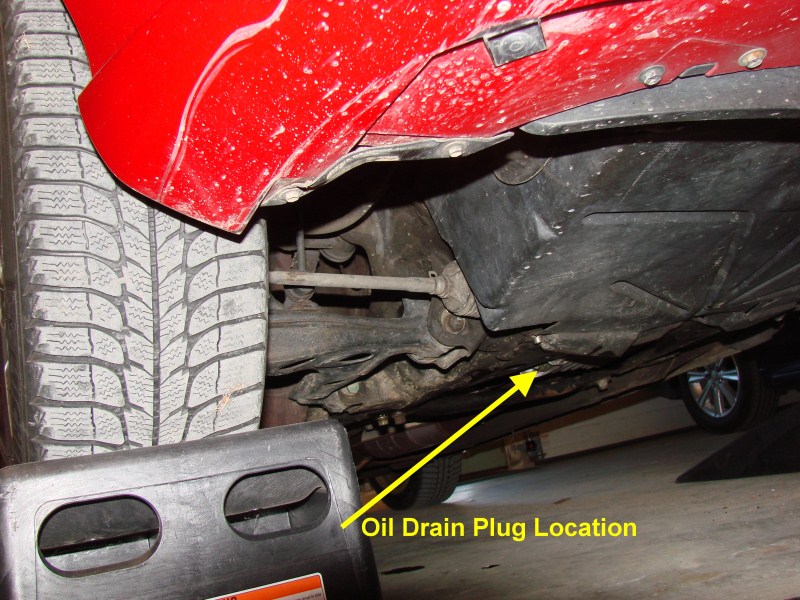
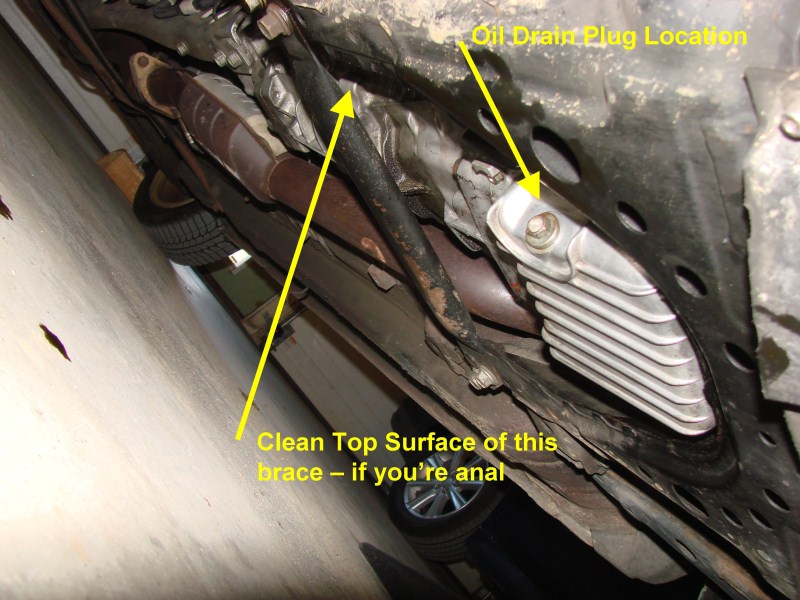
Locate the drain plug, and ensure that the waste oil drainpan is within easy reach (see photo 4). Also ensure that YOU are far enough away from the drain that oil willnot pour onto you. Place the socketwrench onto the oil drain plug and give a quick tug counterclockwise. It should turn slightly and possibly make asnap noise / feel as it breaks free. Remove the socket wrench, and set the drain pan so that the side of the panend nearest car centerline is under the drain. You need to offset the drain pan because the oil will spurt out towardsthe passenger wheel when the plug is removed. Unscrew the plug by hand, holding it in place so the oil doesn’t leakout until the plug is completely free. Try to hold onto the plug firmly while you remove it, otherwise you’llneed to search in the pan for the plug.

Once the oil is draining, go back to the top of the engineand remove, by hand, the shiny “Mazdaspeed” oil cap at the top and front of thered cam cover (see photo 5). This willaid the oil in draining out of the engine.
Now comes the fun part – changing the oil filter. You may know that this engine was originallydesigned for a front wheel drive car. When the engine was selected for the Miata, the oil filter ended upunder the intake manifold, in a spot that’s nearly invisible, and is ratherinteresting to reach. Two methods can be used to reach the oil filter. It can be reached from the passenger sidewheel well, or it can be reached from the above the engine bay.
I use, and will describe the method for reaching it from above the engine bay.
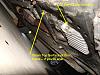
Press your hips against the passenger side fender, near the rear of the engine bay. Reach straight down in the open area between the fuseblock and the engine block, further, until your shoulder is almost hitting theengine. Now reach horizontally as far asyou can, towards the front of the car. With a little exploring, you should find the smooth can of the oilfilter, which extends horizontally out of the engine block towards your legs. Since it’s your garage, you’re free todiscuss your opinion of the Mazda engineer who designed this. I suggest using words of Anglo Saxon origin.
Remove your arm, and place the towel under the filter and asbest possible spread it out starting just forward of the filter and going towardsthe rear of the car. Once the towel’s in place, grasp the filter and twist it counterclockwise. It should loosen relatively easy. You of course will have one that was put on by a former WWF wrestler – sigh. Once it’s unthreaded completely, turn it so that the threaded end (formerly towardsthe engine) is pointed up. This keeps the oil inside the filter from spilling over the engine and the paint as youremove it. Wiggle your way out with thefilter, and place it on the paper towel near the oil pan drain plug.
Take a clean paper towel, and once again reach into theengine bay, and clean the flange around the oil filter. I know you can’t see it. Change the portion of the paper towel you’reusing to wipe the seat the oil filter seals to as you do this. Remove the paper towel, and dispose ofit. You should also feel the threaded pipethe filter screws onto, that you must reach around to clean the seat.
Open the box the oil filter came in, remove the filter, andplace it threaded side up. Open one ofthe oil cans (I know they’re plastic) and dab a bit onto the rubber sealsurrounding the oil filter, just enough to moisten it. Then fill the oil filter with oil, allow thatoil to drain into the filter media, and refill it again. The filter media should soak up most of that oil. Since the filter is already filled with oil, when you start the engine, the filter can supply the engine with oil immediately. Clean as much oil as you can off your rubber gloves. It’s challenging to tighten an oil coated filter. It is not a good thing to dropt he filter. Take the oil filter, and carefully reach into the engine bay. Place it over the threaded stud, and screw the filter on, turning it gently in a clockwise direction. It will start easily, usually. Once the filter stops, turn it a quarter turn more. Theworkshop manual calls for 11 – 13 ft-lbf (that isn’t much force). Remember you will have to remove this filter later. It doesn’t take much force to seal the rubber against the engine block seat. Just for the record, I have no idea how you are supposed to use a torque wrench on an oil filter in this location. In any case, you’ve now replaced the filter.
Yes, this is elementary.
Supplies:
1 long sleeved shirt or sweat shirt you don’t mind gettingoil / grime covered
1 roll of paper towels
1 sheet of newspaper
2 rubber gloves
4 quarts of the oil of your choice
1 oil filter
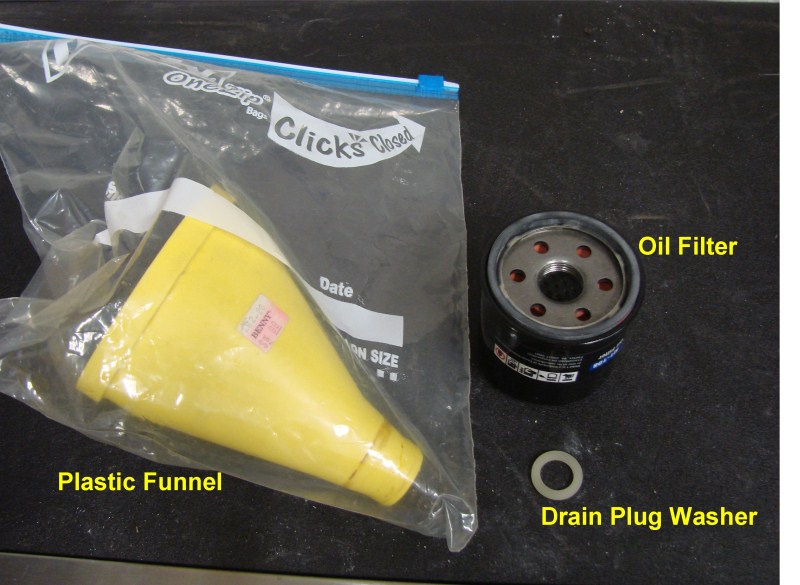
1 replacement oil drain plug washer
You can Google for many intense discussions of brands, oilweights, synthetic vs dino, change intervals, etc. Those are your decision, not mine! Should you wish to discuss that in detail,there is a perpetual discussion of these topics on - Bob is the Oil Guy.
Tools:
Drain plug socket 14mm typically
6” extension
Socket wrench
Waste oil drain pan – at least 6 quart size, and low enough to slide under the car
Carpet or pad to lay on while working (a large sheet of cardboard is good too)
flashlight or drop light
Empty plastic screw top jars (from orange juice or similar) to store the used fluid in
A towel / cotton or paper to place under the filter before it’s removed. NEVER tell your S. O.where the towel went.
Optional: a 0 – 50ft-lbf reading torque wrench
Optional: a plastic funnel that will go into the valve cover opening beneath the valve cover cap(shiny “Mazdaspeed” screw on cover - on my car)
Procedure:
It’s not a bad idea to do this after a car / undercarriagewash. It also aids the oil to drain outcompletely if the engine is slightly warm.
The car is too low for me to work on the underside, so thefirst step is to raise at least the front of the car.

Using the jack to support the car is a major leagueNO-NO. Using any jack or hydraulicallysupported device to support the car while you work under it is a major leagueNO-NO. You want a mechanical supportthat is stable and can be visually verified to be safe while you’re under it.
At a minimum, ramps can be used. You can make ramps from 2 x 12 lumber, borrowfrom a friend, or use store bought ramps. Other devices such as lifts or jack stands, which raise the entire carare easier to work under, again provided there is a mechanical stop to keep thecar from coming down on top of you. Note that jack stands have a relativelynarrow base. It is not difficult to pusha car sideways off jack stands.
As you’ve likely noted, I tend to be very cautious about this. A secondary stop will make you feel much safer. I use stacked firewood. You can also use 6x6 timbers, or almostanything that is strong, economical and will not crack under a sudden impact.Do not use cinder or concrete blocks. They will crack if the car falls on them.
I use ramps, since they’re inexpensive, and easy touse. Simply place the ramps in front ofthe front tires, on the garage / driveway surface, ensure that they’re in linewith the both the front and back wheels, and that the front wheels arestraight. If you have a helper, havethem watch for problems when you drive onto the ramps.
As you climb the ramp, the car will go up rather slowly andthen quickly accelerate on the flat portion of the ramp. Typically, that flat portion is little longerthan the tires contact patch, so it is best to stop the car quickly once you’reon the flat surface. Repairing the car once you drive past the end of the ramp is outside the scope of this procedure. Sorry.
Once your front wheels are on the ramps, put the car inreverse, set the parking brake, and chock the rear wheels. I use split pieces of firewood, manufactured chocks will also work. Again, you want to ensure the car doesn’t come down on top of you.
Now, pull the inside latch, and raise the hood, setting theend of the hood support rod (located just in front of the radiator) in the slotnear the right (as you look at the car) front of the hood.
By the way, while you’re doing this, it’s a good idea tolook for leaks, stains, dirt accumulations, or anything that appearsunusual. If you see something odd,consider discussing it with a mechanic.
Put on the rubber gloves.
Slide the oil drain pan under the front of the car, andplace the carpet / pad as close to the front wheels as you can. Place yourflashlight, socket wrench assembly, and a roll of paper towels on thecarpet. Then lie down on the carpet, onyour back, and slide under the car until you see the stuff in photo 2 aboveyou.
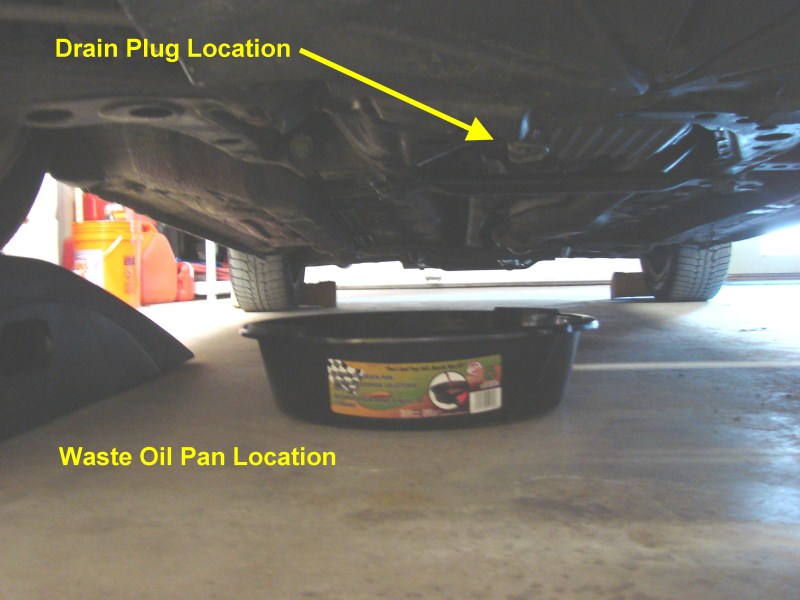
Locate the drain plug, and ensure that the waste oil drainpan is within easy reach (see photo 4). Also ensure that YOU are far enough away from the drain that oil willnot pour onto you. Place the socketwrench onto the oil drain plug and give a quick tug counterclockwise. It should turn slightly and possibly make asnap noise / feel as it breaks free. Remove the socket wrench, and set the drain pan so that the side of the panend nearest car centerline is under the drain. You need to offset the drain pan because the oil will spurt out towardsthe passenger wheel when the plug is removed. Unscrew the plug by hand, holding it in place so the oil doesn’t leakout until the plug is completely free. Try to hold onto the plug firmly while you remove it, otherwise you’llneed to search in the pan for the plug.
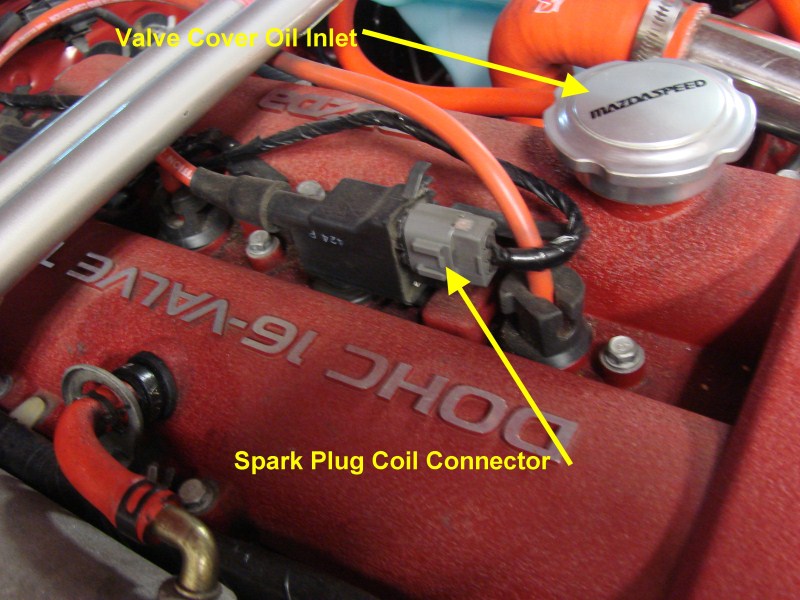
Once the oil is draining, go back to the top of the engineand remove, by hand, the shiny “Mazdaspeed” oil cap at the top and front of thered cam cover (see photo 5). This willaid the oil in draining out of the engine.
Now comes the fun part – changing the oil filter. You may know that this engine was originallydesigned for a front wheel drive car. When the engine was selected for the Miata, the oil filter ended upunder the intake manifold, in a spot that’s nearly invisible, and is ratherinteresting to reach. Two methods can be used to reach the oil filter. It can be reached from the passenger sidewheel well, or it can be reached from the above the engine bay.
I use, and will describe the method for reaching it from above the engine bay.
Press your hips against the passenger side fender, near the rear of the engine bay. Reach straight down in the open area between the fuseblock and the engine block, further, until your shoulder is almost hitting theengine. Now reach horizontally as far asyou can, towards the front of the car. With a little exploring, you should find the smooth can of the oilfilter, which extends horizontally out of the engine block towards your legs. Since it’s your garage, you’re free todiscuss your opinion of the Mazda engineer who designed this. I suggest using words of Anglo Saxon origin.
Remove your arm, and place the towel under the filter and asbest possible spread it out starting just forward of the filter and going towardsthe rear of the car. Once the towel’s in place, grasp the filter and twist it counterclockwise. It should loosen relatively easy. You of course will have one that was put on by a former WWF wrestler – sigh. Once it’s unthreaded completely, turn it so that the threaded end (formerly towardsthe engine) is pointed up. This keeps the oil inside the filter from spilling over the engine and the paint as youremove it. Wiggle your way out with thefilter, and place it on the paper towel near the oil pan drain plug.
Take a clean paper towel, and once again reach into theengine bay, and clean the flange around the oil filter. I know you can’t see it. Change the portion of the paper towel you’reusing to wipe the seat the oil filter seals to as you do this. Remove the paper towel, and dispose ofit. You should also feel the threaded pipethe filter screws onto, that you must reach around to clean the seat.
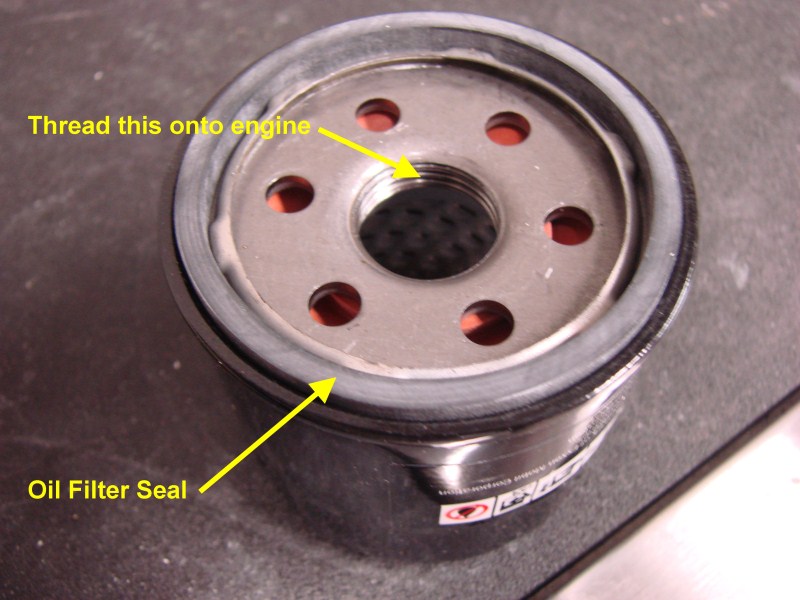
Open the box the oil filter came in, remove the filter, andplace it threaded side up. Open one ofthe oil cans (I know they’re plastic) and dab a bit onto the rubber sealsurrounding the oil filter, just enough to moisten it. Then fill the oil filter with oil, allow thatoil to drain into the filter media, and refill it again. The filter media should soak up most of that oil. Since the filter is already filled with oil, when you start the engine, the filter can supply the engine with oil immediately. Clean as much oil as you can off your rubber gloves. It’s challenging to tighten an oil coated filter. It is not a good thing to dropt he filter. Take the oil filter, and carefully reach into the engine bay. Place it over the threaded stud, and screw the filter on, turning it gently in a clockwise direction. It will start easily, usually. Once the filter stops, turn it a quarter turn more. Theworkshop manual calls for 11 – 13 ft-lbf (that isn’t much force). Remember you will have to remove this filter later. It doesn’t take much force to seal the rubber against the engine block seat. Just for the record, I have no idea how you are supposed to use a torque wrench on an oil filter in this location. In any case, you’ve now replaced the filter.
Last edited by CharlesE; 11-09-2013 at 12:22 PM. Reason: I'm a spelling nazi!! sigh
 11-09-2013, 12:18 PM
#2
MFz Regular
Thread Starter
Join Date: Oct 2013
Location: North Stonington, Connecticut
Posts: 107
Remove the towel you spread out under the filter. You’ll likely have to dispose of it, although it can be cleaned. Again should you chose this option, you might want to do this while others are NOT washing their delicates.
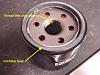
Clean the oil drain plug using the paper towels, both the internal face of the plug and the threads. Replace the washer on the oil drain plug with a new one. If you don’t have one on the plug, take another look at the oil drain, it’s probably stuck on there. You only need one, and you only want ONE. If the oil has stopped draining, go back under the car, with the socket wrench, flashlight, and paper towels. Carefully move the oil drain pan off to the side. Carefully, because it makes a real mess if it spills. Clean off the smoothly machined seat and the threads for the oil drain plug with the paper towels.
Thread the drain plug into the oil pan, again turning it clockwise. Once it reaches its seat,torque the drain plug to 22 to 30 ft-lbf. The drain plug can be reached with a torque wrench, if you have one available, and angle it properly. Should you decide to estimate this, it is easy to tighten the drain, if you have a slight leak. It is a very difficult process to repair a stripped oil drain. Please remember that the oil pan is aluminum. This isn’t a good place to show your strength. Repairing a stripped oil drain requires as step 1 removing the engine!
Carefully taking the waste oil pan with you, slide / crawlout from under the car. Set the waste oil pan aside.
Place the funnel into the valve cover, and slowly pour the oil into the valve cover. After you’ve poured in the first quart, you may wish to verify that you did replace the oil drain plug. Add two additional quarts,then remove the funnel and replace the valve cover cap. The book says that 4.0 US quarts are required for oil and filter replacement. Since some of the oil remains in the engine, I generally add three quarts, then measure to ensure the proper quantity of oil in the engine. Too much is bad, too little is VERY bad.
Pour the waste oil into the screw top plastic containers for proper disposal. Orange juice containers work well. You can use the now empty oil cans, just mark them for disposal.
Pick up all your tools, and put them away. Store the carpet /pad for next time. Carefully lower the hood. Remove the chocks, and drive the car off the ramps onto a level surface. Allow the engine to warm up. Typically I let it run until the water temperature gauge begins to move. Turn the engine off, raise the hood and check the oil level.
You’re done!!

Thread
Thread Starter
Forum
Replies
Last Post