Brap-Brap's (Mis)adventures version 2.0
 10-29-2018, 11:00 AM
#1
MFz Regular
Thread Starter

Join Date: May 2017
Location: Columbus, OH
Posts: 53
I did this to my last NA:
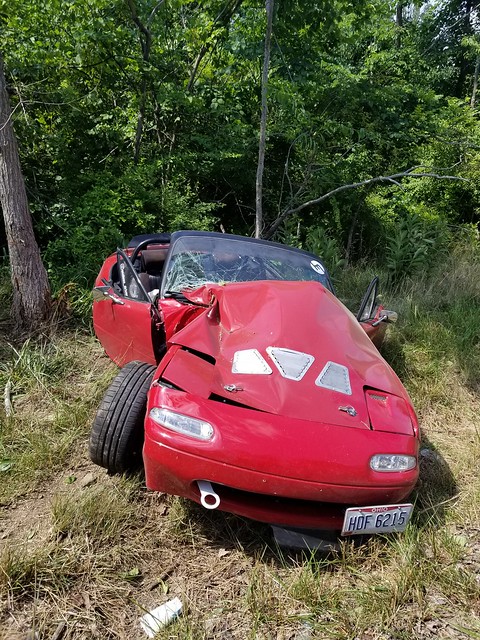
Not gonna do that again.
So I bought another one:
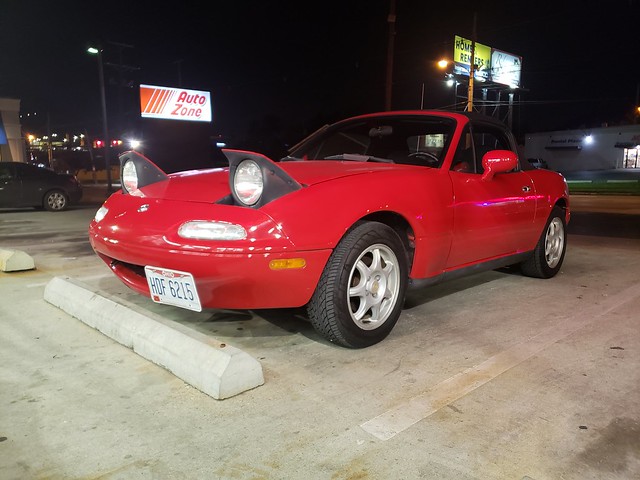
Meet Riley the 97' NA. 77,264 on the ODO when I bought it. 100% bone stock, right down to the factory soft top. AC/PC, power windows, power mirrors and a torsen. AC still works surprisingly. Not a spot of rust on her.
If y'all have seen my first build thread you know how I roll. If not, go read it. "Brap-Brap's Miata (Mis)adventutes"
Time to do it all over again, but better this time.
Not gonna do that again.
So I bought another one:
Meet Riley the 97' NA. 77,264 on the ODO when I bought it. 100% bone stock, right down to the factory soft top. AC/PC, power windows, power mirrors and a torsen. AC still works surprisingly. Not a spot of rust on her.
If y'all have seen my first build thread you know how I roll. If not, go read it. "Brap-Brap's Miata (Mis)adventutes"
Time to do it all over again, but better this time.
 10-30-2018, 08:03 AM
#2
MFz Regular
Thread Starter
Join Date: May 2017
Location: Columbus, OH
Posts: 53
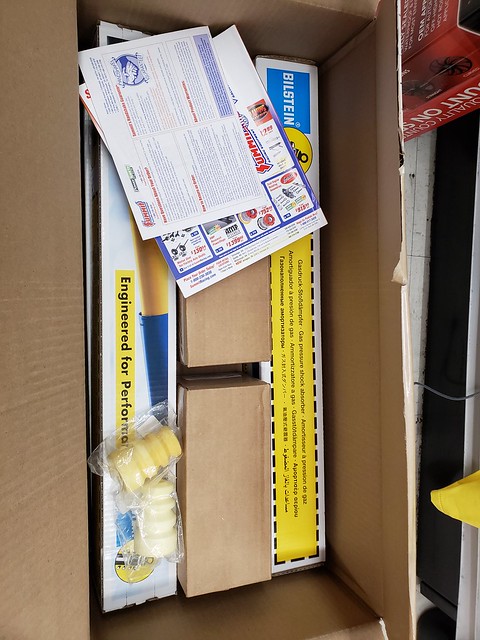
I ordered this stuff from Summit on Saturday night and it arrived Monday afternoon. The perks of being in Ohio.
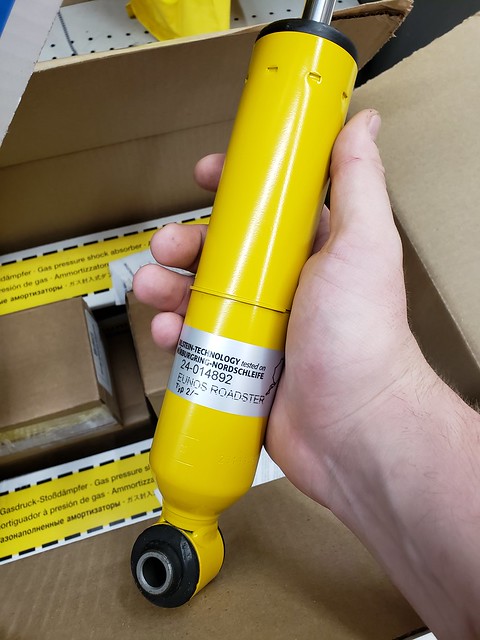
Mmmmmmmm Billies...

Can you figure out what i'm doing yet?
Also, funny thing is the "Summit Racing" branded springs on the website are just QA1 springs with the labels rubbed off.
Plenty more to come this week.
11-06-2018, 07:48 AM
#3
MFz Regular
Thread Starter
Join Date: May 2017
Location: Columbus, OH
Posts: 53
So as it turns out I ordered the wrong Bilsteins. I needed NB B8s, not NA B6s. I didn't realize until I tried to stack up the tophat bushings and the threaded shaft was no where near long enough.

Advanced Autosport coil sleeves.
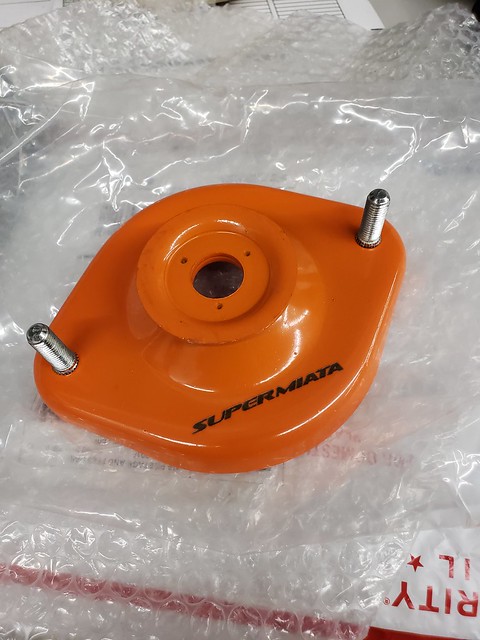
Orange tophats means I have Xidas right?
Fab9 COP kit installed. Seemed to fix my idle dip and issues I had with her breaking up in the higher RPMs.
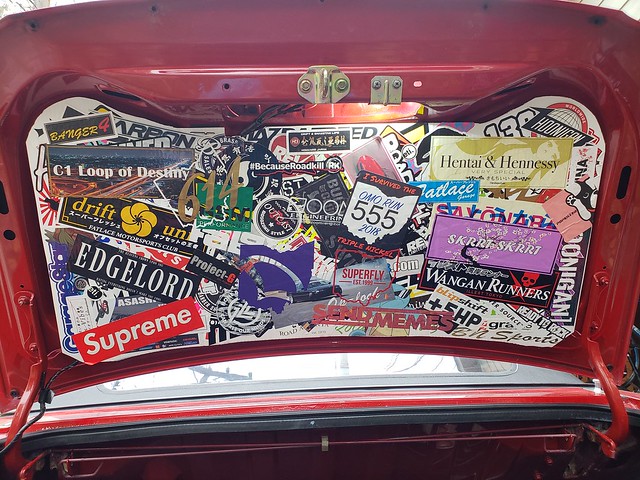
Sticker panel makes a return.
I saw someone on Miata DIY use a 90mm halo LED ring to turn the ring into a driving light. Figured I had a spare set of tails and I would give it a go.

Foil keeps the heat indirect and prevents the coils from burning something.

People complain about these Chinese LED rings breaking and cracking from vibration. So I used some clear silicone to glue them down into the ring. The ring in the lens fits the LED ring perfectly, almost so perfectly I would say you don't even need to glue it.
Running lights

Running lights + Brake lights.

Also put back in my LED headlights. This time I went with Cibie Housings instead of the Hellas. Cutoff and light throw seems a lot better.
And finally the old shell going away.
Moving on from the past.
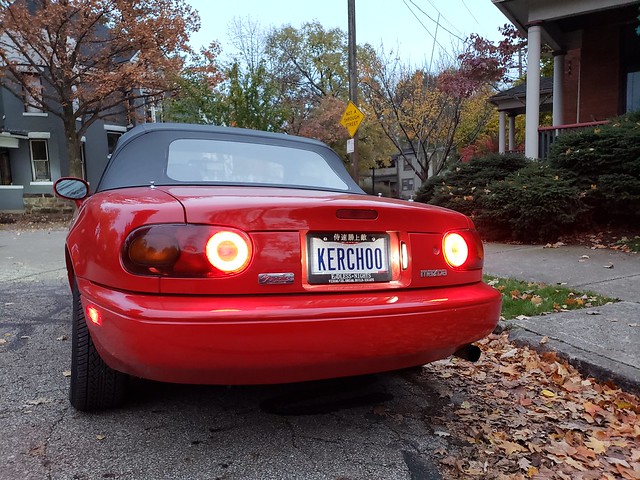
For those wondering about the vanity plate, this is the meme is came from:
Advanced Autosport coil sleeves.
Orange tophats means I have Xidas right?
Fab9 COP kit installed. Seemed to fix my idle dip and issues I had with her breaking up in the higher RPMs.
Sticker panel makes a return.
I saw someone on Miata DIY use a 90mm halo LED ring to turn the ring into a driving light. Figured I had a spare set of tails and I would give it a go.
Foil keeps the heat indirect and prevents the coils from burning something.
People complain about these Chinese LED rings breaking and cracking from vibration. So I used some clear silicone to glue them down into the ring. The ring in the lens fits the LED ring perfectly, almost so perfectly I would say you don't even need to glue it.
Running lights
Running lights + Brake lights.
Also put back in my LED headlights. This time I went with Cibie Housings instead of the Hellas. Cutoff and light throw seems a lot better.
And finally the old shell going away.
Moving on from the past.
For those wondering about the vanity plate, this is the meme is came from:
11-13-2018, 09:22 AM
#4
MFz Regular
Thread Starter
Join Date: May 2017
Location: Columbus, OH
Posts: 53
Took the time to get some quick mods done before I put her away for the winter. Just usual driving/comfort things.
Did a massive foamectamy. I left a 1" piece of foam on the bottom for my tailbone, but otherwise this gets me VERY low. Also adds a ton of lateral support.
A friend gave me a set of headrest speakers so I transplanted them, but the plugs were different. A quick set of spade connectors fixed that. Also allows me to add rear speakers when I want to down the line.
A friend also gave me this Whiteline shock tower brace. I heard they don't do much on these cars, but it looks nice and was free.
Also installed a FM brake master brace. It fits with the Whiteline STB. The brake master brace got rid of my semi-squishy pedal on the street. Braking just feels better all around.
Also (not pictured) I installed Garage Star door bushings. Wow do they make a difference on a stock car. Bumps are more solid clunks and less rattles/shakes. Car just feels overall better.
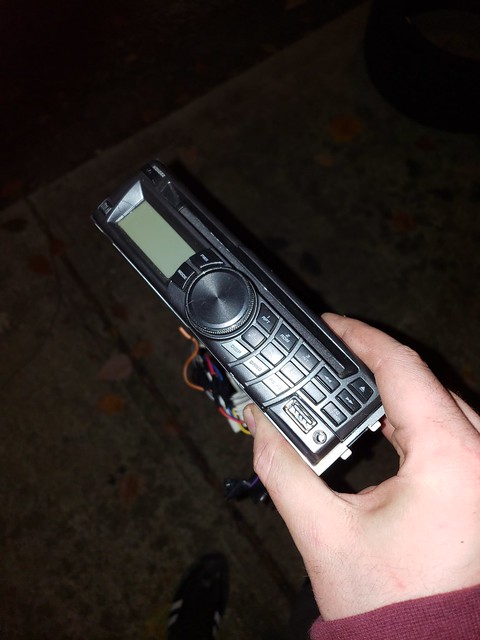
Got rid of the Walmart special radio. Dropped in my Clarion M508 unit I saved from my old car.
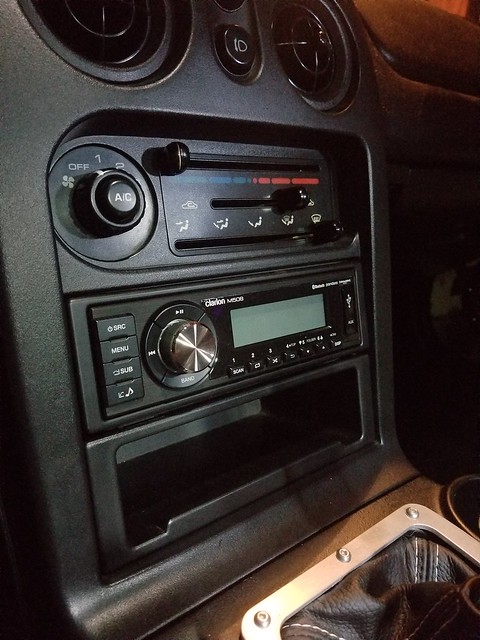
What wonders a new head unit does to the sound of a car.
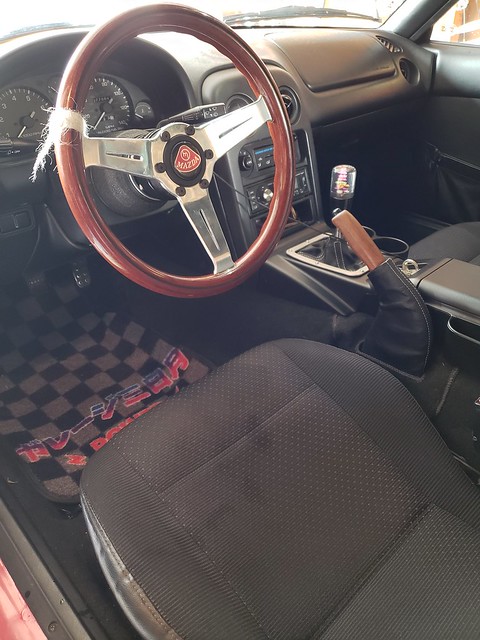
Also ordered a new I.L. center console, polished the shifter like before, re-installed my Redline Leather shift boot, re-installed the trim ring and put back my flower shift ****.
Now I just have to find my damn wooden e-brake handle I made and the interior will be close to done.
Did a massive foamectamy. I left a 1" piece of foam on the bottom for my tailbone, but otherwise this gets me VERY low. Also adds a ton of lateral support.
A friend gave me a set of headrest speakers so I transplanted them, but the plugs were different. A quick set of spade connectors fixed that. Also allows me to add rear speakers when I want to down the line.
A friend also gave me this Whiteline shock tower brace. I heard they don't do much on these cars, but it looks nice and was free.
Also installed a FM brake master brace. It fits with the Whiteline STB. The brake master brace got rid of my semi-squishy pedal on the street. Braking just feels better all around.
Also (not pictured) I installed Garage Star door bushings. Wow do they make a difference on a stock car. Bumps are more solid clunks and less rattles/shakes. Car just feels overall better.
Got rid of the Walmart special radio. Dropped in my Clarion M508 unit I saved from my old car.
What wonders a new head unit does to the sound of a car.
Also ordered a new I.L. center console, polished the shifter like before, re-installed my Redline Leather shift boot, re-installed the trim ring and put back my flower shift ****.
Now I just have to find my damn wooden e-brake handle I made and the interior will be close to done.
11-18-2018, 04:59 PM
#5
MFz Regular
Thread Starter
Join Date: May 2017
Location: Columbus, OH
Posts: 53
I was sitting around on Sunday with no homework. So I said to myself "i'm gonna build my billies today"

So I did.
NB B8 Billies, Advanced Autosport sleeves, FM rear tophats, NB fronts, QA1 550/350 springs. should work nicely.
Interior is coming along nicely as well.
Also, the allure of Fashion keys caught me recently. Unfortunately my wallet hasn't caught up. So like usual I took matters into my own hands.
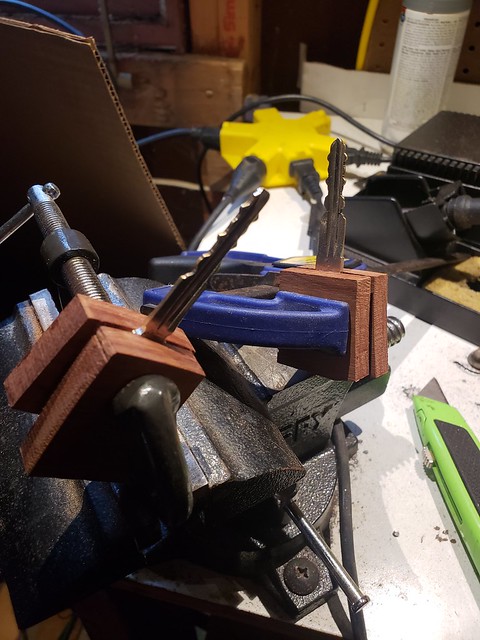
Just a sneak peak into what I have in the pipeline.
So I did.
NB B8 Billies, Advanced Autosport sleeves, FM rear tophats, NB fronts, QA1 550/350 springs. should work nicely.
Interior is coming along nicely as well.
Also, the allure of Fashion keys caught me recently. Unfortunately my wallet hasn't caught up. So like usual I took matters into my own hands.
Just a sneak peak into what I have in the pipeline.
03-10-2019, 08:46 PM
#6
MFz Regular
Thread Starter
Join Date: May 2017
Location: Columbus, OH
Posts: 53
Ladies and Gentlemen I present to you: Fab Week.
I'm on spring break, and have committed myself to getting the car ready for track season.
Below is my to-do list. I have an alignment scheduled for Saturday. Lets see how much I can get done.


There was a puddle underneath her when I went out to the garage. Brake fluid. Clutch master reservoir was bone dry. Oh well, I have new ones anyway.

P.O. Didn't use a washer. Yay, now I can add "Cleaning oil gunk" to my list.
CAS O-ring was also done for. Entire trans bellhousing is caked in oil. Good thing I bought one.
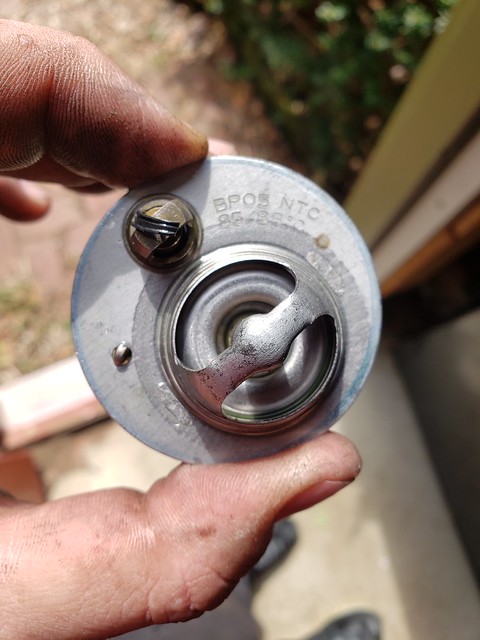
Original T-stat?
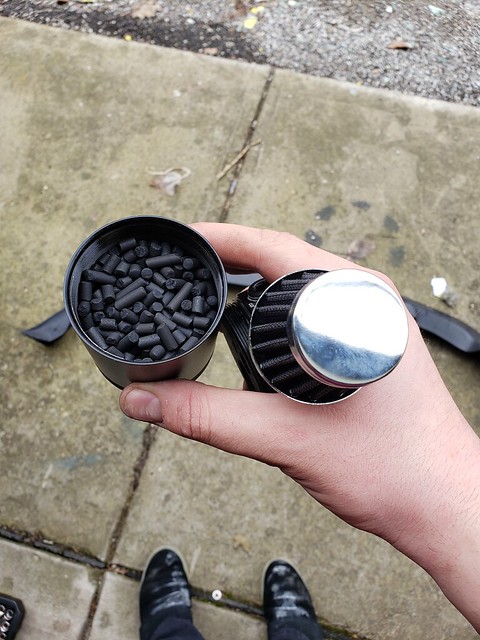
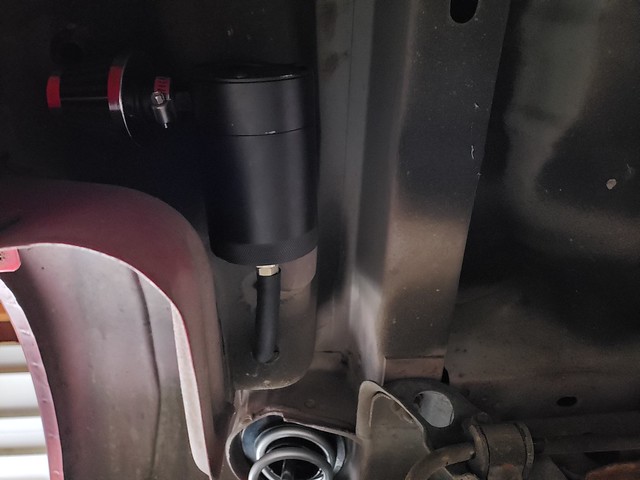
Adam over at RevLimiter posted about making his own charcoal canister to cut down on gas fumes. If you remember I took my old car down to Atlanta in May of last year. I had serious gas fume issues then but chocked it up to just being an old car with less stringent emissions control.
But, seeing as there is a way to fix it I might as well. $20 Mishimoto Compact eBay special catch can, gutted then filled with activated charcoal pellets from the local aquarium store. 3/8 NPT to 5/16 Barb on the bottom is the EVAP in, and a breather filter on top keeps any ingested air clean and tidy. The plan is to mount this under the car and run a hose from the rollover valve to the can.
Belts, radiator, reroute, coolant hoses, etc. The usual for track-duty. The small coolant hoses are made by Vibrant, its this trick rubber lined silicone hose.
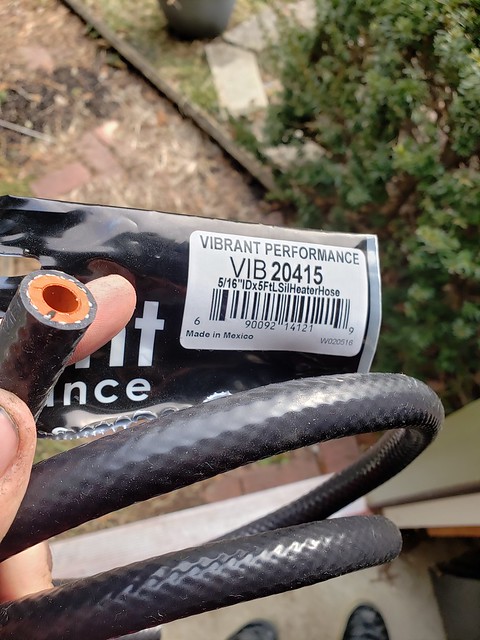
I re-did all the auxiliary coolant hoses with this stuff. Head to oil cooler, etc. 5/16 Fuel Injection hose clamps work great to keep it together.

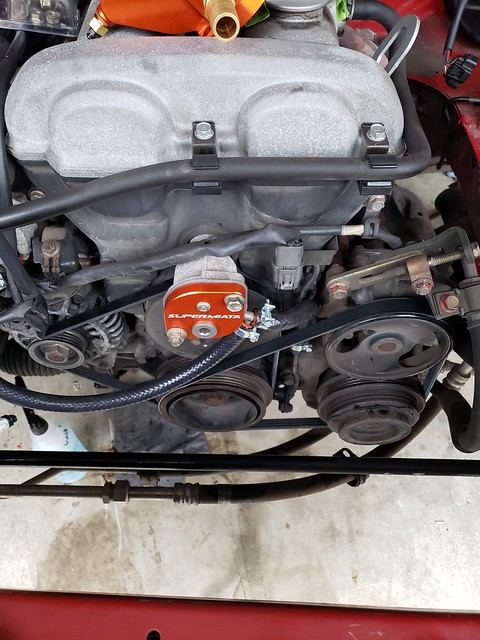
Managed to get this thing in there.

You can see EGR *barely* clears. Its a very tight, well designed piece of kit that works very well.

Found these sick T-bolt clamps on amazon for my heater hoses. I hate gear clamps and spring clamps.
Lets see how far I get tomorrow.
I'm on spring break, and have committed myself to getting the car ready for track season.
Below is my to-do list. I have an alignment scheduled for Saturday. Lets see how much I can get done.
There was a puddle underneath her when I went out to the garage. Brake fluid. Clutch master reservoir was bone dry. Oh well, I have new ones anyway.
P.O. Didn't use a washer. Yay, now I can add "Cleaning oil gunk" to my list.
CAS O-ring was also done for. Entire trans bellhousing is caked in oil. Good thing I bought one.
Original T-stat?
Adam over at RevLimiter posted about making his own charcoal canister to cut down on gas fumes. If you remember I took my old car down to Atlanta in May of last year. I had serious gas fume issues then but chocked it up to just being an old car with less stringent emissions control.
But, seeing as there is a way to fix it I might as well. $20 Mishimoto Compact eBay special catch can, gutted then filled with activated charcoal pellets from the local aquarium store. 3/8 NPT to 5/16 Barb on the bottom is the EVAP in, and a breather filter on top keeps any ingested air clean and tidy. The plan is to mount this under the car and run a hose from the rollover valve to the can.
Belts, radiator, reroute, coolant hoses, etc. The usual for track-duty. The small coolant hoses are made by Vibrant, its this trick rubber lined silicone hose.
I re-did all the auxiliary coolant hoses with this stuff. Head to oil cooler, etc. 5/16 Fuel Injection hose clamps work great to keep it together.
Managed to get this thing in there.
You can see EGR *barely* clears. Its a very tight, well designed piece of kit that works very well.
Found these sick T-bolt clamps on amazon for my heater hoses. I hate gear clamps and spring clamps.
Lets see how far I get tomorrow.
03-17-2019, 09:30 PM
#7
MFz Regular
Thread Starter
Join Date: May 2017
Location: Columbus, OH
Posts: 53
Progress is a slow and cruel mistress. Life also caught me off guard.
New evap can installed. Hose goes through the fuel pump wiring grommet, around, next to the trunk latch cable, down into the jack well and through the forward most body plug. Bolted behind the fender liner to avoid direct spray. Gas fumes should be eliminated for good.
These were a much larger pain to install than expected. New SuperPro bushings are nice, stock rubber ones crumbled in my hand when I removed them.
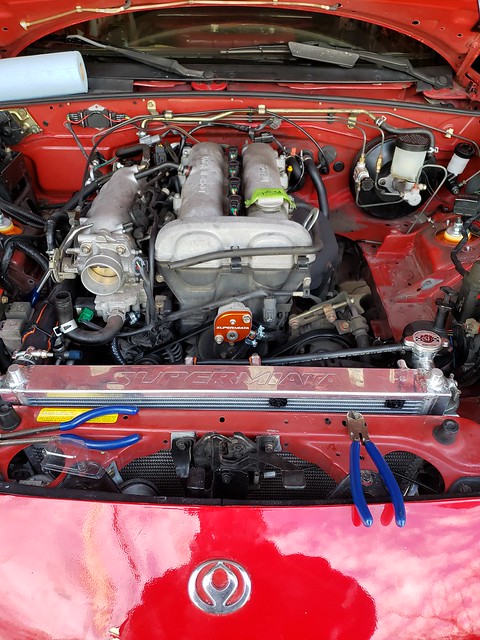
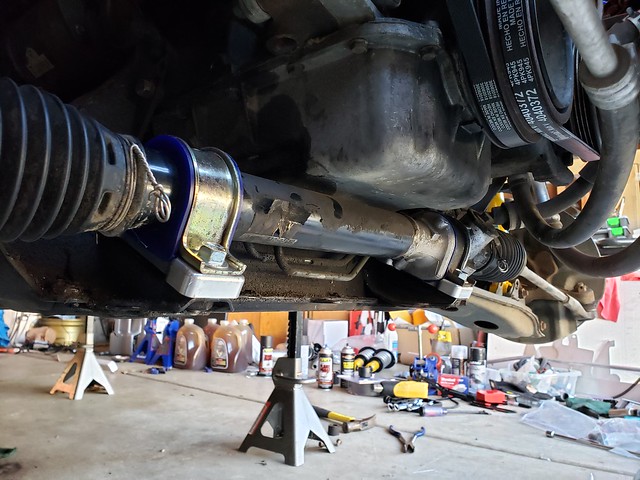
Crossflow rad installed. Also trimmed up the engine bay a bit. Real track-ready stuff.

Centric Premium coated rotors, refreshed calipers, Hawk HPS pads, Techna-fit SS lines, stiff RB front bar, stock rear bar, FM endlinks, and built billies installed. Basically wrapped up the suspension and brakes. I still need to fill them with Motul DOT4 and bleed them. Numbers also came in, and I couldn't resist slapping them on.
Testpipe came out nice. Since its right below the drivers seat I figured some heatwrap would be good. Too bad this pipe is for a 1.6L car... Stupid FB sellers.

These were VERY easy to install. Line up, slap on with a rubber mallet, drill, screw and repeat. Also got the BBFW rollbar in but it was late so no photos.
Unfortunately due to life I couldn't get the car done. She'll be on jackstands for the time being until I can finish it up and tie all the loose ends.
New evap can installed. Hose goes through the fuel pump wiring grommet, around, next to the trunk latch cable, down into the jack well and through the forward most body plug. Bolted behind the fender liner to avoid direct spray. Gas fumes should be eliminated for good.
These were a much larger pain to install than expected. New SuperPro bushings are nice, stock rubber ones crumbled in my hand when I removed them.
Crossflow rad installed. Also trimmed up the engine bay a bit. Real track-ready stuff.
Centric Premium coated rotors, refreshed calipers, Hawk HPS pads, Techna-fit SS lines, stiff RB front bar, stock rear bar, FM endlinks, and built billies installed. Basically wrapped up the suspension and brakes. I still need to fill them with Motul DOT4 and bleed them. Numbers also came in, and I couldn't resist slapping them on.
Testpipe came out nice. Since its right below the drivers seat I figured some heatwrap would be good. Too bad this pipe is for a 1.6L car... Stupid FB sellers.
These were VERY easy to install. Line up, slap on with a rubber mallet, drill, screw and repeat. Also got the BBFW rollbar in but it was late so no photos.
Unfortunately due to life I couldn't get the car done. She'll be on jackstands for the time being until I can finish it up and tie all the loose ends.
04-19-2019, 11:07 AM
#8
MFz Regular
Thread Starter
Join Date: May 2017
Location: Columbus, OH
Posts: 53
Long time no update eh?
 [/url]
Prop valve in. This should be fun to play with.
 [/url]
This is the greatest invention every created. Took less than 10 minutes to bleed all 4 brakes. I also made an adapter for the clutch master out of an old master cyl cap.

Nice pedal set, makes driving a lot easier IMHO.
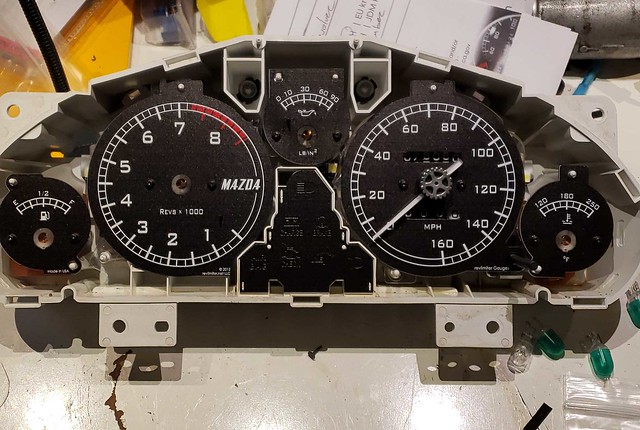

Seatbelt turned Rev icon. Why? I'm wiring in a Bee*R rev limiter box, and I want the icon to light up when its on to let me know I have the rev limit engaged. e-brake will engage a lower rev limit for launch control (4500 RPM or so) and the upper limit will be set however I feel.
 [/url]

Sound mat cuts down on the noise from the rear of the car and the rattle trap that is the parcel shelf panel.

Hood vents in. I love seeing the heat rise out of them at stoplights.
Got her back from the alignment shop. Went with a 949 Dual Duty at 4.00" Pinch height. I tried to set some rake but the springs settled in even. So I had -3* of rear camber with the eccentrics maxed. I jacked the rear back up to 4.5" and it brought my camber back into the -2 region where it should be.

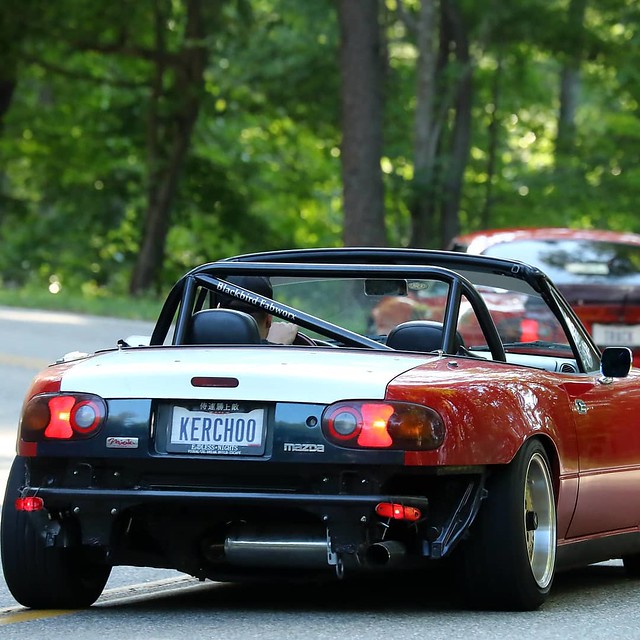
Meeting up with some friends to cruise to Cars and Coffee. The S2K is from my buddy Tim, he's a bodyman at Autobody Specialists here in CBUS. He just finished respraying the car about a week before. There is not a single defect in it.

At C&C Lennox. The MK7 GLI is owned by my friend Frankie. @iamsuperfrankie on insta. The thing puts down 400 to the front wheels.
I signed up for NWOR Auto-X @ TEA on April 28th. We'll see how she performs.
[/url]Prop valve in. This should be fun to play with.
[/url]This is the greatest invention every created. Took less than 10 minutes to bleed all 4 brakes. I also made an adapter for the clutch master out of an old master cyl cap.
Nice pedal set, makes driving a lot easier IMHO.
Seatbelt turned Rev icon. Why? I'm wiring in a Bee*R rev limiter box, and I want the icon to light up when its on to let me know I have the rev limit engaged. e-brake will engage a lower rev limit for launch control (4500 RPM or so) and the upper limit will be set however I feel.
[/url]Sound mat cuts down on the noise from the rear of the car and the rattle trap that is the parcel shelf panel.
Hood vents in. I love seeing the heat rise out of them at stoplights.
Got her back from the alignment shop. Went with a 949 Dual Duty at 4.00" Pinch height. I tried to set some rake but the springs settled in even. So I had -3* of rear camber with the eccentrics maxed. I jacked the rear back up to 4.5" and it brought my camber back into the -2 region where it should be.
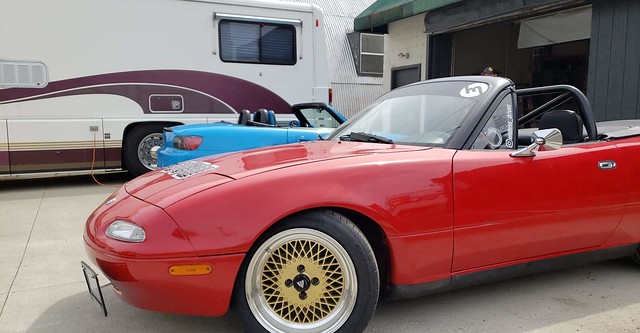
Meeting up with some friends to cruise to Cars and Coffee. The S2K is from my buddy Tim, he's a bodyman at Autobody Specialists here in CBUS. He just finished respraying the car about a week before. There is not a single defect in it.
At C&C Lennox. The MK7 GLI is owned by my friend Frankie. @iamsuperfrankie on insta. The thing puts down 400 to the front wheels.
I signed up for NWOR Auto-X @ TEA on April 28th. We'll see how she performs.
05-03-2019, 10:14 AM
#9
MFz Regular
Thread Starter
Join Date: May 2017
Location: Columbus, OH
Posts: 53
Auto-X was a huge success!
A Mutual friend co-drove my car in TSM (Street tire SSM class special to NWOR) and laid down consistent 62s runs in my car. my best was a 65.007 but I punted 2 cones unfortunately. Up to me to get my driver mod up there now.

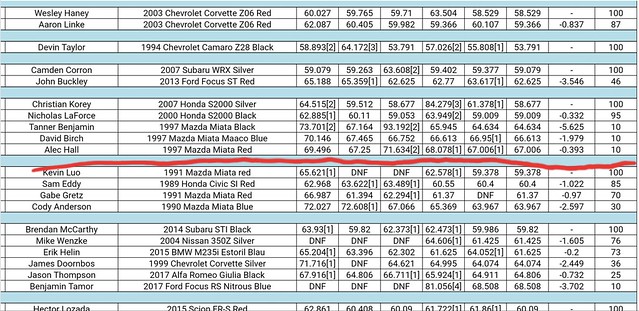

All of us squadded up. All of us are in the Group Ohio Miata Owners. From left to right its Dave Birch (97' in STR), Steven Lynch (ES), Gabe Gretz (STS), Ryan Brown (ES, it was his first event as well), myself, then Bret Horn (He drove his MK6 GTI that day, he's turboing his 91' BRG). Kevin Luo brought his 350z (out of frame to the right) but co-drove Gabe's car that day.
It was an absolute blast. I can't wait until the next event.
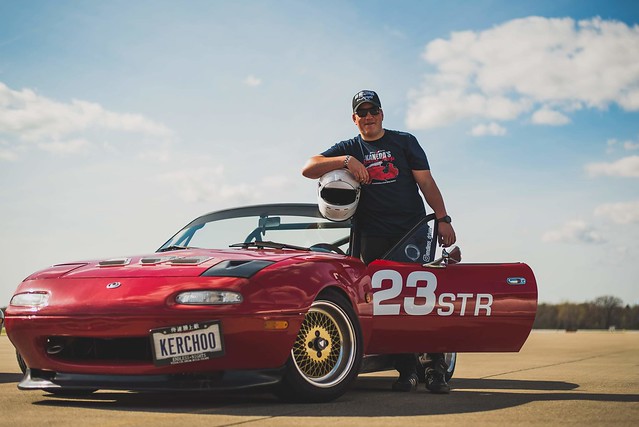
I signed up for a Nelson Ledges track day August 10th, we'll see how she goes.
A Mutual friend co-drove my car in TSM (Street tire SSM class special to NWOR) and laid down consistent 62s runs in my car. my best was a 65.007 but I punted 2 cones unfortunately. Up to me to get my driver mod up there now.
All of us squadded up. All of us are in the Group Ohio Miata Owners. From left to right its Dave Birch (97' in STR), Steven Lynch (ES), Gabe Gretz (STS), Ryan Brown (ES, it was his first event as well), myself, then Bret Horn (He drove his MK6 GTI that day, he's turboing his 91' BRG). Kevin Luo brought his 350z (out of frame to the right) but co-drove Gabe's car that day.
It was an absolute blast. I can't wait until the next event.
I signed up for a Nelson Ledges track day August 10th, we'll see how she goes.
04-26-2020, 12:34 PM
#10
MFz Regular
Thread Starter
Join Date: May 2017
Location: Columbus, OH
Posts: 53
Wow, time flies.*
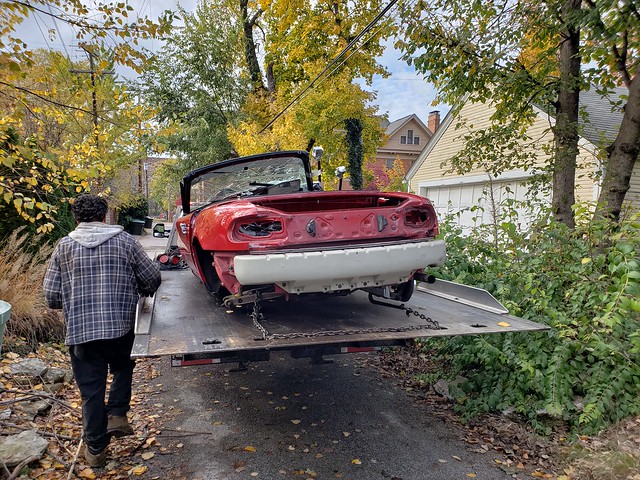
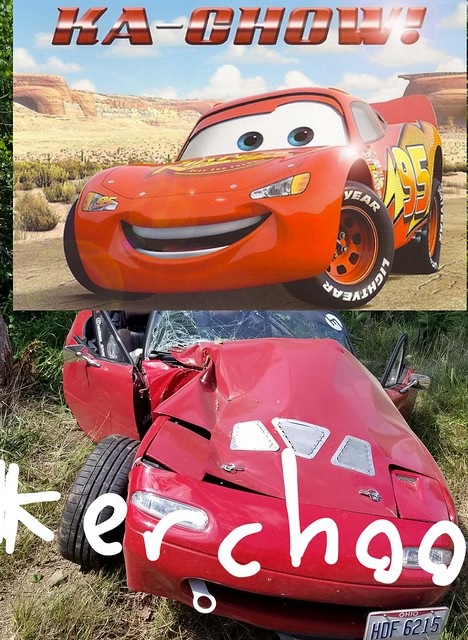
After Auto-X, I had a bit of an oopsie.*
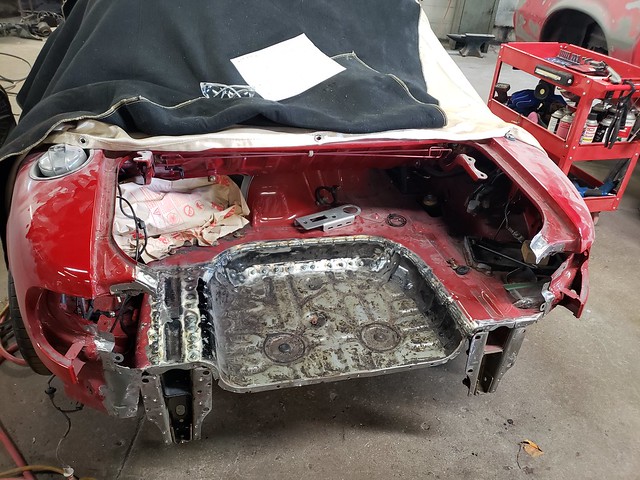
Needed pretty much a new *** end of the car.*
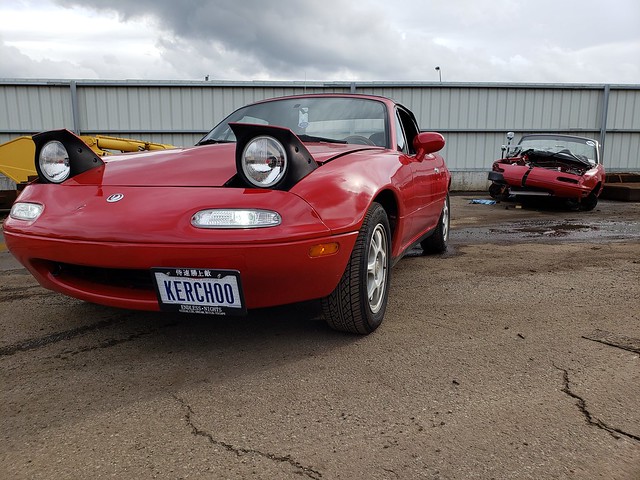
Could have been worse, could have been this:

I took a trip to Colorado, visited the Pikes Peak Museum at the Penrose Heritage Center.*
Came back from Colorado to this:

Couldn't afford a full paint at the time, left in in Harlequin form for a bit.*
Then I went to MATG with some friends.

Then it was time for Nelson Ledges with the boys.*

Here's a video comparison between my friend Dave and myself. Dave has several track days under his belt.*
Here's my footage of the last session of the day:
Take note, the billies are BOUNCY. Like Anime fan service episode bouncy. Also doesn't help that I was so low it was rebounding off the bumpstops 24/7. This will be addressed later.*
Tracking was way better than punting cones or touge ricing lol.*
Then, my dad expressed in interest in going to Radwood Detroit. So we went.

I touched up the back end, gave it a nice Mad Max vibe I guess.*
I decided I hated how it looked. So I put the car away for the winter, up on stands preparing for another spring break refresh.*

Well as it turns out, Corona basically gave me infinite spring break lol. I decided to use the time to round out the car and improve the garage a fair amount. You'll see this later.*
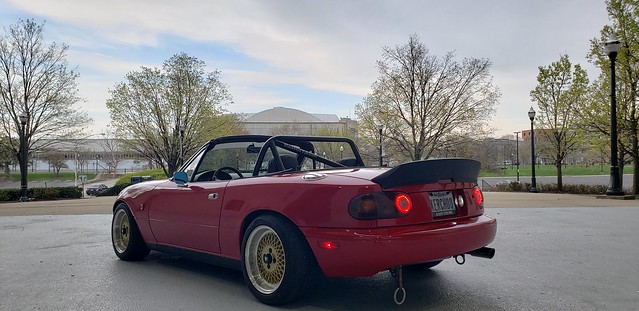
I found a SCREAMING deal on my dream wheels.*

And then I went on a Clout Crusade.*


Wheel woolie on a drill makes quick work of dusty mesh wheels.*
Back to actual car progress.
Step one was to make a space more conducive to actual work. That meant organized storage, lights, accessible power. Wrenching by candlelight was getting old fast.*

Step two was address suspension.
My front sway was much too stiff for what I was using the car for, so I stepped down one level from RB. My FM endlinks were also too long and I hated how the lower rubber bushing bound up. The billies also desperately needed a revalve and some tenders in the front.

Built my own end-links from stuff from QS components. Ended up at like $80 for all 4? Somewhere in that ballpark.*
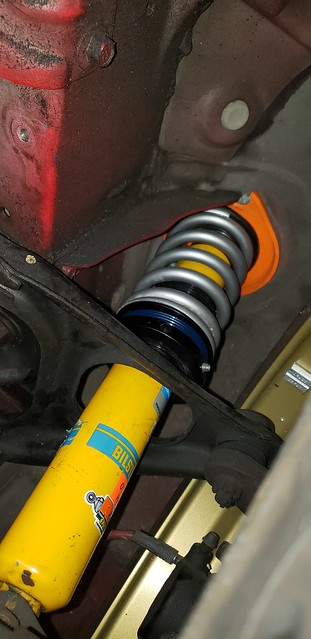
Billies got revalved by RAM engineering in Michigan, and I got some Hyperco 25# tenders. I was checking clearances and such here, but the tenders and guides rattled on the sleeves. I flipped them next time around.*

I had to cut and modify the new links, but everything fit up nicely and worked through the active suspension travel range. It binds at full droop in the front, but I hope to never see that, and it frees up once you compress the suspension a bit.*
Step 3 was get the rear end sorted.*

Bumper cut, get the LED ring tails back together,and then off to paint to match.*
While the panels are getting painted, I needed to finish up some odds and ends on the car. Hopefully make a dent in my parts stash.
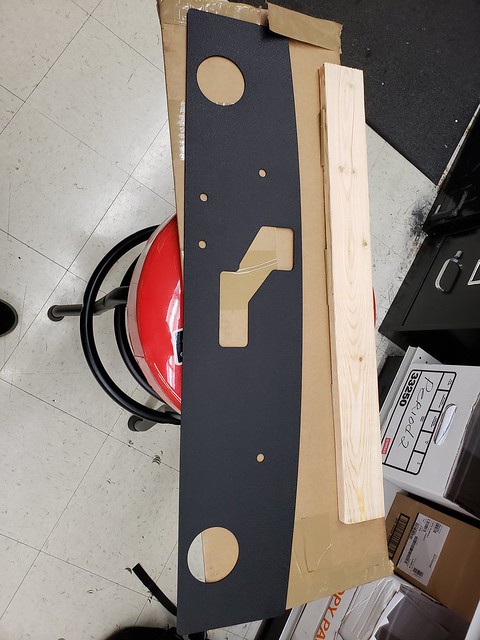
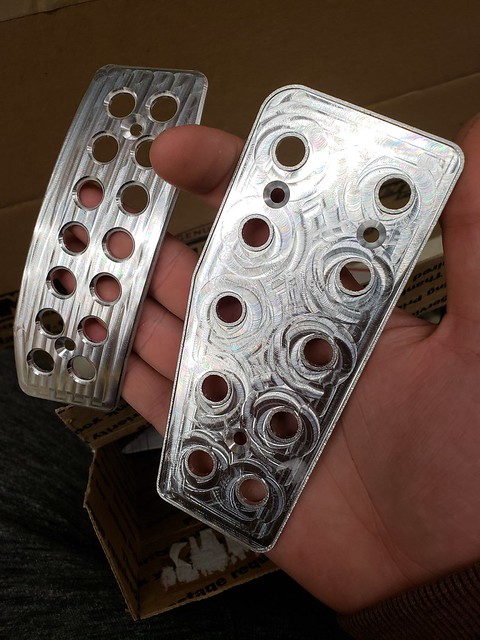
CAD Certified template
Then to metal

Paint and then into the car.


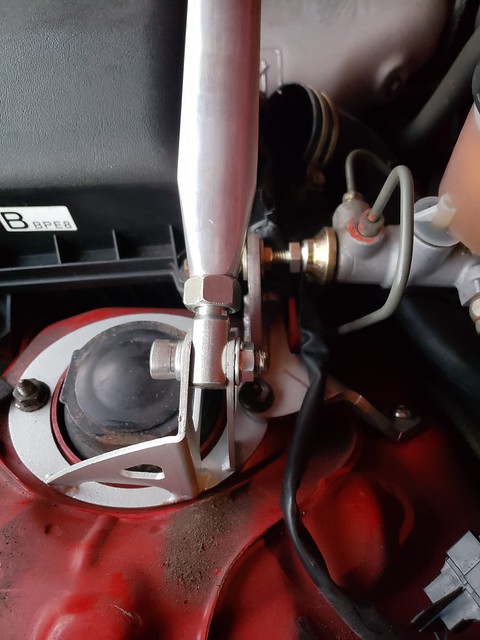
Did one of these Auber gauge things for water temp. On the first test drive though she read 300 when OBD said 195... May need to adjust some things.*
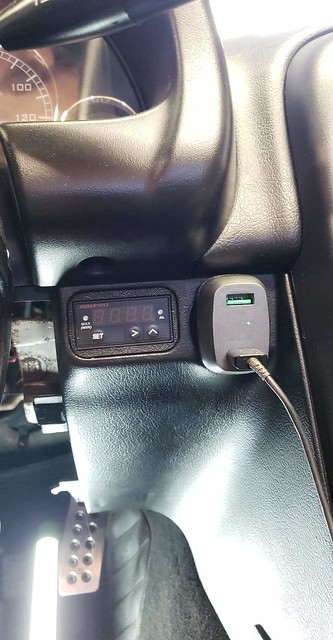

Nice clean look, amber LED color matches gauges and radio.*
I 3D printed the adapter from ABS Plastic.*

The workhorse machine. If built billies are Miata Turbo "Zyduhs" Then I guess this you can call it the Miata Turbo "Proo-suh eye-tree mahk tree"
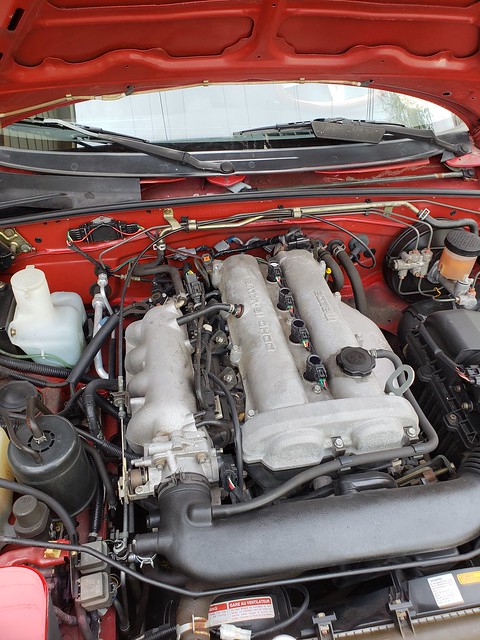
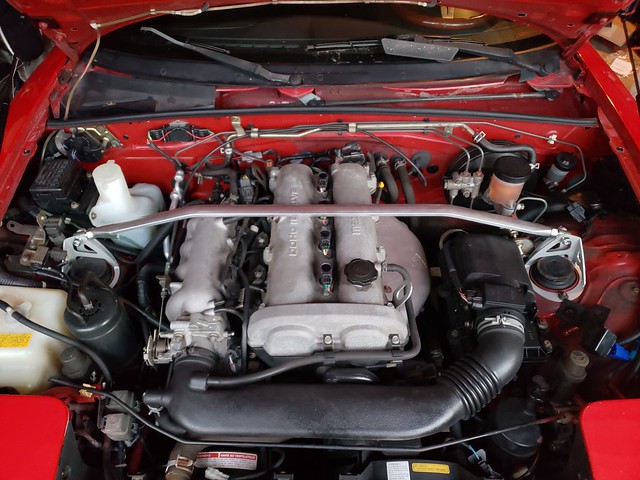
Moved to a Toyota COP setup. Made my own harness from the guide on Miata Turbo. Figured it would be better if I'm tracking to have easily accessed coils and plugs, unlike the Fab9 setup.*

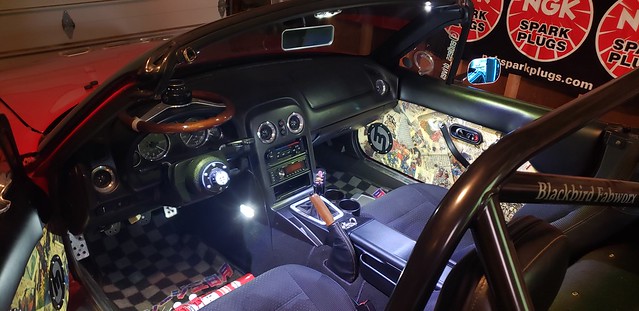
I needed more interior lighting. So I went to LEDs in the visor plates and knee lights in the dash plates.*
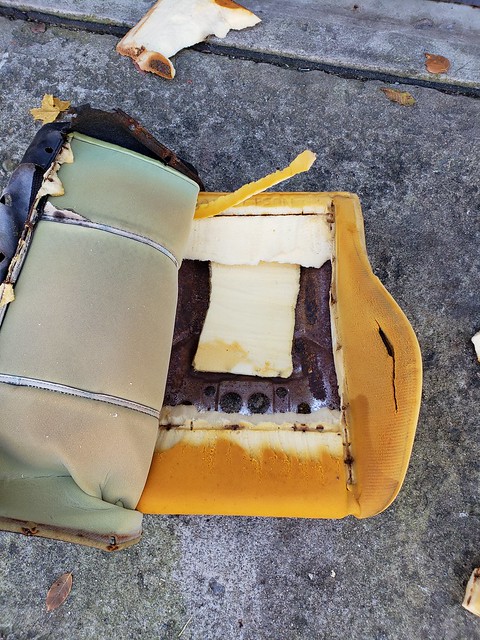
Next step was making the car a bit more plush. Vibration Dampening, MLV.*
If you remember I did this on the finish panel last year, but this time I did the rest of the interior, door skins, deck lid and trunk.
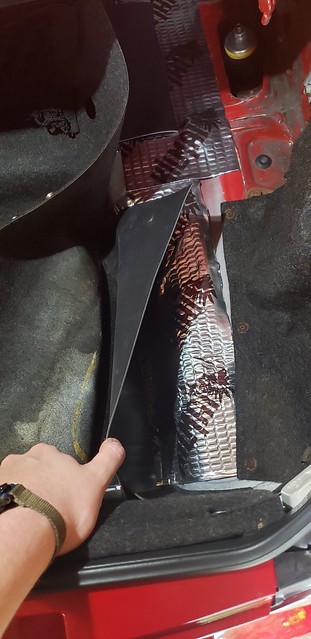
This is the trunk, but same idea applies to the rest of the car. Tap the panel to see how it rings, apply mat until you get a dead thump. Then lay down the MLV over the whole thing.*
I also added acoustic foam to the tunnels under the parcel panel just in front of the rear shock mounts. I swapped my jank Pioneer 4 way speakers for some nice Kicker 2 ways. This also let me take the spacers off my speaker grills and run them flush to the door card. I was tired of catching my shoes on them lol.*

Almost there.*

Polished and ceramic coated my glass. Makes a huge difference.*


I'm happy with it. Also a good throwback to when I took similar photos with my first Miata.*
Coming Soon:*


VTEC Time.*
After Auto-X, I had a bit of an oopsie.*
Needed pretty much a new *** end of the car.*
Could have been worse, could have been this:
I took a trip to Colorado, visited the Pikes Peak Museum at the Penrose Heritage Center.*
Came back from Colorado to this:
Couldn't afford a full paint at the time, left in in Harlequin form for a bit.*
Then I went to MATG with some friends.
Then it was time for Nelson Ledges with the boys.*
Here's a video comparison between my friend Dave and myself. Dave has several track days under his belt.*
Here's my footage of the last session of the day:
Take note, the billies are BOUNCY. Like Anime fan service episode bouncy. Also doesn't help that I was so low it was rebounding off the bumpstops 24/7. This will be addressed later.*
Tracking was way better than punting cones or touge ricing lol.*
Then, my dad expressed in interest in going to Radwood Detroit. So we went.
I touched up the back end, gave it a nice Mad Max vibe I guess.*
I decided I hated how it looked. So I put the car away for the winter, up on stands preparing for another spring break refresh.*
Well as it turns out, Corona basically gave me infinite spring break lol. I decided to use the time to round out the car and improve the garage a fair amount. You'll see this later.*
I found a SCREAMING deal on my dream wheels.*
And then I went on a Clout Crusade.*
Wheel woolie on a drill makes quick work of dusty mesh wheels.*
Back to actual car progress.
Step one was to make a space more conducive to actual work. That meant organized storage, lights, accessible power. Wrenching by candlelight was getting old fast.*
Step two was address suspension.
My front sway was much too stiff for what I was using the car for, so I stepped down one level from RB. My FM endlinks were also too long and I hated how the lower rubber bushing bound up. The billies also desperately needed a revalve and some tenders in the front.
Built my own end-links from stuff from QS components. Ended up at like $80 for all 4? Somewhere in that ballpark.*
Billies got revalved by RAM engineering in Michigan, and I got some Hyperco 25# tenders. I was checking clearances and such here, but the tenders and guides rattled on the sleeves. I flipped them next time around.*
I had to cut and modify the new links, but everything fit up nicely and worked through the active suspension travel range. It binds at full droop in the front, but I hope to never see that, and it frees up once you compress the suspension a bit.*
Step 3 was get the rear end sorted.*
Bumper cut, get the LED ring tails back together,and then off to paint to match.*
While the panels are getting painted, I needed to finish up some odds and ends on the car. Hopefully make a dent in my parts stash.
CAD Certified template
Then to metal
Paint and then into the car.
Did one of these Auber gauge things for water temp. On the first test drive though she read 300 when OBD said 195... May need to adjust some things.*
Nice clean look, amber LED color matches gauges and radio.*
I 3D printed the adapter from ABS Plastic.*
The workhorse machine. If built billies are Miata Turbo "Zyduhs" Then I guess this you can call it the Miata Turbo "Proo-suh eye-tree mahk tree"
Moved to a Toyota COP setup. Made my own harness from the guide on Miata Turbo. Figured it would be better if I'm tracking to have easily accessed coils and plugs, unlike the Fab9 setup.*
I needed more interior lighting. So I went to LEDs in the visor plates and knee lights in the dash plates.*
Next step was making the car a bit more plush. Vibration Dampening, MLV.*
If you remember I did this on the finish panel last year, but this time I did the rest of the interior, door skins, deck lid and trunk.
This is the trunk, but same idea applies to the rest of the car. Tap the panel to see how it rings, apply mat until you get a dead thump. Then lay down the MLV over the whole thing.*
I also added acoustic foam to the tunnels under the parcel panel just in front of the rear shock mounts. I swapped my jank Pioneer 4 way speakers for some nice Kicker 2 ways. This also let me take the spacers off my speaker grills and run them flush to the door card. I was tired of catching my shoes on them lol.*
Almost there.*
Polished and ceramic coated my glass. Makes a huge difference.*
I'm happy with it. Also a good throwback to when I took similar photos with my first Miata.*
Coming Soon:*
VTEC Time.*