Brap-Brap's Miata (Mis)Adventures
 07-09-2017, 07:17 AM
#1
MFz Regular
Thread Starter

Join Date: May 2017
Location: Columbus, OH
Posts: 53
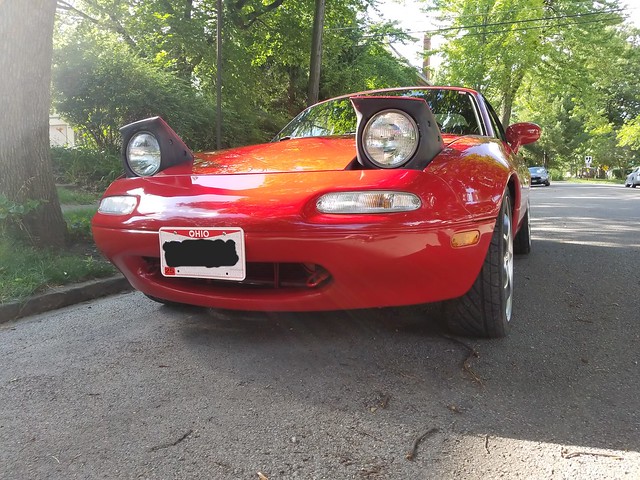
Hey guys, this is the build thread of my Daily Driver 97'.
But first a little story. The earliest memory I have is when I was 7 years old and my dad took me to the grocery store and as we were walking in the parking lot I saw a little red NA and I was transfixed by it, and the driver saw me as a little kid just staring at it and he winked the headlights for me. I was smitten and I vowed myself to own one of these cars one day. And now I do.
Purchased 5-20-2017 I present: Molly the Miata.
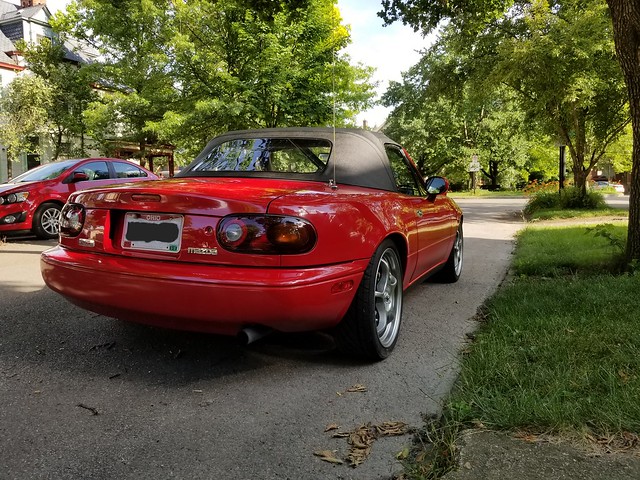
She came with Ground Control's, Eibach Springs and Sway Bars, Racing Beat end links, a Bosal Exhaust, a Hard Dog DD roll bar, an Autozone special CAI, 17x7 ASA's wrapped in Yokohama Parada's and a whole list of problems.
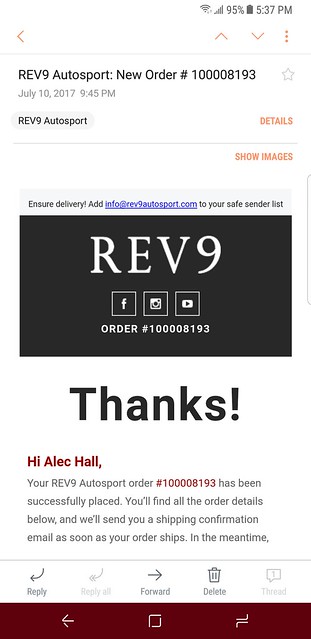
The night I brought the car home I was instantly signed up for all of the forums and I stayed up until some insane hour going through every aftermarket retailer for the Miata. The prices for some things made me cringe (I'm looking at you Rev9 lol) but others encouraged me that I made the right choice for my first car. After I saw how much some things went for I committed myself to making as much as reasonably possible for my car.
But I needed to start somewhere so off to my local Harbor Freight.
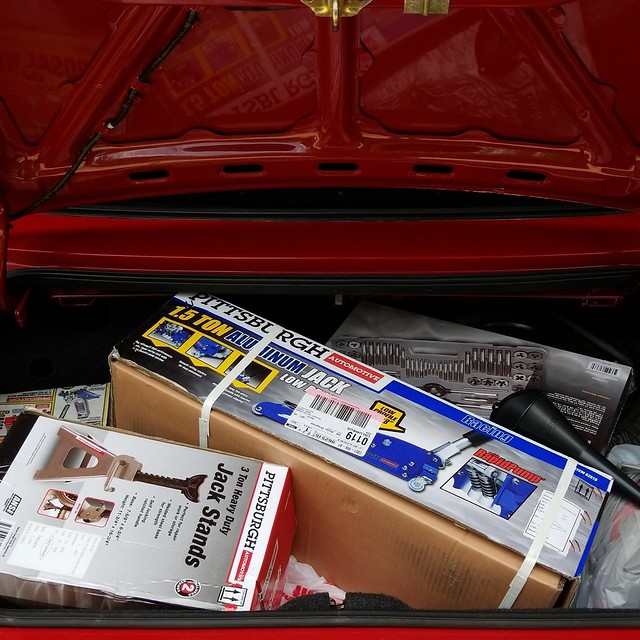
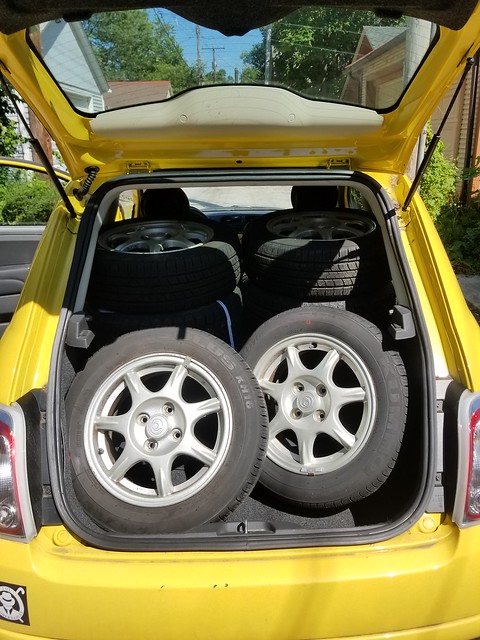
Miata trunks are deceptively big...
With the appropriate tools acquired I started the process of base-lining the car. First came oil and a filter, spark plugs and a few other things.
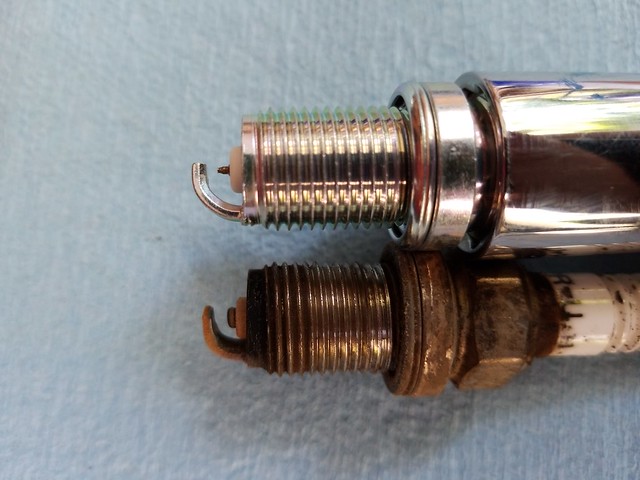
She desperately needed plugs...
Then as i'm 6'2" 250LBS I set about making the car more comfortable for me.

I removed the armrest to get more room and then I sacrificed an old leather belt for a pull handle. I got the holes by beveling the outside of a 1/2 inch copper pipe until it was sharp and then using it as a leather punch of sorts.
Next came a foamectamy for both seats, for the passenger side I just removed the extra part at the bottom and left the back untouched, but for the driver's seat went crazy. Underside piece gone, trimming of topside cushions, shaving of the side bolsters all around, removal of back piece. My head was level with the roll bar but now it's 2 inches below.
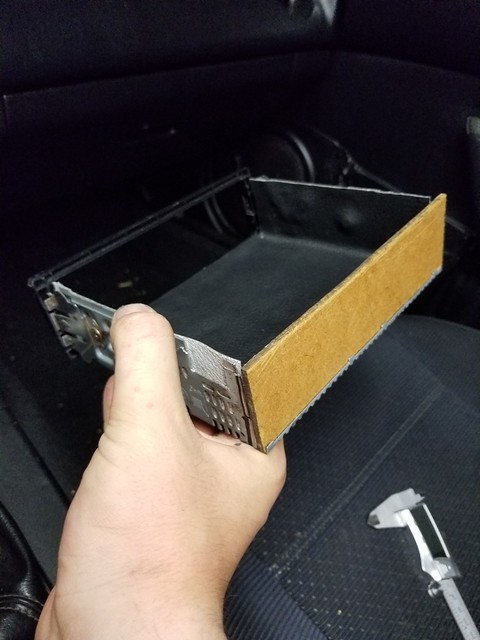
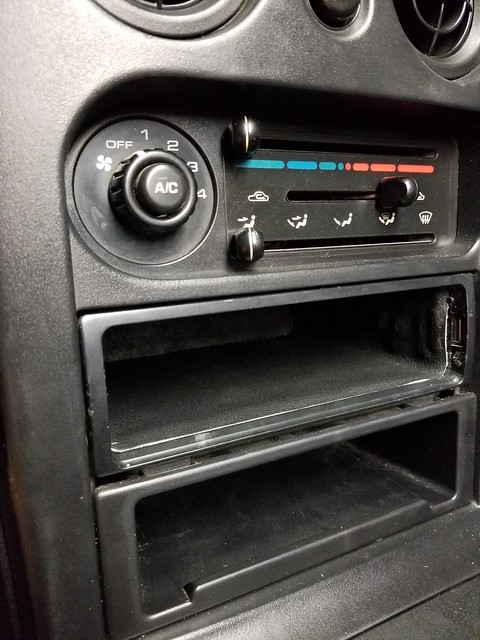
Another issue I had was storage. The car came with some ancient Sony radio with a CD player but it didn't work, so I modded it a bit.

Leather came from an old VW seat my neighbor had sitting out back by the dumpster.
I'm not gonna say it's good as it still looks a little crummy in person but everyone who rides with me says it looks factory. But my perfectionist attitude I have developed with this car doesn't think so.
Next came my obsession with old-school. Wood, leather, chrome, raw metal. I've always loved to look back, listening to Jazz music and appreciating the certain aesthetic the past has.
It also didn't help that around this time I found RevLimiter.net...
Adam if you're reading this I just wanna say you are a huge inspiration to me and i've spent too much time pouring over your Sharka posts. Also prepare to get literally all of my money.
Whatever. A wooden e-brake handle was my next task:
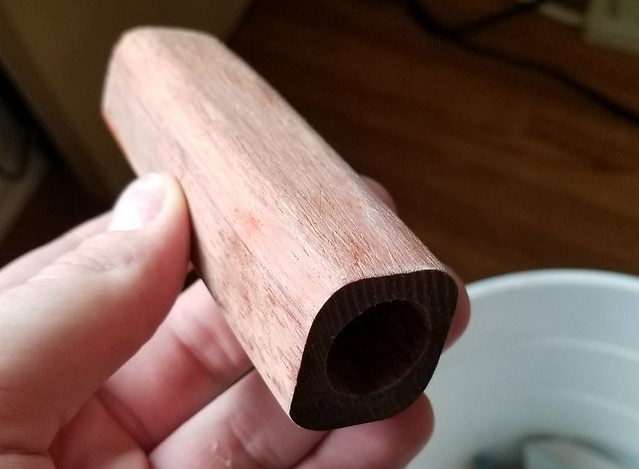
Started as square stock that I filed off the edges. Then my neighbor (Same one who threw out the VW seat) who is a professional wood worker showed me that If you mount it up on a dowel in a vice you can get way more pressure and remove material way easier.

After a couple hours. This is before finishing with beeswax. I went all they from 80 grit to 5000 grit norton pad (similar to scotch brite but goes way finer)
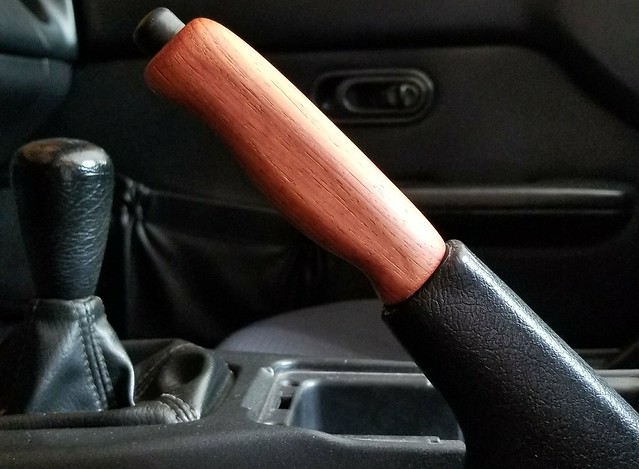
Personally I hate the "Mile of glass" super shiny almost epoxy-coated look Nardi and other wooden parts have. I prefer a matte, more soft finish to my wood pieces. Just feels nicer in the hand.
I'm on vacation right now, and the night before I leave i'm going to be buying a whole ton of parts. Until next time.
Also F-U Photobucket for removing 3rd party hosting. This thread would have gone up a week sooner if you didn't screw literally the entire forum-using section of the internet.
But first a little story. The earliest memory I have is when I was 7 years old and my dad took me to the grocery store and as we were walking in the parking lot I saw a little red NA and I was transfixed by it, and the driver saw me as a little kid just staring at it and he winked the headlights for me. I was smitten and I vowed myself to own one of these cars one day. And now I do.
Purchased 5-20-2017 I present: Molly the Miata.
She came with Ground Control's, Eibach Springs and Sway Bars, Racing Beat end links, a Bosal Exhaust, a Hard Dog DD roll bar, an Autozone special CAI, 17x7 ASA's wrapped in Yokohama Parada's and a whole list of problems.
The night I brought the car home I was instantly signed up for all of the forums and I stayed up until some insane hour going through every aftermarket retailer for the Miata. The prices for some things made me cringe (I'm looking at you Rev9 lol) but others encouraged me that I made the right choice for my first car. After I saw how much some things went for I committed myself to making as much as reasonably possible for my car.
But I needed to start somewhere so off to my local Harbor Freight.
Miata trunks are deceptively big...
With the appropriate tools acquired I started the process of base-lining the car. First came oil and a filter, spark plugs and a few other things.
She desperately needed plugs...
Then as i'm 6'2" 250LBS I set about making the car more comfortable for me.
I removed the armrest to get more room and then I sacrificed an old leather belt for a pull handle. I got the holes by beveling the outside of a 1/2 inch copper pipe until it was sharp and then using it as a leather punch of sorts.
Next came a foamectamy for both seats, for the passenger side I just removed the extra part at the bottom and left the back untouched, but for the driver's seat went crazy. Underside piece gone, trimming of topside cushions, shaving of the side bolsters all around, removal of back piece. My head was level with the roll bar but now it's 2 inches below.
Another issue I had was storage. The car came with some ancient Sony radio with a CD player but it didn't work, so I modded it a bit.
Leather came from an old VW seat my neighbor had sitting out back by the dumpster.
I'm not gonna say it's good as it still looks a little crummy in person but everyone who rides with me says it looks factory. But my perfectionist attitude I have developed with this car doesn't think so.
Next came my obsession with old-school. Wood, leather, chrome, raw metal. I've always loved to look back, listening to Jazz music and appreciating the certain aesthetic the past has.
It also didn't help that around this time I found RevLimiter.net...
Adam if you're reading this I just wanna say you are a huge inspiration to me and i've spent too much time pouring over your Sharka posts. Also prepare to get literally all of my money.
Whatever. A wooden e-brake handle was my next task:
Started as square stock that I filed off the edges. Then my neighbor (Same one who threw out the VW seat) who is a professional wood worker showed me that If you mount it up on a dowel in a vice you can get way more pressure and remove material way easier.
After a couple hours. This is before finishing with beeswax. I went all they from 80 grit to 5000 grit norton pad (similar to scotch brite but goes way finer)
Personally I hate the "Mile of glass" super shiny almost epoxy-coated look Nardi and other wooden parts have. I prefer a matte, more soft finish to my wood pieces. Just feels nicer in the hand.
I'm on vacation right now, and the night before I leave i'm going to be buying a whole ton of parts. Until next time.
Also F-U Photobucket for removing 3rd party hosting. This thread would have gone up a week sooner if you didn't screw literally the entire forum-using section of the internet.

 07-12-2017, 02:49 PM
#3
MFz Regular
Thread Starter
Join Date: May 2017
Location: Columbus, OH
Posts: 53
More madness:

Not pictured is the cheddar I sent over to Adam at RevLimiter, Garage Star and LRB Speed. And a massive order from Amazon for some supplies for custom modding. I've got a ton of stuff ahead of me...
Not pictured is the cheddar I sent over to Adam at RevLimiter, Garage Star and LRB Speed. And a massive order from Amazon for some supplies for custom modding. I've got a ton of stuff ahead of me...
07-21-2017, 08:32 PM
#4
MFz Regular
Thread Starter
Join Date: May 2017
Location: Columbus, OH
Posts: 53
SUPER MEGA UPDATE TIME!!!!!
So every part is in except the LRB Speed Undertray I ordered... I've been sitting on them for a while but i've been too lazy to install anything until recently.
First things first I did the seat rail mod to the passenger side. It drops it 2 inches and I did this just to ensure anyone who rides with me will be safe and well below the roll bar. I didn't do it to the driver's seat as it moves it too far forward and that would put my knees into the dash.

You can see the difference in the forward/ backward position here. It doesn't change how much the passenger seat can move though, as I have a 97' and so there was a travel stop anyway to prevent you from crushing the ECU. The mod retains this only the rails stops at the mounting bolt instead of a travel limiter.
To remove these two rail brackets took a spot weld cutter, an angle grinder, a cold chisel and lots and lots of swearing. If you do this I recomend getting the biggest spot weld cutter you can find. The 3/8 Harbor Freight one I was using just barely cut the weld and to get it to fully break I had to go at it with the chisel. 1/2 inch should be just the right size.
I then got some 2 inch wide steel stock from Lowe's and made some 2x2 plates to put under the floor pan to ensure everything was nice and strong.
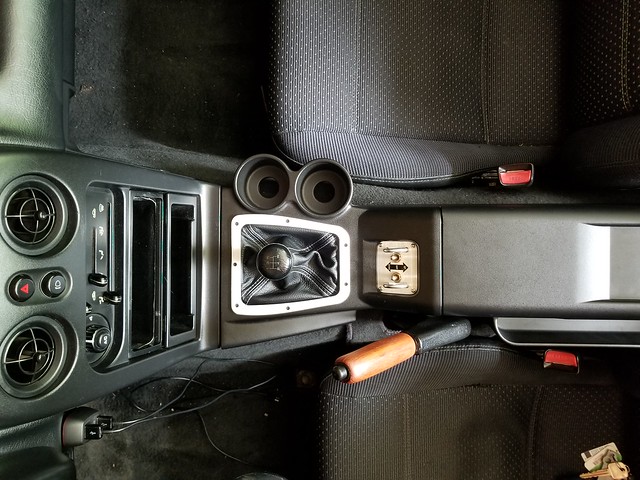
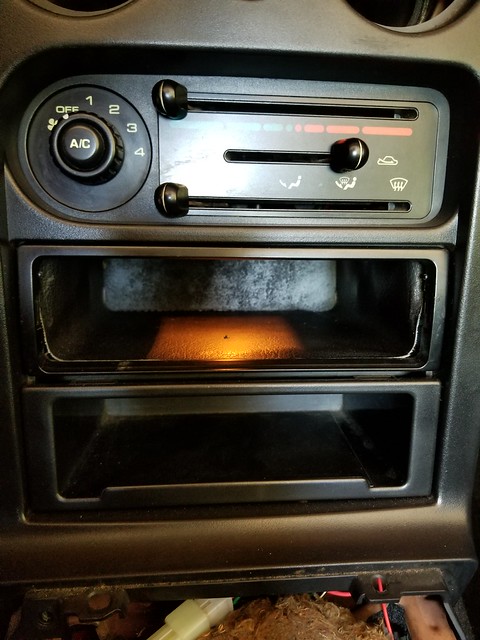
Next step after I had the interior back together again was my new I.L. Motorsports center console and various other bits I got.
Now for being $300 the I.L. Console is pretty shitty actually...
That's a horrible surface finish on a part that is just FRP... It looks like they did a simultaneous fiber media injection with the molten nylon, and those bubbles indicate they didn't pre-mix the fiber and plastic and the mold was too cold... Not good attention to detail here. Also notice the fade of surface finish... They applied the texture after but it looks like by hand and a really rushed job as some things look horrible on the sides...
The tolerances are absolutely horrible too. To get the locking mechanism to work smoothly and line up with the hole I had to space it up on 1mm worth of washers and use little rubber o-rings from RC Car shocks to allow me to move the lock cylinder into place but still tighten it down properly. The screws went in VERY tightly, so tight I was afraid I was going to strip or break something just putting them in. Once they were down they moved the lock out of place, requiring the rubber o-rings to allow me to position the lock.
THEN even with the lock working smoothly without the lid, once I put the lid on I had more issues. It wouldn't lock without me pressing the thing down and the culprit were these rubber bumpers. I had to shave 2mm off them but now I have buttery smooth lock action and the plastic lock cover lines up perfectly dead center with the hole.
I got a new leather shift boot from Red Line leather goods but the stock boot holder has some issues with the console again. I had to trim this corner to fit next to the cupholders.
Also gotta trim the wire clips off it.

And because the window switch it RIGHT behind the shifter and at a shallower angle than stock the window switch has less room than before. My RevLimiter window switch required a bit of cable management to fit but luckily Adam uses super thick and surprisingly supple wire so I was able to bend them a bit to fit.
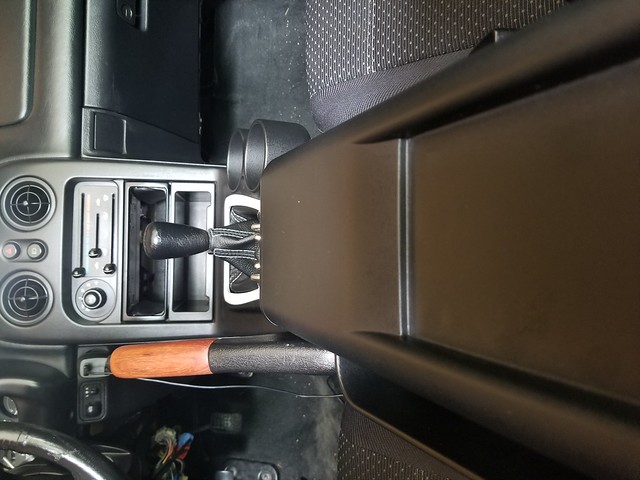
Final Result.
My final verdict on the I.L. Console is that it's "Meh". The cupholders are very nice and fit 2 Starbucks grande sized cups perfectly, but the quality, finish and function is not worth $300. The hinge is built into the lid so it has a weird opening geometry and the travel is not limited like stock. Also there is no hole for the ashtray light. The stock CC had very robust hinges, a travel limiter and just feels more sturdy. That being said this thing is COMPHY. The arm rest is higher and longer so it actually supports your arm, and the window switch is in a much better position than before, you don't have to shift your arm as much. If it was $200 It would be reasonable but $300 is just too much for something like this.
The trim ring is a Garage Star unit, I didn't want to drill into a $300 CC so I filed the screws flush with the bottom and i'm gonna attach the ring with some double sided tape.
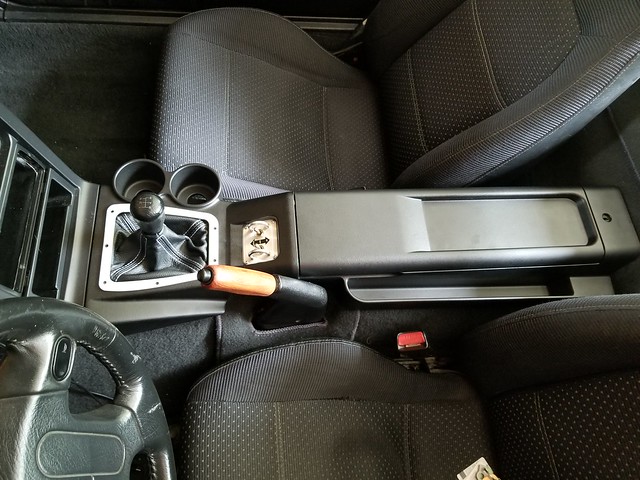
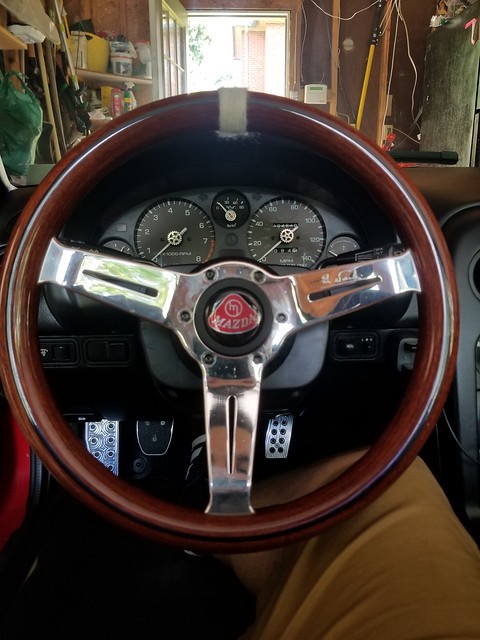
This is my favorite part though:

My new office. Nardi Classico 330mm, Daikei Hub and a Rev Limiter "elanore" horn button.
Last but not least these things:
HOLY CRAP these are amazing. Molly feels like... like a car now. Bumps don't make my teeth rattle anymore, I can feel the slight differences in the road as the whole body moves instead of flexing and I can feel what the suspension is doing versus how much the chassis is flexing.
Next up is gonna be something big...
So every part is in except the LRB Speed Undertray I ordered... I've been sitting on them for a while but i've been too lazy to install anything until recently.
First things first I did the seat rail mod to the passenger side. It drops it 2 inches and I did this just to ensure anyone who rides with me will be safe and well below the roll bar. I didn't do it to the driver's seat as it moves it too far forward and that would put my knees into the dash.
You can see the difference in the forward/ backward position here. It doesn't change how much the passenger seat can move though, as I have a 97' and so there was a travel stop anyway to prevent you from crushing the ECU. The mod retains this only the rails stops at the mounting bolt instead of a travel limiter.
To remove these two rail brackets took a spot weld cutter, an angle grinder, a cold chisel and lots and lots of swearing. If you do this I recomend getting the biggest spot weld cutter you can find. The 3/8 Harbor Freight one I was using just barely cut the weld and to get it to fully break I had to go at it with the chisel. 1/2 inch should be just the right size.
I then got some 2 inch wide steel stock from Lowe's and made some 2x2 plates to put under the floor pan to ensure everything was nice and strong.
Next step after I had the interior back together again was my new I.L. Motorsports center console and various other bits I got.
Now for being $300 the I.L. Console is pretty shitty actually...
That's a horrible surface finish on a part that is just FRP... It looks like they did a simultaneous fiber media injection with the molten nylon, and those bubbles indicate they didn't pre-mix the fiber and plastic and the mold was too cold... Not good attention to detail here. Also notice the fade of surface finish... They applied the texture after but it looks like by hand and a really rushed job as some things look horrible on the sides...
The tolerances are absolutely horrible too. To get the locking mechanism to work smoothly and line up with the hole I had to space it up on 1mm worth of washers and use little rubber o-rings from RC Car shocks to allow me to move the lock cylinder into place but still tighten it down properly. The screws went in VERY tightly, so tight I was afraid I was going to strip or break something just putting them in. Once they were down they moved the lock out of place, requiring the rubber o-rings to allow me to position the lock.
THEN even with the lock working smoothly without the lid, once I put the lid on I had more issues. It wouldn't lock without me pressing the thing down and the culprit were these rubber bumpers. I had to shave 2mm off them but now I have buttery smooth lock action and the plastic lock cover lines up perfectly dead center with the hole.
I got a new leather shift boot from Red Line leather goods but the stock boot holder has some issues with the console again. I had to trim this corner to fit next to the cupholders.
Also gotta trim the wire clips off it.
And because the window switch it RIGHT behind the shifter and at a shallower angle than stock the window switch has less room than before. My RevLimiter window switch required a bit of cable management to fit but luckily Adam uses super thick and surprisingly supple wire so I was able to bend them a bit to fit.
Final Result.
My final verdict on the I.L. Console is that it's "Meh". The cupholders are very nice and fit 2 Starbucks grande sized cups perfectly, but the quality, finish and function is not worth $300. The hinge is built into the lid so it has a weird opening geometry and the travel is not limited like stock. Also there is no hole for the ashtray light. The stock CC had very robust hinges, a travel limiter and just feels more sturdy. That being said this thing is COMPHY. The arm rest is higher and longer so it actually supports your arm, and the window switch is in a much better position than before, you don't have to shift your arm as much. If it was $200 It would be reasonable but $300 is just too much for something like this.
The trim ring is a Garage Star unit, I didn't want to drill into a $300 CC so I filed the screws flush with the bottom and i'm gonna attach the ring with some double sided tape.
This is my favorite part though:
My new office. Nardi Classico 330mm, Daikei Hub and a Rev Limiter "elanore" horn button.
Last but not least these things:
HOLY CRAP these are amazing. Molly feels like... like a car now. Bumps don't make my teeth rattle anymore, I can feel the slight differences in the road as the whole body moves instead of flexing and I can feel what the suspension is doing versus how much the chassis is flexing.
Next up is gonna be something big...
08-01-2017, 12:38 PM
#5
MFz Regular
Thread Starter
Join Date: May 2017
Location: Columbus, OH
Posts: 53
UPDATE TIME!!!!!!
Just some housekeeping things, This is how I did the GS trim ring. Clipped and filed the bolts, just a little double-sided tape and it holds just fine.

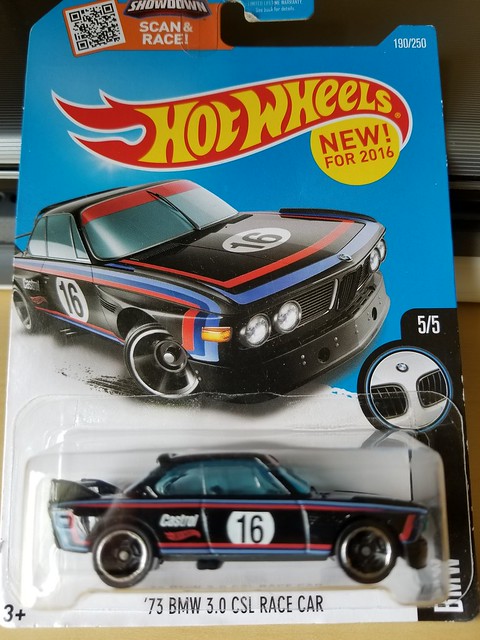
Adam sent me a BMW CSL 3.0 in the M colors and this was nice as I had the Castrol colored one but not the M colors.
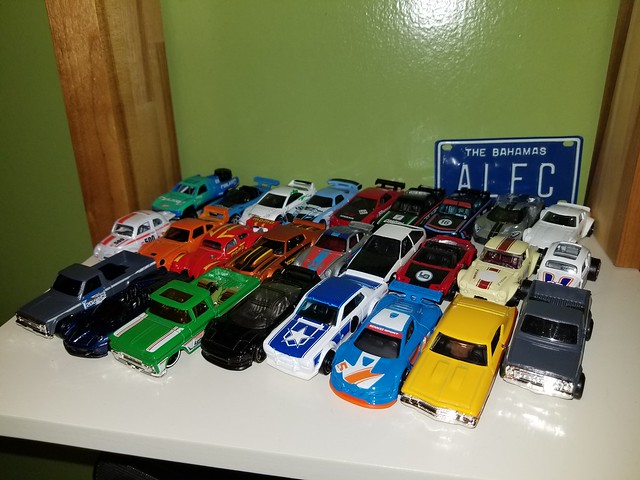
She's back there next to the Castrol BMW. Cool stuff, these new Hotwheels are pretty neat.
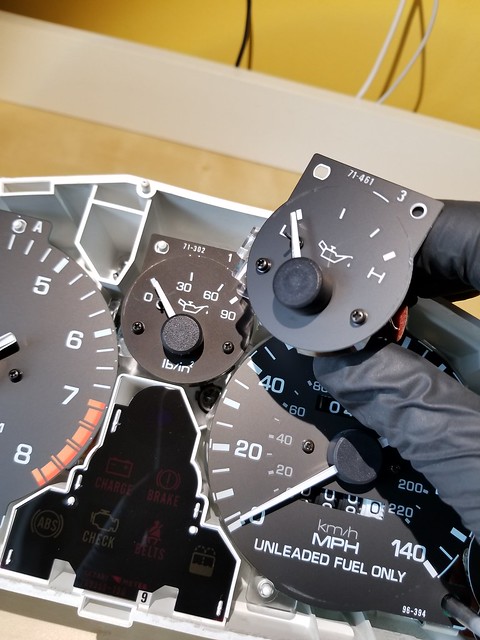
Some other quick things, I got a real OPG pressure sender and gauge set. Looks cool but also a peace of mind thing.
Also found these nice little buttons at JoAnn Fabric and I had a bit of an idea...
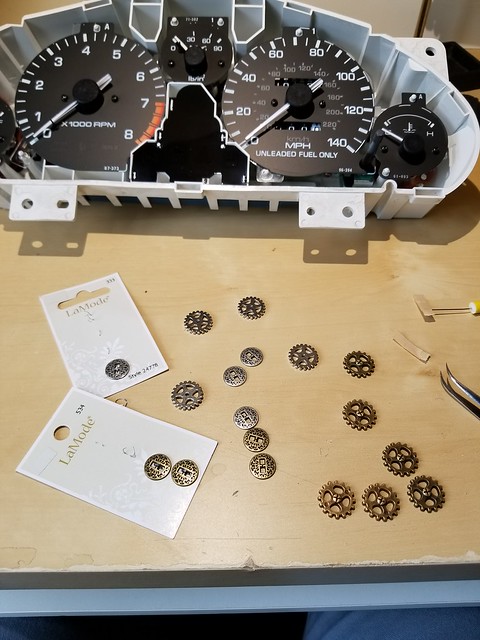
Normal needle caps are $50-$200 for various designs and styles. I got all of these for $5 total. Heck if you just get the ones you want it can be done for less than that.

Also I didn't have that knee panel as the PO raced it so I figured he removed it for the few pounds of weight savings. The clips and holes for the bottom were broken so I figured out a way of my own to keep it secured well.

Cut a slit, flip the U-nut clip thing upside down and screw it in like normal.
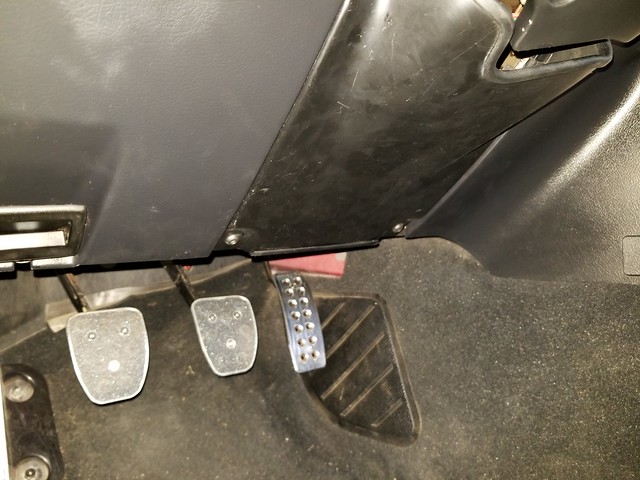
Also installed some Cobalt pedals. They're not bent correctly so I had some trouble fitting them. The one button head screw on the bottom of the brake pedal is *totally* because I want to feel the difference when i'm on the clutch or brake when left-foot braking on the autocross and *not* because I snapped one of the bolts giving it 200 pound gorilla levels of torque...
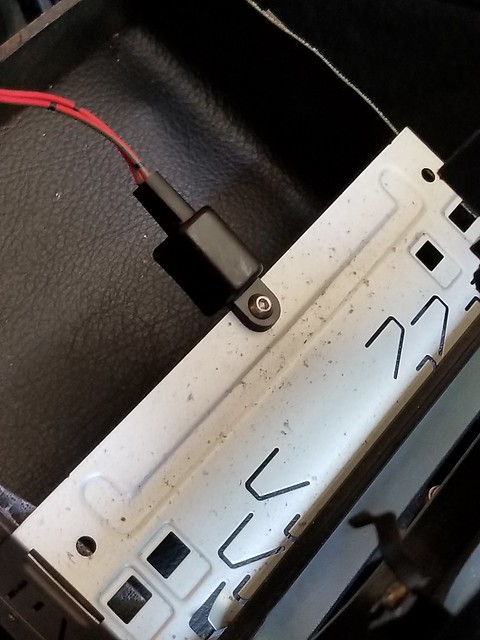
The I.L. Motorsports console doesn't have the ashtray light hole so I moved the light to the little cubby I made so it has a little light inside as its pretty deep and things like keys can get lost in there.
I took this pic before I trimmed the housing a bit and put in some aluminum tape to spread the light out a bit.
Coming next is something big...
Just some housekeeping things, This is how I did the GS trim ring. Clipped and filed the bolts, just a little double-sided tape and it holds just fine.
Adam sent me a BMW CSL 3.0 in the M colors and this was nice as I had the Castrol colored one but not the M colors.
She's back there next to the Castrol BMW. Cool stuff, these new Hotwheels are pretty neat.
Some other quick things, I got a real OPG pressure sender and gauge set. Looks cool but also a peace of mind thing.
Also found these nice little buttons at JoAnn Fabric and I had a bit of an idea...
Normal needle caps are $50-$200 for various designs and styles. I got all of these for $5 total. Heck if you just get the ones you want it can be done for less than that.
Also I didn't have that knee panel as the PO raced it so I figured he removed it for the few pounds of weight savings. The clips and holes for the bottom were broken so I figured out a way of my own to keep it secured well.
Cut a slit, flip the U-nut clip thing upside down and screw it in like normal.
Also installed some Cobalt pedals. They're not bent correctly so I had some trouble fitting them. The one button head screw on the bottom of the brake pedal is *totally* because I want to feel the difference when i'm on the clutch or brake when left-foot braking on the autocross and *not* because I snapped one of the bolts giving it 200 pound gorilla levels of torque...
The I.L. Motorsports console doesn't have the ashtray light hole so I moved the light to the little cubby I made so it has a little light inside as its pretty deep and things like keys can get lost in there.
I took this pic before I trimmed the housing a bit and put in some aluminum tape to spread the light out a bit.
Coming next is something big...
08-03-2017, 10:39 PM
#6
MFz Regular
Thread Starter
Join Date: May 2017
Location: Columbus, OH
Posts: 53
So today was a big day, I finally got the last round of mods in.
LRB Speed tray. I ended up not putting on the side wings as my air duct for the bumper was AAAALLLLL messed up and thus my bumper was super misaligned. I'll maybe put them on at a later date after the bumper adjusts itself. Or maybe when I get a new bumper. Time will tell.
I think the reason it was so messed up was that it ate one too many cones on the auto-X course... I had to scrounge some hardware to get it bolted back like factory with the 2 bolts going from the duct to the frame and the 3 going from the bumper to the duct. I had to cut some of the bolts though...
Dremel decided to take a walk on me and my thumb knuckle was in the path. This was the last bolt to attach it though so some neosporin, a *slightly* clean strip off a rag, some zip-ties and a little bit of duct tape and I was back under the car. It was like 11pm too so I was tired.
After that I had a few more little mods I wanted to do before tackling the big project.
But I have a confession to make... I, Brap-Brap, am a ricer...

Hood pins and NO removal of stock latch. Actually I saw a buddy's 240 hood fly open on him while he was running the Auto-X recently and that made me paranoid. $40 later and some Sparco Hood Pins were in my possession. Got them the day after I ordered them too (Thanks Jegs). Just some extra security for my hood.
I also had all these stickers from Formula Drift and various parts purchases and I wanted to do something... but I didn't want an obvious sticker bomb...
So I had an idea... Stealth rice or stealth reppin' or stealth sticker bomb, whatever you wanna call it.

Trunk off, cut and trimmed sheet of Coroplast.

Little dots of some 3M heavy duty doubled sided tape...
Final product.
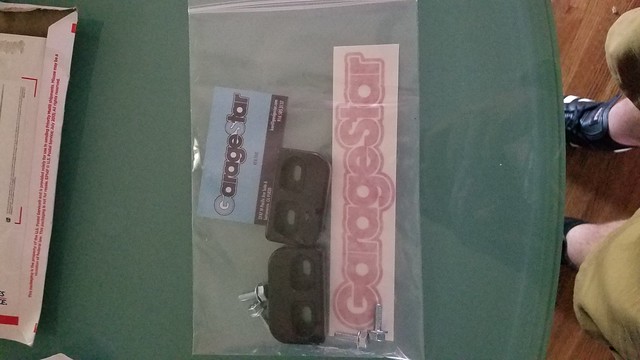
Also got a Garage Star offset plate bracket.

LRB Speed tray. I ended up not putting on the side wings as my air duct for the bumper was AAAALLLLL messed up and thus my bumper was super misaligned. I'll maybe put them on at a later date after the bumper adjusts itself. Or maybe when I get a new bumper. Time will tell.
I think the reason it was so messed up was that it ate one too many cones on the auto-X course... I had to scrounge some hardware to get it bolted back like factory with the 2 bolts going from the duct to the frame and the 3 going from the bumper to the duct. I had to cut some of the bolts though...
Dremel decided to take a walk on me and my thumb knuckle was in the path. This was the last bolt to attach it though so some neosporin, a *slightly* clean strip off a rag, some zip-ties and a little bit of duct tape and I was back under the car. It was like 11pm too so I was tired.
After that I had a few more little mods I wanted to do before tackling the big project.
But I have a confession to make... I, Brap-Brap, am a ricer...
Hood pins and NO removal of stock latch. Actually I saw a buddy's 240 hood fly open on him while he was running the Auto-X recently and that made me paranoid. $40 later and some Sparco Hood Pins were in my possession. Got them the day after I ordered them too (Thanks Jegs). Just some extra security for my hood.
I also had all these stickers from Formula Drift and various parts purchases and I wanted to do something... but I didn't want an obvious sticker bomb...
So I had an idea... Stealth rice or stealth reppin' or stealth sticker bomb, whatever you wanna call it.
Trunk off, cut and trimmed sheet of Coroplast.
Little dots of some 3M heavy duty doubled sided tape...
Final product.
Also got a Garage Star offset plate bracket.
Last edited by Brap-Brap; 08-03-2017 at 10:42 PM.
08-03-2017, 10:40 PM
#7
MFz Regular
Thread Starter
Join Date: May 2017
Location: Columbus, OH
Posts: 53
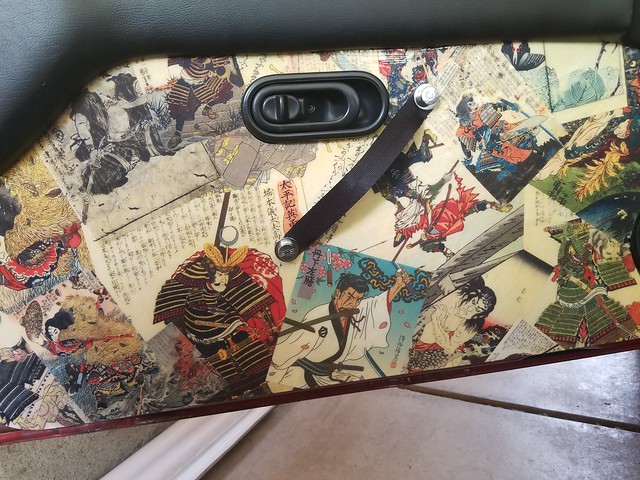
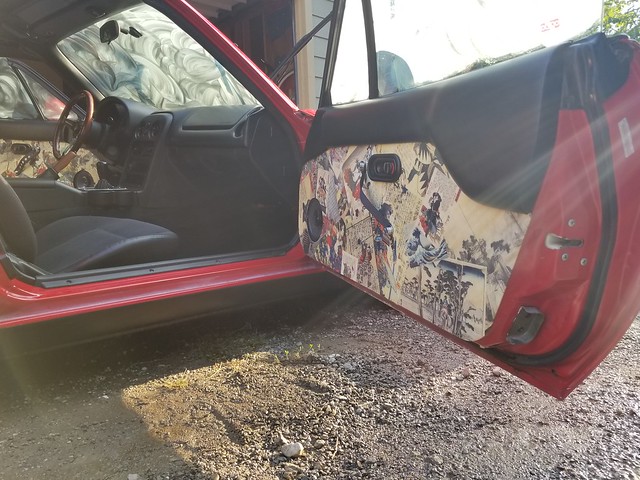
Now for the mod i've been waiting for... Custom door cards.
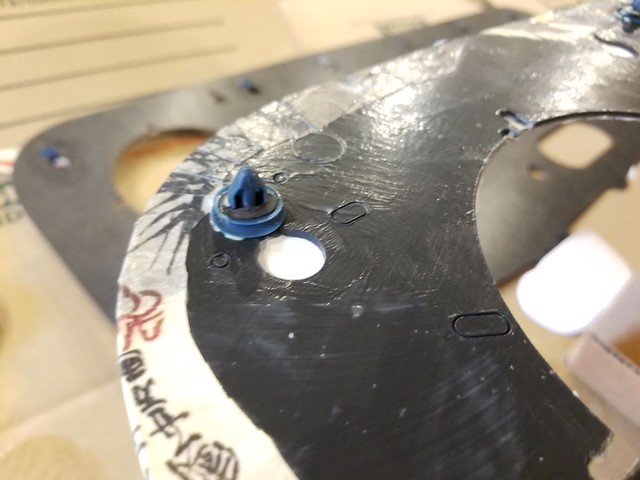
The Primer 3d Forever cards require you to drill these two posts on the door pad. One broke so I replaced it with an M4 nut.
So what I'm going to be doing is called Decoupaging or something like that. Basically you take paper, lay it out, cover it in this stuff called Modge-Podge and have at it.
First step is choosing your images. I went with Feudal Japanese art. You must use a Laser Jet printer if you don't want the ink to bleed, but if you use an Ink Jet you have to spray it in some kind of clear coat. Minwax PolyCrylic or Poly Acrylic is whats recommended for this stuff.
But before you lay anything down grease the heck out of the little clips and a small area around the holes for them. Modge-Podge is water based so the grease will prevent it from gluing the clips to the door and will let you pull out the clips and do whatever with them. This just makes your life way easier down the road. I used silicone grease that I used to use for RC cars but if you do brakes often you can use the silicone paste that you put into the caliper guides.

So then you coat the whole door card in Modge-Podge and then you lay out your photos how you want. Be careful though as they can rip. Modge Podge is water based so it cleans up easy when wet but the paper does act like soggy paper as you manipulate it. Take your time with it. I used antique modge-podge which has a amber tone to it and I didn't care about wrinkles or rumples as it adds to the old look.
Then to pull it around the edges so it holds I cut the paper and left an inch all the way around the ABS door card. I then made cuts every 1/4 inch or so and pulled it around and stuck it down with more modge-podge.
This is after about half a can of Modge-podge. It took a full 8oz can for each door card just to stick the paper to the door card.
I hung it up to dry overnight to let everything set before I put on the next layer.
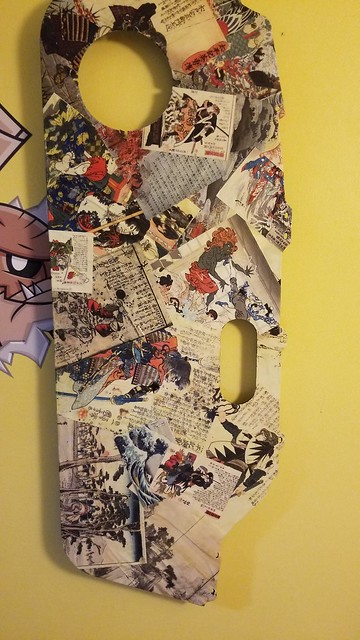
I then used about 3/4 of a 16oz can of Modge-Podge hard coat per door card. The Hard coat gives it a sort of... stiff plastic covered in packing tape feel. Its smooth but still slightly tacky but its hard when you poke it. I did about 8 layers of this stuff to really seal it and protect it.
Then came clear coat/ sealer.
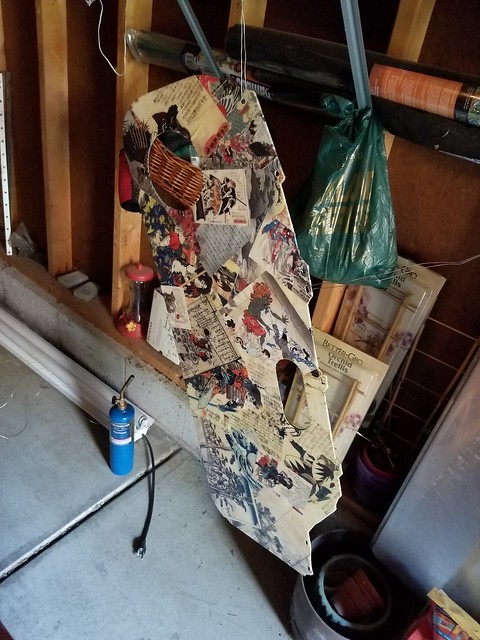
Ghetto spray booth with the door card hung by wires from the rafters of my garage.
Modge-Podge will disolve with prolonged exposure to water so you have to seal it. I used Minwax PolyCrilic or Poly Acrylic or whatever it's called. About half a can per door card got it done. The blowtorch gets rid of some bubbles that pop up and you want to lay this on THICC. After 2 light coats I got right up to the door card, about 3 inches away and I laid into the thing. It sets instantly, dries enough for another coat after about 5 minutes, but don't touch it as it will leave marks.
24 hours of curing in a hot garage later...

I then decided my ghetto straps weren't going to cut it...
I ordered 5 feet of some 1 inch seat belt webbing from Strapworks.com for like $6. Ace Hardware has a wicked selection of Chrome Hardware so I got some chrome fender washers and chrome screw caps to clean up the look.
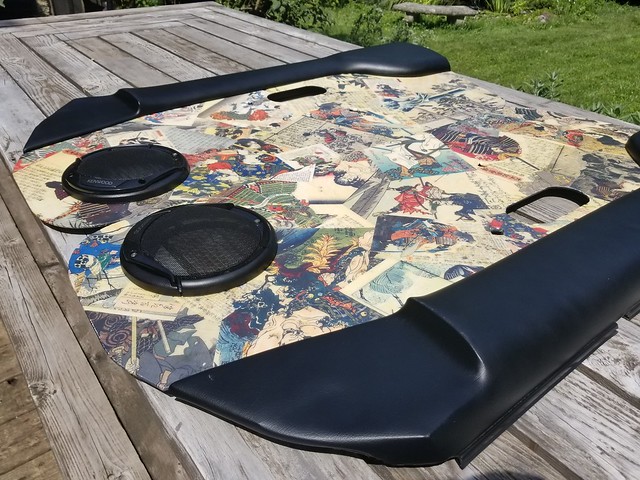
The one thing that irriates me about this is the speaker grills... they're too modern. So I ordered some nice ones off Carbon Miata. No telling when they're gonna get here but I hate these Kenwood ones so much I just left them off in the final installation.

Then it was time to clean up. I did a bunch of stuff in the engine bay like flushing the coolant, changing the oil, cleaning the MAF, lubing up the hood latch, conditioning the belts and inspecting a bunch of stuff. I also replaced the fuel filter and changed out the diff fluid.
After a long set of mods I like to give the car a THOROUGH cleaning to get her back to looking good. There were so many muddy and dirty prints on her from me poking around it was disgusting.
I like rain-x car wash as it's spot free and it cleans things very nicely but is gentle on plastics and rubber. I got one of those Harbor Freight hose nozzles with the soap reservoir and with the mix cranked to max, the water pressure on its lowest setting and the spray set to mist it become a pretty good ghetto foam gun. Couple that with the 2 bucket method and a wash mitt and you can get your car looking very nice. I take the extra step to spray it down with some mothers Instant Detailer and wipe the whole car down for that extra shine.
So my buddy who used to be a long haul trucker taught me this trick. You clean your glass with normal glass cleaner but then you clay bar it, then you wax it and it makes the water run better than any rain-x or other product you can buy. I did this last time I washed her and holy crap does it work amazing. In light rain you don't even need wipers. He also told me to use shaving cream on the inside to prevent fogging. I didn't like the idea of using shaving cream so I bought the little anti-fog gel stuff from Autozone. I'll keep this thread posted with how it works.
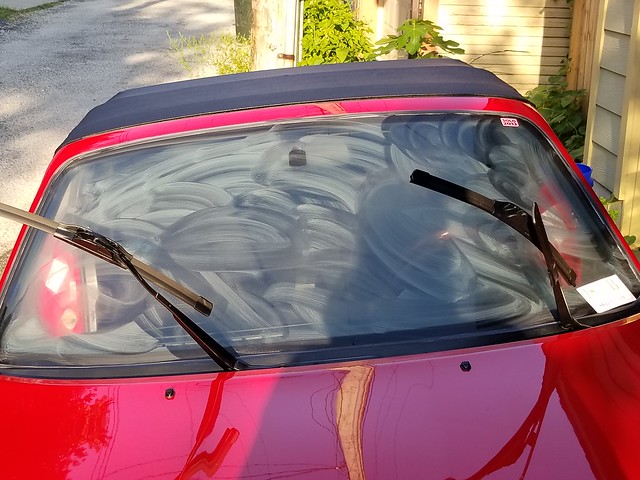
I washed, clayed, treated and waxed all the glass, including the back window. The wax trick is especially helpful for this as the Miata has no rear windshield wiper. The water just runs off giving you amazing visibility. The wax also prevents ice from sticking for you winter guys out there.
I also waxed the front bumper and the lower quarter panels next to the wheels. I don't wax the whole car as i'm too lazy.
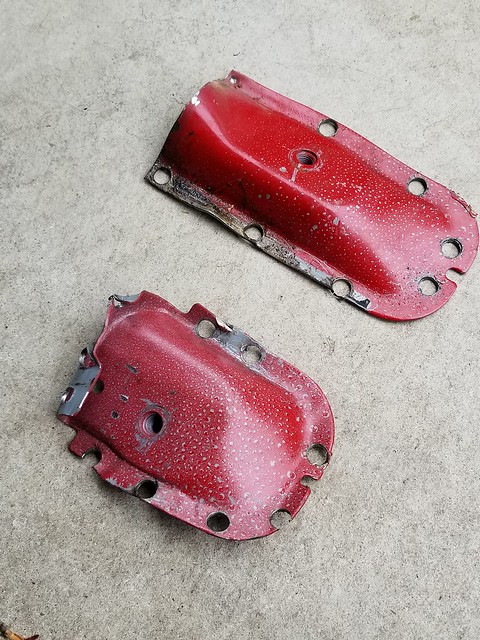
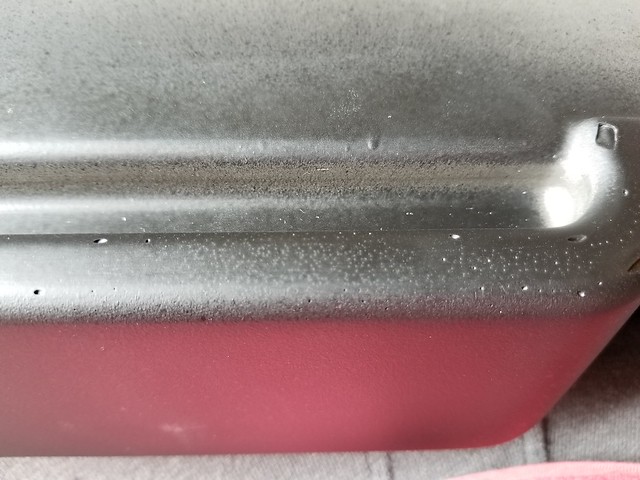
I always do the wheels last and as I went to wipe them down I noticed this...

F***************K! Cheap ASA REP Pieces of Sh*t. I must have done something... Maybe some brake clean got on them or some of my nitro RC cleaner I use to clean up the door- sealing tar...
Oh well. I needed 15's anyway. Looks like next weeks project is to clean these up and re-spray them. I have the stock wheels I need to plasti-dip anyway as I'm going to run those as winter wheels. Looks like I have 8 wheels to sand, prime and paint now instead of 4. Ughhhhhhhhhh
Now she's all tucked away in the garage until next time. I have 2 little things coming in but they're from overseas so it's gonna be a while. I also have a shifter re-build coming in from Moss and i'll do the trans fluid with that.
The Primer 3d Forever cards require you to drill these two posts on the door pad. One broke so I replaced it with an M4 nut.
So what I'm going to be doing is called Decoupaging or something like that. Basically you take paper, lay it out, cover it in this stuff called Modge-Podge and have at it.
First step is choosing your images. I went with Feudal Japanese art. You must use a Laser Jet printer if you don't want the ink to bleed, but if you use an Ink Jet you have to spray it in some kind of clear coat. Minwax PolyCrylic or Poly Acrylic is whats recommended for this stuff.
But before you lay anything down grease the heck out of the little clips and a small area around the holes for them. Modge-Podge is water based so the grease will prevent it from gluing the clips to the door and will let you pull out the clips and do whatever with them. This just makes your life way easier down the road. I used silicone grease that I used to use for RC cars but if you do brakes often you can use the silicone paste that you put into the caliper guides.
So then you coat the whole door card in Modge-Podge and then you lay out your photos how you want. Be careful though as they can rip. Modge Podge is water based so it cleans up easy when wet but the paper does act like soggy paper as you manipulate it. Take your time with it. I used antique modge-podge which has a amber tone to it and I didn't care about wrinkles or rumples as it adds to the old look.
Then to pull it around the edges so it holds I cut the paper and left an inch all the way around the ABS door card. I then made cuts every 1/4 inch or so and pulled it around and stuck it down with more modge-podge.
This is after about half a can of Modge-podge. It took a full 8oz can for each door card just to stick the paper to the door card.
I hung it up to dry overnight to let everything set before I put on the next layer.
I then used about 3/4 of a 16oz can of Modge-Podge hard coat per door card. The Hard coat gives it a sort of... stiff plastic covered in packing tape feel. Its smooth but still slightly tacky but its hard when you poke it. I did about 8 layers of this stuff to really seal it and protect it.
Then came clear coat/ sealer.
Ghetto spray booth with the door card hung by wires from the rafters of my garage.
Modge-Podge will disolve with prolonged exposure to water so you have to seal it. I used Minwax PolyCrilic or Poly Acrylic or whatever it's called. About half a can per door card got it done. The blowtorch gets rid of some bubbles that pop up and you want to lay this on THICC. After 2 light coats I got right up to the door card, about 3 inches away and I laid into the thing. It sets instantly, dries enough for another coat after about 5 minutes, but don't touch it as it will leave marks.
24 hours of curing in a hot garage later...
I then decided my ghetto straps weren't going to cut it...
I ordered 5 feet of some 1 inch seat belt webbing from Strapworks.com for like $6. Ace Hardware has a wicked selection of Chrome Hardware so I got some chrome fender washers and chrome screw caps to clean up the look.
The one thing that irriates me about this is the speaker grills... they're too modern. So I ordered some nice ones off Carbon Miata. No telling when they're gonna get here but I hate these Kenwood ones so much I just left them off in the final installation.
Then it was time to clean up. I did a bunch of stuff in the engine bay like flushing the coolant, changing the oil, cleaning the MAF, lubing up the hood latch, conditioning the belts and inspecting a bunch of stuff. I also replaced the fuel filter and changed out the diff fluid.
After a long set of mods I like to give the car a THOROUGH cleaning to get her back to looking good. There were so many muddy and dirty prints on her from me poking around it was disgusting.
I like rain-x car wash as it's spot free and it cleans things very nicely but is gentle on plastics and rubber. I got one of those Harbor Freight hose nozzles with the soap reservoir and with the mix cranked to max, the water pressure on its lowest setting and the spray set to mist it become a pretty good ghetto foam gun. Couple that with the 2 bucket method and a wash mitt and you can get your car looking very nice. I take the extra step to spray it down with some mothers Instant Detailer and wipe the whole car down for that extra shine.
So my buddy who used to be a long haul trucker taught me this trick. You clean your glass with normal glass cleaner but then you clay bar it, then you wax it and it makes the water run better than any rain-x or other product you can buy. I did this last time I washed her and holy crap does it work amazing. In light rain you don't even need wipers. He also told me to use shaving cream on the inside to prevent fogging. I didn't like the idea of using shaving cream so I bought the little anti-fog gel stuff from Autozone. I'll keep this thread posted with how it works.
I washed, clayed, treated and waxed all the glass, including the back window. The wax trick is especially helpful for this as the Miata has no rear windshield wiper. The water just runs off giving you amazing visibility. The wax also prevents ice from sticking for you winter guys out there.
I also waxed the front bumper and the lower quarter panels next to the wheels. I don't wax the whole car as i'm too lazy.
I always do the wheels last and as I went to wipe them down I noticed this...
F***************K! Cheap ASA REP Pieces of Sh*t. I must have done something... Maybe some brake clean got on them or some of my nitro RC cleaner I use to clean up the door- sealing tar...
Oh well. I needed 15's anyway. Looks like next weeks project is to clean these up and re-spray them. I have the stock wheels I need to plasti-dip anyway as I'm going to run those as winter wheels. Looks like I have 8 wheels to sand, prime and paint now instead of 4. Ughhhhhhhhhh
Now she's all tucked away in the garage until next time. I have 2 little things coming in but they're from overseas so it's gonna be a while. I also have a shifter re-build coming in from Moss and i'll do the trans fluid with that.
08-11-2017, 09:24 AM
#8
MFz Regular
Thread Starter
Join Date: May 2017
Location: Columbus, OH
Posts: 53
Here's another BIG update:
But first some minor things as always.

A friend sent me this JDM Tsurikawa for my birthday which was the 5th. Every single modified car in Japan had one of these, the only problem was when I went to Yellow Hat or AutoBacs or any of the parts stores the only one they had was heart shaped and I didn't want that. There's actually a company IN Japan that custom makes them nowadays so people don't go around cutting up the JR Trains lol. JDMTsurikawa.com and it was only ~$25.
I mounted it to one of the factory tie-down bolts on the drivers side. The JDM zip tie is to keep it kinda closed up so it doesn't fall off. No mounting pics yet because I needed to get some nylon spacers to make sure it doesn't crush the strap when I tighten it down.
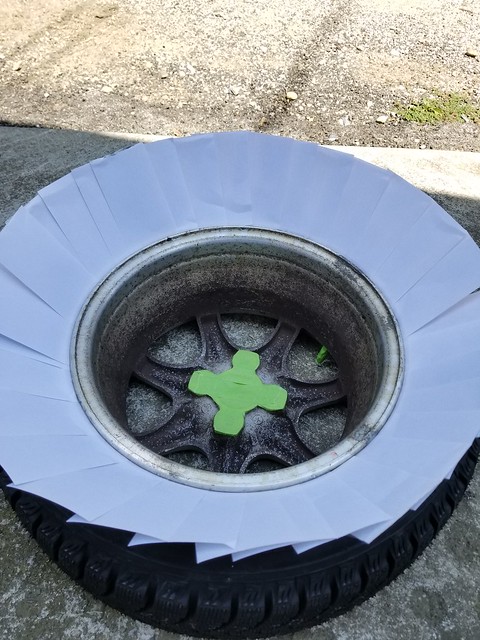
Also for my birthday my friend gave me some Agora Rabbit fur yarn. She breeds rabbits for show and they are judged by their coat and health. No products or conditioners are used and she has won shows all over the midwest for many years. After the show she shaves the rabbits and makes yarn. Its incredibly soft. I was missing having a center mark on the wheel like other more race oriented wheels. Heck my mom's Audi RS6 wagon has a little stitch at the top to perform the same purpose. So I used the yarn and wrapped my own.
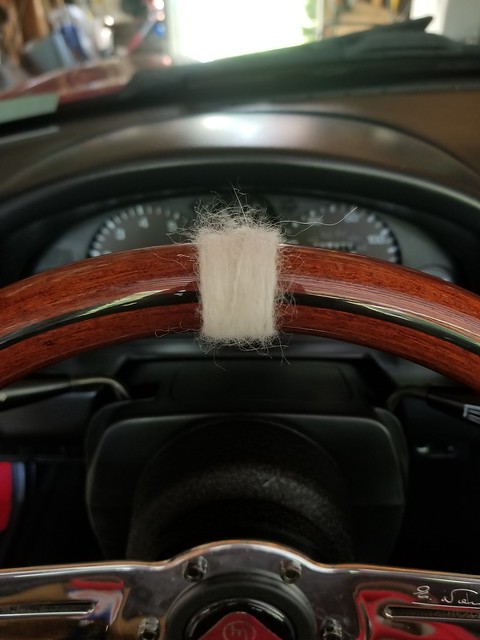
Just something a little extra. The white also matches the white stitching on my shift and e-brake boot.
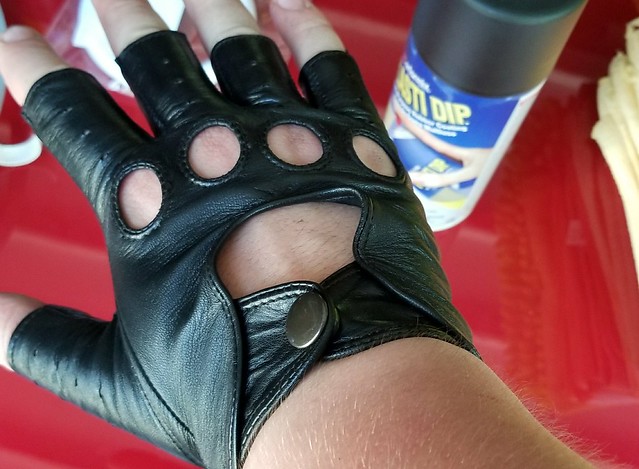
My girlfriend got these for me for my birthday. Funny story, I was going to order a set closer to November when it gets cold here but we saw Baby Driver together and when he got a set of red and white driving gloves I made a little comment like "Oh it's real when he puts the gloves on" and so she had to get a set for me. Now my glovebox can be used for its intended purpose lol.
Also my wheels and tires came in... Because my stock wheels already had some dry-rotted all seasons on them I couldn't fit them in the Miata, even with the passenger seat out. So I took the other car in the family. Tires are some 185/65/R14 Bridgestone Blizzak WS60's and my friend works for Bridgestone so I got a killer deal on these.
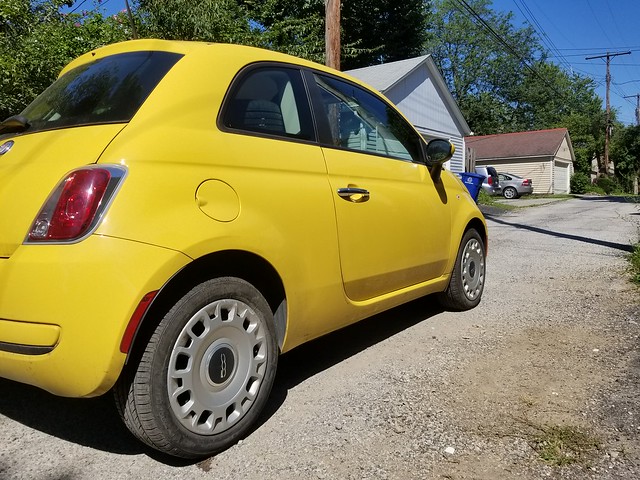
Miata Forumz, meet Pikachu. She's a 2012 Fiat 500 Base model with a Manual, and she took me through my last two years of High School up until I got Molly. I went to prom in this car, I've had many parking lot hooning sessions in her and she has hauled band gear across the state more times than I can count.
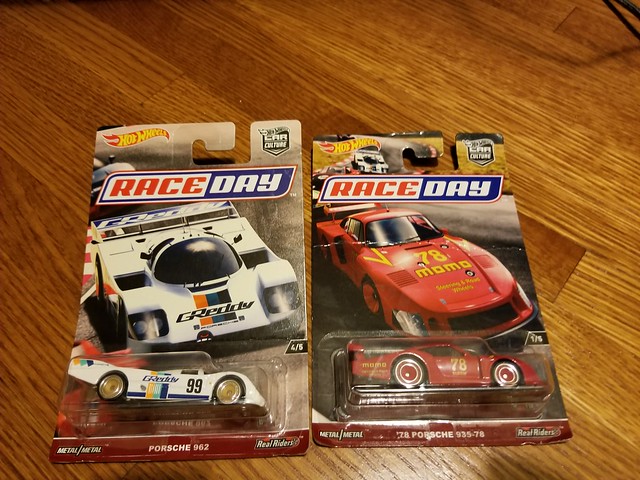
So while I waited for my tires to be mounted up at Discount Tire I chilled at Barnes and Nobel. They just got the new Roadkill mag, Pas Mag Japan edition and the new Super Street with a widebody NSX build i've been following on Instagram. They also had a book on the anniversary of Corvette (Like 50 or 60 years, I forgot...) and a neat book on the history of the Porsche 911. But Barnes and Nobel also has some nice Hotwheels. Picked up these two icons of overboosted German Engineering.
So after the tires were mounted up I decided to plastidip my stock wheels because winter beater set. Many just plastidip the face but I like to do the inside as well because it makes it look cleaner and is easy to clean off. Because its basically rubber all it takes to clean is some Simple Green versus wheel and tire cleaner and Simple Green is way less expensive than some nice wheel and tire cleaner.
The brake dust was so caked on even clay couldn't get it off, and I don't really care how these wheels look so I just sprayed over it.

I masked off the center caps because I like the little eternal flame design and the silver makes the wheels pop a little more than some basic flat black.
As for some new wheels... I had a buddy with some Momo Quasars but they were really crappy and needed refinishing and his New Old Stock set was just way to expensive for me. Also finiding VW to MX-5 hubcentric rings was going to be insane as its only a 3mm difference. I could machine my own but I'm about to start college so I don't have the time.
So I got these:

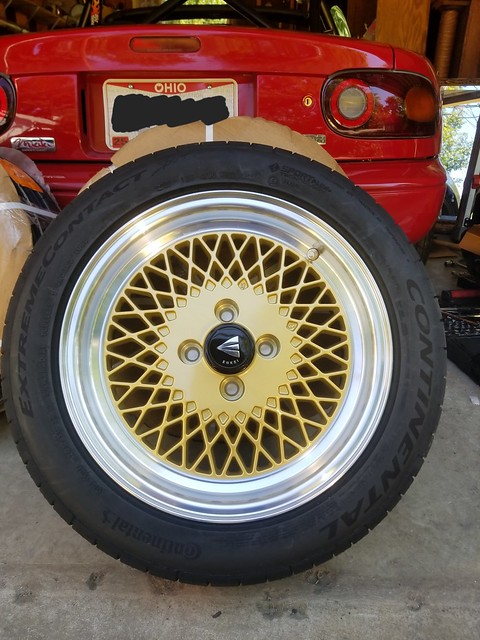
I was already on Tire Rack for some tires and so I decided to look at what wheels they had. Turns out they have a nice selection of Enkei's. And I could save some money as they mount and balance for free.
Specs are 15x7 ET38 Enkei 92's shod in 205/50/R15 Continental Extreme Contact Sports. My car friends swear by these tires as nothing else compares to their wet weather traction and durability. Those 2 things were my priority in deciding on tires.
But of course with the good comes the bad... UPS friggin lost one of my wheels/ tires. How the heck do you lose a massive round thing bundled with a bunch of other massive round things? Who would order 3 wheels and tires? The one that was lost also happens to be the one with the lugnuts, lugnut tool and centering rings.
Tire Rack is sending me the 4th one and it'll be here by Monday. Ugh.
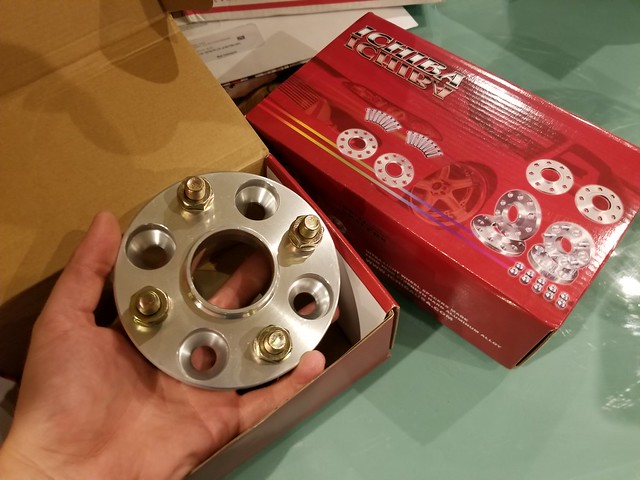
Rev9 also sells these and in their photos the car has some 25mm Spacers and it has that perfect tuck look. So I spent the money and bought some high quality spacers from Good-Win. I was going to get some $50 amazon spacers but one of my friends did that for his Foxbody and the studs sheered clean the moment he launched it at the strip. I didn't wanna take that risk. Ichiba spacers are machined versus cast and they use ARP studs with grade 8 hardware and are fully hubcentric. $250 is a lot to swallow for some spacers though...
But first some minor things as always.
A friend sent me this JDM Tsurikawa for my birthday which was the 5th. Every single modified car in Japan had one of these, the only problem was when I went to Yellow Hat or AutoBacs or any of the parts stores the only one they had was heart shaped and I didn't want that. There's actually a company IN Japan that custom makes them nowadays so people don't go around cutting up the JR Trains lol. JDMTsurikawa.com and it was only ~$25.
I mounted it to one of the factory tie-down bolts on the drivers side. The JDM zip tie is to keep it kinda closed up so it doesn't fall off. No mounting pics yet because I needed to get some nylon spacers to make sure it doesn't crush the strap when I tighten it down.
Also for my birthday my friend gave me some Agora Rabbit fur yarn. She breeds rabbits for show and they are judged by their coat and health. No products or conditioners are used and she has won shows all over the midwest for many years. After the show she shaves the rabbits and makes yarn. Its incredibly soft. I was missing having a center mark on the wheel like other more race oriented wheels. Heck my mom's Audi RS6 wagon has a little stitch at the top to perform the same purpose. So I used the yarn and wrapped my own.
Just something a little extra. The white also matches the white stitching on my shift and e-brake boot.
My girlfriend got these for me for my birthday. Funny story, I was going to order a set closer to November when it gets cold here but we saw Baby Driver together and when he got a set of red and white driving gloves I made a little comment like "Oh it's real when he puts the gloves on" and so she had to get a set for me. Now my glovebox can be used for its intended purpose lol.
Also my wheels and tires came in... Because my stock wheels already had some dry-rotted all seasons on them I couldn't fit them in the Miata, even with the passenger seat out. So I took the other car in the family. Tires are some 185/65/R14 Bridgestone Blizzak WS60's and my friend works for Bridgestone so I got a killer deal on these.
Miata Forumz, meet Pikachu. She's a 2012 Fiat 500 Base model with a Manual, and she took me through my last two years of High School up until I got Molly. I went to prom in this car, I've had many parking lot hooning sessions in her and she has hauled band gear across the state more times than I can count.
So while I waited for my tires to be mounted up at Discount Tire I chilled at Barnes and Nobel. They just got the new Roadkill mag, Pas Mag Japan edition and the new Super Street with a widebody NSX build i've been following on Instagram. They also had a book on the anniversary of Corvette (Like 50 or 60 years, I forgot...) and a neat book on the history of the Porsche 911. But Barnes and Nobel also has some nice Hotwheels. Picked up these two icons of overboosted German Engineering.
So after the tires were mounted up I decided to plastidip my stock wheels because winter beater set. Many just plastidip the face but I like to do the inside as well because it makes it look cleaner and is easy to clean off. Because its basically rubber all it takes to clean is some Simple Green versus wheel and tire cleaner and Simple Green is way less expensive than some nice wheel and tire cleaner.
The brake dust was so caked on even clay couldn't get it off, and I don't really care how these wheels look so I just sprayed over it.
I masked off the center caps because I like the little eternal flame design and the silver makes the wheels pop a little more than some basic flat black.
As for some new wheels... I had a buddy with some Momo Quasars but they were really crappy and needed refinishing and his New Old Stock set was just way to expensive for me. Also finiding VW to MX-5 hubcentric rings was going to be insane as its only a 3mm difference. I could machine my own but I'm about to start college so I don't have the time.
So I got these:
I was already on Tire Rack for some tires and so I decided to look at what wheels they had. Turns out they have a nice selection of Enkei's. And I could save some money as they mount and balance for free.
Specs are 15x7 ET38 Enkei 92's shod in 205/50/R15 Continental Extreme Contact Sports. My car friends swear by these tires as nothing else compares to their wet weather traction and durability. Those 2 things were my priority in deciding on tires.
But of course with the good comes the bad... UPS friggin lost one of my wheels/ tires. How the heck do you lose a massive round thing bundled with a bunch of other massive round things? Who would order 3 wheels and tires? The one that was lost also happens to be the one with the lugnuts, lugnut tool and centering rings.
Tire Rack is sending me the 4th one and it'll be here by Monday. Ugh.
Rev9 also sells these and in their photos the car has some 25mm Spacers and it has that perfect tuck look. So I spent the money and bought some high quality spacers from Good-Win. I was going to get some $50 amazon spacers but one of my friends did that for his Foxbody and the studs sheered clean the moment he launched it at the strip. I didn't wanna take that risk. Ichiba spacers are machined versus cast and they use ARP studs with grade 8 hardware and are fully hubcentric. $250 is a lot to swallow for some spacers though...
08-11-2017, 11:21 PM
#9
MFz Regular
Thread Starter
Join Date: May 2017
Location: Columbus, OH
Posts: 53
So funny thing guys. I was driving home and I notice my car is pulling to the left. So the moment I'm in my garage I'm under the car checking suspension and joints and the PPF, etc. Then it dawned on me. I weight 250 pounds which is about 10% of the cars weight. And I'm on the left side of the car. Just a little food for thought.
08-15-2017, 06:12 PM
#10
MFz Regular
Thread Starter
Join Date: May 2017
Location: Columbus, OH
Posts: 53
Another update!
A little teaser:
But first as always little things...
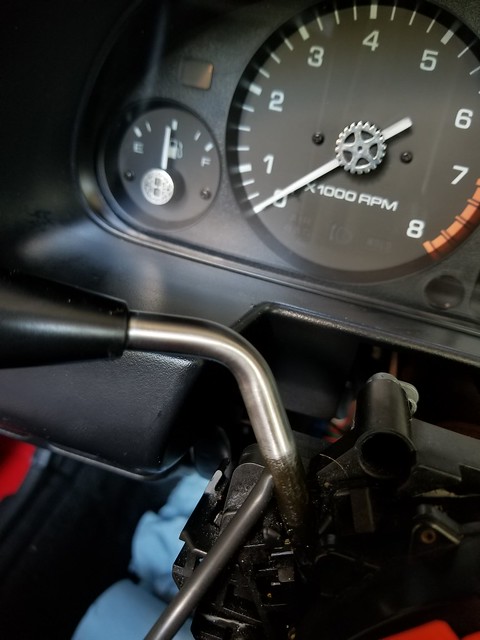
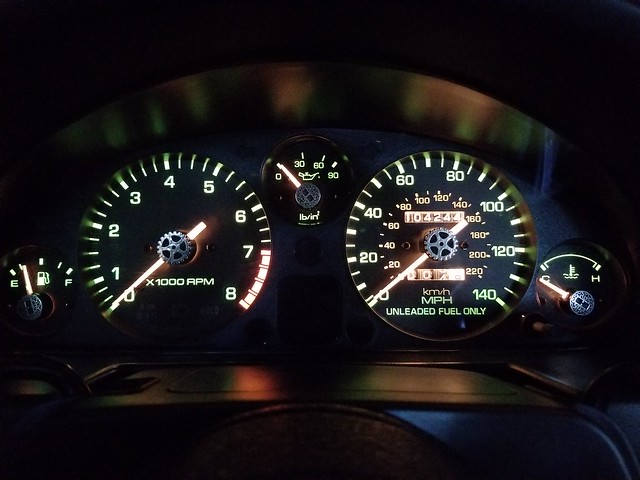
I polished up my indicator stalks today. The nasty green/ gray coating on them is super super thin and soft, I just hit with a couple licks of some 320 and it was all gone. Then I went through strips of Norton Pads from 400 to 4000. All of this was in a single direction to give it a brushed look. The secret to this is don't wet sand. Like at all. Little 3mm wide strips of sand paper and just go back and forth all the way around.

Looks pretty nice, also ties together the whole cluster/ dash panel together.
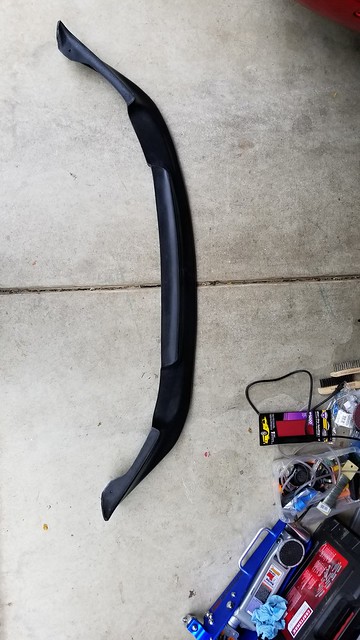
Also my Amazon Garage Vary Rep lip came in and of course it's moulded incorrectly and is garbage. But props to the Amazon rep kit sellers they gave me a full refund and so i'm happy. No I refuse to pay more than $75 for a front lip as it's going to get scraped and messed up and will need to be replaced eventually.
Now for what everyone is waiting for... the new wheels!
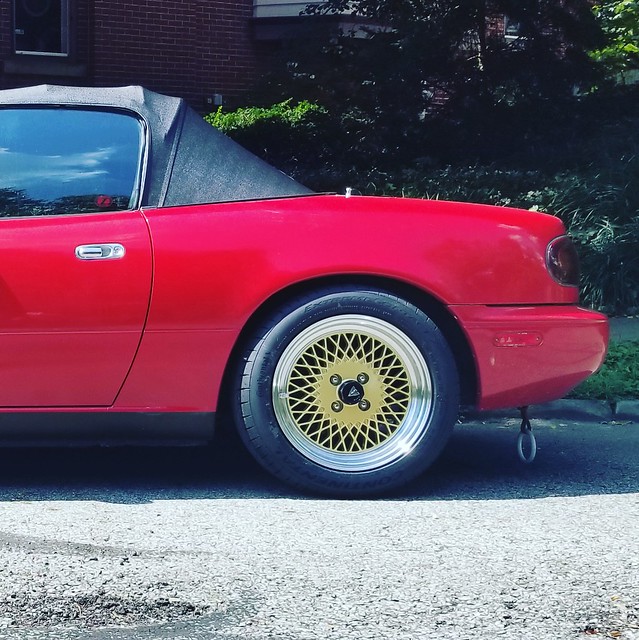

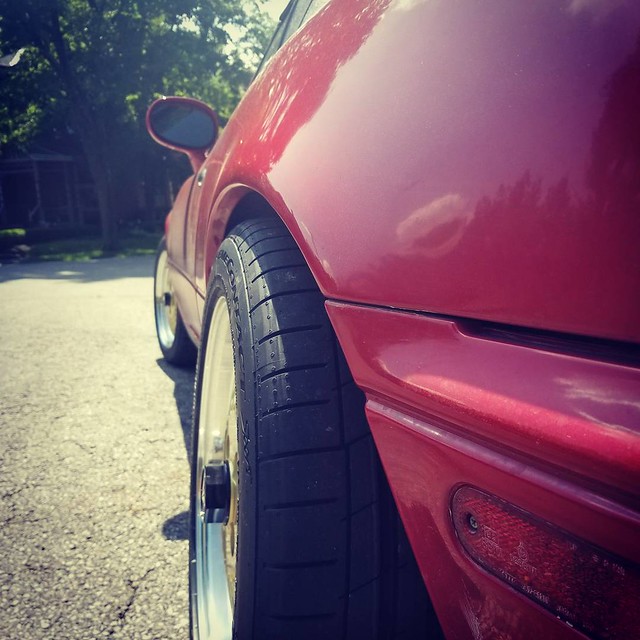
That fitment is absolutely perfect...
Also I posted these photos to my instagram, go check it out, alec_hall
A little teaser:
But first as always little things...
I polished up my indicator stalks today. The nasty green/ gray coating on them is super super thin and soft, I just hit with a couple licks of some 320 and it was all gone. Then I went through strips of Norton Pads from 400 to 4000. All of this was in a single direction to give it a brushed look. The secret to this is don't wet sand. Like at all. Little 3mm wide strips of sand paper and just go back and forth all the way around.
Looks pretty nice, also ties together the whole cluster/ dash panel together.
Also my Amazon Garage Vary Rep lip came in and of course it's moulded incorrectly and is garbage. But props to the Amazon rep kit sellers they gave me a full refund and so i'm happy. No I refuse to pay more than $75 for a front lip as it's going to get scraped and messed up and will need to be replaced eventually.
Now for what everyone is waiting for... the new wheels!
That fitment is absolutely perfect...
Also I posted these photos to my instagram, go check it out, alec_hall