What did you do to your NB today?


MFz Regular
Joined: Aug 2011
Posts: 142
From: SoCal
Did crap I shouldn't have had to do. Ever since the mechanic replaced my clutch, transmission fluid's been leaking after a drive (plastic oil trays to confirm leaks are worth it). Got under the car, found 3 bolts (including the square fluid filler bolt) less than finger tight. 
Shifting's been notchy since the clutch change, filled it back up with Redline fluids. Hopefully that fixes the problem. Clutch slave cylinder still seems fine at 115k on my 99.
Shifting's been notchy since the clutch change, filled it back up with Redline fluids. Hopefully that fixes the problem. Clutch slave cylinder still seems fine at 115k on my 99.
Installed my new Schroth Profi ASM harnesses. Can't fully remove the OEM seat belts unless I take the roll bar out. I wasn't drunk enough to talk myself into that one. Also bolted on my ghetto hard top, fixed my coolant leak and took her for a spin.
The Profi's make getting in and driving off a bit of a chore, but I feel much better driving in them.
The Profi's make getting in and driving off a bit of a chore, but I feel much better driving in them.

MFz Lurker
Joined: Mar 2012
Posts: 14
From: Cicero, NY
Over the weekend: I can has Supertones? (Click pictars for bigger!)
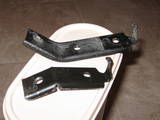
There's not a lot of opportunity to mount these horns (which are plenty bigger than the stock one!) I figured I'd modify the stock bracket. There's a space for another one on the opposite side of the car. I snagged a second bracket, and I modified them like so:
1) Top: Stock shape. The center hole is where the new horn will mount. Bottom: Trimmed and bent!
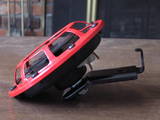
2) Fresh coat of paint and mounted
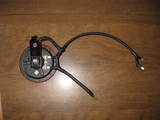
3) Bulletproof harness
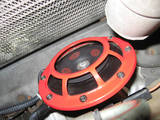
Lay on your back and stick your head in the Miata's mouth, and you'll see this!

Even facing backwards and on the stock relay, they're plenty loud! :wha:
There's not a lot of opportunity to mount these horns (which are plenty bigger than the stock one!) I figured I'd modify the stock bracket. There's a space for another one on the opposite side of the car. I snagged a second bracket, and I modified them like so:
1) Top: Stock shape. The center hole is where the new horn will mount. Bottom: Trimmed and bent!
2) Fresh coat of paint and mounted
3) Bulletproof harness


Lay on your back and stick your head in the Miata's mouth, and you'll see this!


Even facing backwards and on the stock relay, they're plenty loud! :wha:

Featured Miata!
Joined: Aug 2011
Posts: 187
From: Royal Oak, MI
My BEGi downpipe was leaking beyond the point of me dealing with it. The flexpipe was blown out so I picked up a replacement piece from Vibrant. The job was a bit tedious with the position of everything and I was not 100% confident that I could pull it off in one go. Luckily I have a friend who is likely one of the best welders I'll ever meet.
He was happy to help out.

And as expected- it looks like jewelry. His welds are both the ones immediately next to the flex material and the one that meets my downpipe.


I pulled the diff and knew the bushings were bad so out they came. Heated it up and pounded it out with my bawse-***-air-hammer.

The new mounts obviously didn't want to slide in so I drilled a hole in a piece of aluminum and ran a bolt through it with my fancy ratchet.

Now it was time to get to the fancy stuff. I pulled the diff apart and started to disassemble it. Everything looked pretty clean.


New gears and old gears. The new ring got the old better safe than sorry treatment with some loctite.

The new pinion installed. The old one was a bit of a tough one to get out. Required some rather serious pounding.

Ring gear torqued on. (51-61 ft-lb)

The bearing caps didn't look very clean so I got them back in shape with some light scuffing.


Dropped the caps on and installed the bearing adjusting rings. These are used when setting up the diff. They basically allow adjustment of preload and the position of the ring gear against the pinion for setting the proper backlash clearances.
To move the diff right- loosen the right ring and tighten the left ring... Simple.
To adjust preload- Tighten them both or loosen them both.

Next it was time to setup the dial indicator. I used a random transmission line hanger from a small block chevy to mount my Dial Indicator. I made some adjustments after this picture in order to make the measurement at the 90 degree marks but you can get the idea.


The ring gear backlash needed to fall between (0.0036-0.0043) so I set it to 0.0038 and checked the measurement at 4 points on the gear.
Then you must check the bearing preload. There are four points on the bearing caps and the preload is measured between these points. You measure the tabs diagonal from each other. The preload must be (7.3004-7.3031). I aimed for 7.3025.
You can see that my digital micrometer didn't have big enough arms on it so I used some aluminum angle to extend the range. I was super careful and extremely precise with this.

Again these adjustments are done by rotating the bearing rings so you should try to move them both equally to not mess up your already set backlash. Once you are happy with the preload numbers, recheck the backlash and install your adjuster locks.
I cleaned up the gasket surface and applied RTV silicone. Then I dropped the assembly back into the casing. Installing the diff back in the car was a snap. Everything went together nicely.
Then I moved on to the braided brake lines. These went as expected. The NB has a splitter block built into the passenger rear side from the factory and my Goodridge lines had a nice fancy replacement part. These lines look awesome.

The night had turned into morning and I was out of brake fluid anyways. I'll finish her up tonight after work.